This article was co-authored by Mia Rubie. Mia Rubie is a Nail Artist and the Owner of Sparkle San Francisco, a nail studio based in San Francisco, California. She has over eight years of nail artist and management experience and is known for her push-the-envelope designs and artistic eye for colors. Her clients include Sephora, Target, and Vogue. Her work has been featured in the San Francisco Chronicle and StyleCaster. She holds a BBA focusing on Entrepreneurial and Small Business Operations from San Francisco State University. You can find her work on her Instagram account @superflynails.
There are 7 references cited in this article, which can be found at the bottom of the page.
This article has been viewed 124,755 times.
If you crave a good manicure but don't want to spend money at a salon, try giving yourself one at home. Be sure to trim and condition your nails before painting them for the most professional-looking finish. With the right tools and some patience, you can do a beautiful, salon-caliber manicure at home.
Steps
Nail Care
-
1Gather your supplies. You might have to spend a little money up front to get everything you need for a gorgeous at-home manicure. Investing in tools and products that will last months or years will definitely save you money in the long run. Have everything in one place before you get to work on your nails. Here's what you need:
- Nail polish remover
- Cotton balls
- Cuticle pusher or orange stick
- Nail trimmers
- Nail buffer
- Nail file
- Cuticle oil or hand cream
- Base coat
- Nail color
- Top coat
-
2Start with clean nails. If you're wearing old polish, remove it with some nail polish remover and a cotton ball. If you're wearing acrylics or gels you don't want to keep, you'll need to remove those, too. After removing your polish, wash your nails and dry them completely before you begin the manicure process.
- Look for a nail polish remover that doesn't contain acetone, an ingredient that can dry out your nails and make it more difficult to get them in tip-top manicure condition.[1]
- If you're keeping your nails long, be sure to clean them well with soap and warm water.
Advertisement -
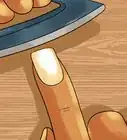
3Trim and file your nails. Use nail clippers to trim your nails to the length you want. Longer nails are pretty but difficult to maintain. If you want shorter nails, don't trim them too quick. The whites of your nails should extend past the tips of your fingers. File your nails by gently dragging the file across the nail to make each nail look evenly shaped.[2]
- When you file your nails, be sure not to drag the file back and forth over your nails. Gently drag it in one direction only. This keeps the fibers in your nails from getting weak.
- Popular nail shapes include square or oval tips. For square tips, level off the tips of your nails so that they're straight across with rounded edges. For oval tips, file your nails into gently tapered oval shapes that are rounded at the tips.[3]
-
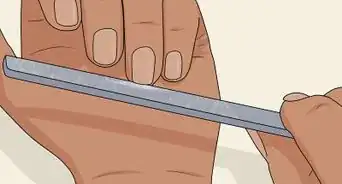
4Buff your nails. Buffing smooths your nails and provides an even surface for your nail polish. Use the side of your buffer with the coarsest sandpaper first. Gently run it across the surface of your nails to smooth out the ridges.[4] Do the same with the medium grade surface. Finish with the finest grade surface.[5]
- Don't press too hard or buff too much. You don't want to thin out the surface of your nails.
- You can also wait to buff your nails after pushing back your cuticles. This is a good choice if your cuticles extend over a large portion of your nail.
-
5Soak and push back your cuticles. Soak your nails in a bowl of warm water for five minutes. Add a few drops of soap or scented oil if you'd like. This will soften your cuticles and make them easier to push back. Use the cuticle pusher to gently push your cuticles back toward your skin.[6]
- Don't push too hard. Try to keep from tearing your cuticles. You want to keep them intact because they protect your nail beds from getting infected.
- Never use a cuticle trimmer. Manicurists often use these in salons, but they leave your fingers prone to infection. They also often cause bleeding. You can still get a beautiful manicure without trimming your cuticles.
-
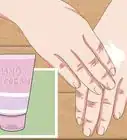
6Apply oil or cream. This is a good chance to give yourself a light hand massage, for a classic salon experience. Rub the oil or cream into your hands, fingers and nails. Let it soak in for about five minutes. When you're ready, take a cotton ball or cotton swab dipped in nail polish remover and run it over your nails to remove the extra oil or lotion and allow your nail polish to stick.


Painting Your Nails
-
1Apply the base coat. Carefully cover each nail with your clear base coat to provide a good surface for your nail color. The base coat will help ensure that your color looks even and doesn't streak. Let your base coat dry for five minutes before continuing.
- Base coat is usually clear, but sometimes it comes in a neutral shade. Either way is fine.
- Some base coats dry with a slightly tacky surface. This helps the nail polish adhere to your nail.
-
2Apply your nail color. Roll the bottle between your hands for about 10 seconds to blend the color and remove any air bubbles. Open the bottle and paint your nails using a thin, even coat. Dip the brush into the bottle and swirl it against the rim of the opening to remove excess polish. You want to load one small bead of paint on the brush. Paint a vertical line down the middle of your nail. Paint stripes on either side to fill in your nail completely. Continue until your nails are all painted.[7]
- Shaking the bottle creates air bubbles, so make sure to roll it instead.
- As you paint, hold the brush at a slight angle and press gently to fan out the brush bristles.
- Avoid applying a large drop of paint and spreading it around. This will result in an uneven coat of paint.
- Keep the finger you're painting steady against a table or work surface.
-
3Let it dry and paint a second coat. The first coat should dry completely before you move on to the second coat. Paint your second coat in the exact same way. Start with one vertical stripe, then fill in the sides. Continue until your nails are all painted. Let the second coat dry completely before moving on.[8]
- The second coat will normally take longer to dry than the first one. Be patient at this stage.
- You can help it along by holding your nails near (but not right next to) a fan.
-
4Touch up the sides. If you accidentally smeared a little nail polish on your skin, dip a cotton swab in some nail polish remover. Carefully rub it over the paint splotches to remove them. Avoid touching the cotton swab to your freshly painted nail.
- You can buy touch-up pens that help you do this more precisely.
- If you're right-handed and you're trying to use your left hand to touch up your right hand (or vice versa) steady your hand by resting it on a table.
-
5Finish with a top coat. This is a clear, smooth coat that will help your manicure stay in place for at least a week. Skipping the top coat will result in a paint job that chips much more quickly. Apply the clear top coat to all of your nails.[9] Let it dry completely. Your manicure is now finished.[10]
- At this point you can add extras like a stick-on or some gems.
- You may want to paint a second top coat over any stick-ons you use.


Nail Art
-
1Do a French manicure. This classic style looks pretty for everyday wear or a special occasion. The bases of your nails are painted a neutral color, while the tips are painted white.
-
2Paint a marbled manicure. This gorgeous look is not as hard to do as it might seem. Water marbling is a fun technique that incorporates more than one color for a beautiful impressionistic look.
-
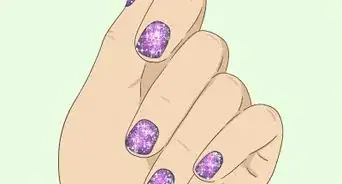
3Do dip dye nails. A painted color fade never goes out of style. It's a subtle way to have fun with your nails without going overboard with designs. Try fading your nails from white to red, yellow to green, or doing a full rainbow.
-
4Try a seasonal look. Celebrate your favorite seasons and holidays with beautiful nail art. You can go with a simple holiday-themed color scheme, or try something more difficult like one of these designs:
- Snowman nails
- Easter bunny nails
- Beach nails for summer
- Spiderweb nails
-
5Create nature-inspired designs. Do you adore pandas? Are you a flower child? Show off your personality by painting your nails in a nature-inspired pattern. Here are a few cute, easy designs to try out:
- Panda nails
- Owl nails
- Cheetah print nails
- Flower nails
Expert Q&A
Did you know you can get expert answers for this article?
Unlock expert answers by supporting wikiHow
-
QuestionWhat kind of nail file should I use?
 Mia RubieMia Rubie is a Nail Artist and the Owner of Sparkle San Francisco, a nail studio based in San Francisco, California. She has over eight years of nail artist and management experience and is known for her push-the-envelope designs and artistic eye for colors. Her clients include Sephora, Target, and Vogue. Her work has been featured in the San Francisco Chronicle and StyleCaster. She holds a BBA focusing on Entrepreneurial and Small Business Operations from San Francisco State University. You can find her work on her Instagram account @superflynails.
Nail ArtistYou don't want it to be super rough. Basically, you want it to be coarse enough that it can remove material, but not so harsh that it's going to crack or damage anything.
Support wikiHow by unlocking this expert answer.
-
QuestionIs the nail buffer mandatory?Mia RubieMia Rubie is a Nail Artist and the Owner of Sparkle San Francisco, a nail studio based in San Francisco, California. She has over eight years of nail artist and management experience and is known for her push-the-envelope designs and artistic eye for colors. Her clients include Sephora, Target, and Vogue. Her work has been featured in the San Francisco Chronicle and StyleCaster. She holds a BBA focusing on Entrepreneurial and Small Business Operations from San Francisco State University. You can find her work on her Instagram account @superflynails.
Nail ArtistWell, nothing is technically mandatory, but yes. It's a good idea to buff your nails. It'll give you a nice, smooth texture.Support wikiHow by unlocking this expert answer.
-
QuestionCan I revive old nail polish?
 Lindsay YoshitomiLindsay Yoshitomi is the nail artist behind the blog, Lacquered Lawyer. She was featured as one of Nail It! magazine’s “Bloggers You Should Know,” and has been on the cover of Nail Art Gallery Magazine. She has been practicing nail art for over 15 years.
Nail ArtistYes! Add some nail polish thinner to old nail polish that's too thick. Make sure you use nail polish thinner and not acetone or nail polish remover since they won't do the same thing.Support wikiHow by unlocking this expert answer.
Warnings
- Don't bite your nails.⧼thumbs_response⧽
- Don't store your nail polish in direct sunlight.[13]⧼thumbs_response⧽


References
- ↑ http://www.self.com/flash/nutrition/2012/03/to-acetone-or-not-the-healthie/,
- ↑ http://www.mayoclinic.org/healthy-lifestyle/adult-health/in-depth/nails/art-20044954
- ↑ Mia Rubie. Nail Artist. Expert Interview. 23 April 2020.
- ↑ Mia Rubie. Nail Artist. Expert Interview. 23 April 2020.
- ↑ http://www.nailcarehq.com/ridges-in-nails/
- ↑ Mia Rubie. Nail Artist. Expert Interview. 23 April 2020.
- ↑ http://www.cosmopolitan.com/style-beauty/beauty/how-to/a5101/things-about-painting-your-nails-you-might-not-know/
- ↑ Mia Rubie. Nail Artist. Expert Interview. 23 April 2020.
- ↑ Mia Rubie. Nail Artist. Expert Interview. 23 April 2020.
- ↑ http://www.cosmopolitan.com/style-beauty/beauty/how-to/a5101/things-about-painting-your-nails-you-might-not-know/
- ↑ Lindsay Yoshitomi. Nail Artist. Expert Interview. 12 July 2019.
- ↑ Lindsay Yoshitomi. Nail Artist. Expert Interview. 12 July 2019.
- ↑ Lindsay Yoshitomi. Nail Artist. Expert Interview. 12 July 2019.
- Videos provided by Ammeta
About This Article

To do a manicure at home, start by removing any old nail polish that you're wearing with non-acetone nail polish remover. Next, trim your nails to the length you want, file them into your preferred shape, and buff them to create a smooth surface. Then, soak your nails in a bowl of warm water for 5 minutes to soften your cuticles and use an orange stick to gently push them back. Finally, apply a base coat, follow it with the nail polish of your choice, and finish your manicure with a clear top coat. For tips on trying different looks with nail polish, read on!