This article was co-authored by wikiHow staff writer, Darlene Antonelli, MA. Darlene Antonelli is a Technology Writer and Editor for wikiHow. Darlene has experience teaching college courses, writing technology-related articles, and working hands-on in the technology field. She earned an MA in Writing from Rowan University in 2012 and wrote her thesis on online communities and the personalities curated in such communities.
This article has been viewed 1,085 times.
Learn more...
Have you noticed that your controller is moving to the side slowly? This is "controller drift," but there are a few ways that you can fix this. Instead of purchasing a new controller, try troubleshooting it yourself! This wikiHow article guides you through two different solutions for an Oculus Quest 2 controller drifting.
Things You Should Know
- First try recalibrating the controllers in "Menu > Devices > Controllers > Deadzone."
- If recalibrating doesn't work for you, and you're comfortable with opening tech up, try cleaning the inside of your controller.
- If the more common solutions don't work for you, there are other things that you can try, like cleaning your headset's cameras and setting tracking frequency.
Steps
Recalibrating the Controllers
-
1Press the Oculus button on your right controller. This button looks like the Oculus logo, which is a thin, white oval.[1]
- This will open the Universal Menu (also known as the Main Menu).
- While this is the most common fix for controller drift, a more severe issue may require you to clean the controllers as well.
-
2Go to Settings. You can simply aim the controller to select menu items.Advertisement
-
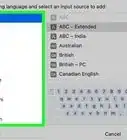
3Select the search bar and enter Deadzone. The search bar is at the top of the menu and you can use the on-screen keyboard to type if you don't have an actual keyboard connected.
-
4Select Thumbstick Range and Deadzone. This will bring you to the controller menu.
- Alternatively, go to Devices > Controllers to get here.
-
5Select Reset Left or Reset Right next to Thumbstick Range and Deadzone. Doing this will allow you to reset the calibration on your controller so it won't drift.
- Do this on the controller that you notice is drifting. If you don't know which controller is the culprit, you can repeat these steps to calibrate both of them.
-
6Select Callibrate Left or Callibrate Right and follow the on-screen instructions. You'll need to roll the thumbstick around and click Next to continue.
- When you're prompted to select the deadzone, make sure the inner circle encompasses your controller's drift. That way a small drift on your controller does not affect any movement recorded on the controller.
- Remember that you can repeat this process to calibrate the other controller if you need to.

Cleaning the Controllers
-
1Remove the battery from the controller. You can do this to one controller or both.
- Since you're opening up the controllers, make sure you're not in a dusty area. You'll also need a bit of skill to do this. If you're not confident in your ability to take the controller apart and put it back together, you shouldn't attempt this method.
-
2Take off the black plastic faceplate. Use something like a Jimmy, a pick, a lego disassembler, or a flathead screwdriver to gently pry off the faceplate.
- The plate is held together with adhesive, so it may be difficult to remove. Don't use so much force that you break the plate, though!
-
3Remove the joystick cap. You can gently pull up on the joystick until the cap comes off.
- Don't bend or break the spring that's exposed between the joystick and the joystick cap. It controls the touch sensor.
-
4Clean the joystick area. With a can of compressed air, blow away any large particles of dust that could be causing an issue. Then use a small amount of contact cleaner or isopropyl alcohol on the joystick and wiggle it around.
- Wait for any liquids to dry before continuing.
-
5Reattach the thumbstick. Make sure the spring attaches to the thumbstick (you may need to get a hold of it as you rotate the thumbstick clockwise) or your finger sensor won't work.


-Step-13.webp)


References
About This Article