This article was co-authored by wikiHow staff writer, Cory Stillman. Cory Stillman is a Technology Writer for wikiHow. Cory has experience writing about Film and TV for several online publications, including Screen Rant and Film Cred. He earned a degree in Film and Media Studies with a minor in Creative Writing and certificates in Global Studies and Children’s Literature from the University of Pittsburgh.
This article has been viewed 274,755 times.
Learn more...
Do you want to hide your caller ID when you place a call using your Android phone? You can do so in the Settings menu of your Phone app. The menu is a little different depending on which phone model you have. You can also hide your caller ID in Google Voice. Of course, if you only want to block your caller ID for a single call, you can dial "*67" before dialing the number. This wikiHow article teaches you how to hide your caller ID on an Android phone.
Things You Should Know
- Tap ⋮ in the top-right corner of your Phone app to reach the app's Settings menu.
- Navigate to the Calls section of the Settings menu, and tap Additional settings.
- Tap Caller ID and select Hide number to permanently hide your caller ID when placing outbound calls.
- Google Voice users can toggle on the Anonymous Caller ID setting within the app's Settings menu to permanently hide their caller ID when placing outbound calls.
Steps
Hiding Caller ID on All Calls
-
1Tap the Phone app. It is represented by an image of a blue phone receiver. Unless you have rearranged your Android's homepage, you should be able to find it in the bottom-left corner of your screen.
- Although Samsung devices may technically use a different phone app from other Androids, the settings remain the same.
-
2Tap ⋮. It's the icon with three vertical dots in the upper-right corner of the Google Phone app, next to the search bar. This will open a drop-down menu.Advertisement
-
3Tap Settings. It's the second option in the menu. This opens the Settings menu.
-
4Tap Calls. It should be about halfway down the page. This opens the Call Settings menu.
- Samsung Galaxy owners will find that their Phone app looks a little different. You will not see the option to tap "Calls", but you can instead select "Supplementary services".
- Different Samsung models may still label these sections differently, so keep an eye out for a "More settings" subheading as well.
- Samsung Galaxy owners will find that their Phone app looks a little different. You will not see the option to tap "Calls", but you can instead select "Supplementary services".
-
5Tap Additional settings. It's near the bottom of the Call Settings menu. This shows your options for caller ID and call waiting.
-
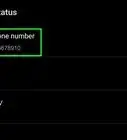
6Tap Caller ID. It's the first option on the page.
- On Samsung phones, this will be labeled as "Show your caller ID". Tap it to change the setting, and select "Never".
-
7Tap Hide number. It's the second option in the caller ID pop-up menu. This permanently hides your number when placing outbound calls using the Phone app.
- You may retrace these steps at any time to update these settings. You can opt to always show your number, or set the network default, which will hide your number in select circumstances.
- Because every developer puts their own skin over the base Android OS, the exact wording in each section may differ from what is listed here. If you are having trouble finding the appropriate setting, try consulting the phone's manufacturer.


Hiding Caller ID for a Single Call
-
1Open the Phone app. The phone app has an icon that resembles an old phone receiver. This works on any device.
-
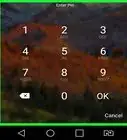
2Open the keypad. If you are using a Samsung Galaxy phone, tap the tab that says Keypad at the bottom of the screen. If you are using a standard Android phone, tap the blue icon with 10 dots that resembles a phone's keypad.
-
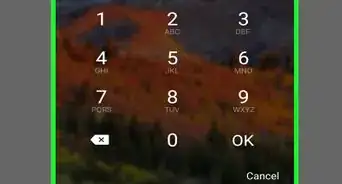
3Dial *67. This is a special code you can dial to block your caller ID when placing an outbound call.[1]
-
4Dial the 10-digit number you want to call. Be sure to dial the entire number starting with the area code, followed by the 7-digit number.
- For example, *67-123-456-7890.
-
5


Using Google Voice
-
1Install and open Google Voice. Google Voice allows you to make Voice-over-IP (VOIP) using a number provided by Google. This number is different from the number provided by your mobile service provider, as it is instead tie to your Google account. The Google Voice app has a green icon with an image that resembles an old phone receiver. Find the app on the Google Play Store and add it to your phone. Open the app once it is ready.
- You need to first set up your Google Voice account and pick a number in order to make calls using Google Voice.
-
2Tap ☰. It's the icon with three horizontal lines in the upper-left corner. Tap this icon to display the menu.
-
3Tap Settings. It's the second option from the bottom of the menu. It's next to an icon that resembles a gear.
-
4Slide the toggle switch next to "Anonymous Caller ID." This hides your caller ID when you place outbound calls with Google Voice. The toggle switch should turn green. [2]


Using a Burner App
-
1Install the app "Burner" on the Google Play Store. If you are not comfortable tinkering with your Android's settings, there are countless apps out there that will provide you with a second phone number to use as a "burner". The most popular among them is Burner: Second Phone Number. Search for it in the Google Play Store to install it, then open the app to get started.
- Burner offers a seven-day free trial, but it is a paid service thereafter.
- Note that Burner will not allow you to hide your caller ID. But because this number is not tied to you and your name, it may suffice for some users.
-
2Tap the gear icon in the top-right corner of the screen. This will open a Settings menu.
-
3Tap Burner Numbers and then +Create Number. This will bring you to a landing page that includes all of your created burners, as well as the different types of burners that are available.
-
4Select a burner type that allows you to place calls. Burner offers different types of phone numbers, each of which costs a different amount of in-app credits. These numbers allow you to send varying degrees of outbound texts or calls. Because we want to make a call with this number, we need to select a plan that will allow us to do so.
-
5Enter the area code you want to use. Burner allows you to choose your number's area code, and then the app will fill in the rest.
-
6Select your new burner number. Burner will provide you with a few different options that use your selected area code. Tap the one you want to use.
-
7Make a call with your new number. Tap the green phone icon in the bottom-right corner of your screen. If you have multiple burners, the app will prompt you to select the burner you want to use for your outbound call. Then, you can simply use the keypad to enter the number you want to call. The person will see you are calling from this number, but will not know to associate it with you.
- Note that you may only use your burner number from within the Burner app on Android.


Asking Your Mobile Carrier
-
1Dial 611 in your Phone app and tap the call button. This dials customer service for your mobile service provider. Use the dial pad to dial "611" and then tap the green icon that resembles an old phone receiver.
-
2Ask customer service to block your caller ID. You may have to first interact with an automated system, but once you do get to talk with a customer service representative, ask them to block your caller ID. Your mobile service provider should be able to block your Caller ID for all outbound calls.


References
About This Article

1. Open the Phone app.
2. Tap the icon with three vertical dots in the upper-right corner.
3. Tap Settings.
4. Tap Calls (if available).
5. Tap Supplemental services.
6. Tap Show caller ID.
7. Tap Hide number.