This article was co-authored by wikiHow Staff. Our trained team of editors and researchers validate articles for accuracy and comprehensiveness. wikiHow's Content Management Team carefully monitors the work from our editorial staff to ensure that each article is backed by trusted research and meets our high quality standards.
This article has been viewed 108,319 times.
Learn more...
Ash soap is made from lye derived from hardwood ash. Once you concentrate the lye water, you can turn it into soap by cooking it with fat. Traditional colonial recipes used animal fat, but you can use other types of fat too. Because of the unique type of lye used to make it, ash soap does not produce much lather. It is also much softer than other types of soap. This does not make it any less effective than other types of soap, however!
Ingredients
Lye
- 10 cups (1.44 kg) white hardwood ashes
- 1 1⁄2 to 2 gallons (5.7 to 7.6 L) soft water
Soap
- 3⁄8 cup (89 mL) concentrated lye
- 1 cup (240 mL) melted fat (lard, coconut oil, etc.)
Steps
Extracting the Lye
-
1Put on old clothes, rubber gloves, and safety goggles. Lye made from wood ash (potassium hydroxide) is less caustic than store-bought lye (sodium hydroxide), but it can still cause severe burns. It is vital that you keep your skin and eyes protected.[1]
- Use rubber gloves that go up to your elbows. A pair of rubber boots would also be a good idea.
- Don’t take the old clothes, gloves, and goggles off until after you have finished making and pouring the soap.
-
2Gather 10 cups (1.44 kg) of white ashes from a hardwood fire. Burn some hardwood until the fire goes out. Gather the ashes and shift them through a sieve into a container. Keep the white ashes in the container and discard the black ashes caught in the sieve.[2]
- Black ashes contain too much carbon to produce good lye.
- Ash, hickory, and maple are all great choices for hardwood, but you can also use others. Avoid softwood, like pine; it won't make good lye for bar soap.
- You may be able to buy the ashes online instead of burning them yourself. Make sure that they come from hardwood and don't contain any pieces of black charcoal.
Advertisement -
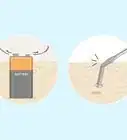
3Cut a hole in the bottom of a 5 US gal (19 L) bucket. Turn a 5 US gal (19 L) plastic bucket upside-down, then drill a finger-thick hole into the bottom. You can also use a wooden barrel or a clay pot instead of a bucket.[3]
- A large planter with a drainage hole in the bottom is a great option for this, because the hole will already be the right size. You don’t have to drill anything.
-
4Layer small stones, dried grass, and the extracted ash into the bucket. Cover the bottom 1 to 2 inches (2.5 to 5.1 cm) of the bucket with rocks. Add a thick layer of straw on top, then place 10 cups (1.44 kg) of white hardwood ash on top. Use enough straw so that the ash sits at least 1 to 2 inches (2.5 to 5.1 cm) below the top edge of the bucket.[4]
- If you can't find dried grass, hay or pine needles will also work.
- Pack the ash down as much as possible. This will make it thinner and take up less space.
- The grass layer should be the thickest, followed by the stone layer.
-
5Use bricks and boards to hold the bucket over a stainless steel pot. Set a stainless steel pot on the ground, then stack some bricks to either side of it. Lay a couple of boards across the bricks so that they cover the pot, then set your bucket on top. Leave a crack between the boards so that the drainage hole is exposed.[5]
- Make sure that the stainless steel pot is big enough to hold at least 1 gallon (3.8 L) of water.
- You can use a different setup, as long as water can flow through the bucket and into the pot. For example, if the bucket is big enough, you could set it on top of the pot.
- Do not use aluminum pots, or the lye will corrode it. Use only stainless steel or enamel. A crock pot may also work.


Extracting and Concentrating the Lye
-
1Bring 1 1⁄2 to 2 gallons (5.7 to 7.6 L) of soft water to a boil. Rainwater would be the best, but you can also use distilled water. Do not use regular tap water, even the filtered kind, as it contains too many minerals and chlorine.[6]
- You don’t have to use a stainless steel pot to boil the water since you won’t be putting the lye into this pot.
- The water needs to be hot in order to extract the ash, so keep it at a constant boil. Alternatively, boil the water in smaller, 1⁄2 gallon (1.9 L) batches instead.
-
2Pour 1⁄2 gallon (1.9 L) of the boiling water over the ashes. Measure out 1⁄2 gallon (1.9 L) of boiled soft water, then carry it over to the bucket containing the ashes. Pour the water into the bucket.[7]
- Don’t pour all 1 1⁄2 to 2 gallons (5.7 to 7.6 L) of water into the bucket. You want to do this in small increments.
-
3Wait 30 minutes for the water to drain into the pot. Be aware that it may take a little longer for the water to drain through. You will also end up with a little less than 1⁄2 gallon (1.9 L) water in the pot, because some of the water would have been absorbed by the grass and stones.[8]
- Instead of looking at the amount of water, pay attention to the dripping. Once the water has stopped dripping, it's time to add more water.
-
4Add another 1⁄2 gallon (1.9 L) of water and let it drain through. Keep adding the water in 1⁄2 US gal (1.9 L) increments until you have 1 gallon (3.8 L) of lye water in the pot. Wait 30 minutes for each batch of water to drain through.[9]
- The water needs to be boiling-hot when you pour it into the bucket. Re-heat it if needed.
- If you don't have 1 gallon (3.8 L) of lye water, repeat the whole process using more ashes and water.
- Test the pH of the lye water with pH strips, if desired. The pH should be 13.[10] It is not absolutely necessary, however.
-
5Boil the lye water until you have 3⁄8 cup (89 mL) left. Place the pot on the stove and turn the heat up to medium-high. Let the lye water come to a boil. As the lye boils, it will thicken. Once it reduces to 3⁄8 cup (89 mL), you’re ready to move on.[11]
- Be patient. This can take 3 to 4 hours.
- Keep a close eye on the pot once the lye water reduces to 1 quart (0.95 L). You don’t want to overcook it.
- If you go below 3⁄8 cup (89 mL), just add more soft water.


Making the Soap
-
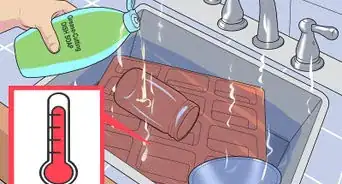
1Heat 1 cup (240 mL) of your choice of fat in a stainless steel pot. Choose a fat or oil, such as lard, tallow, coconut oil, or olive oil. Measure out 1 cup (240 mL) and place it into a small saucepan. Heat it over medium heat until the fat liquifies and turns warm.[12]
- You should do this even if you are using a liquid fat, such as olive oil; you need the fat to be warm.
- Keep in mind that the type of fat you use will have an affect on the ratio. It would be a good idea to check out an online soap-making calculator.
- You can combine fats. For example, you can use olive oil and shea butter. Check the proportions using an online soap-making calculator.
-
2Add the warm lye to the fat and cook it for 3 minutes. If the lye cooled down, heat it back up over medium heat until it is warm again first. Slowly pour the warm lye into the melted fat. Give the mixture a stir, then let it cook for 3 minutes until it thickens and turns smooth.[13]
- If you took off your safety gear earlier, make sure that you put it back on for this step in case the lye splashes.
- Ash soap tends to be very soft. If you want a harder bar of soap, add ¼ teaspoon of salt.
-
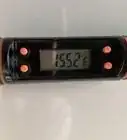
3Reduce the heat and stir the soap continuously for 1 minute. Lower the heat so that the soap is no longer bubbling, but so that it is still warm. You need it to be around 100 °F (38 °C) at this point. Stir the soap with a long-handled wooden spoon for 1 minute.[14]
- Use a candle-making or soap-making thermometer to keep track of the temperature.
-
4Wait 10 to 15 minutes, then stir the soap again for another minute. Let the soap cook on the stove for 10 to 15 minutes. Next, stir the soap continuously for 1 minute with your long-handled wooden spoon.[15]
- Get used to this process because you will be repeating it a few times.
-
5Stir the soap every 10 to 15 minutes until it turns golden brown. Be sure to stir the soap for 1 minute each time you stir it. How many times you repeat this waiting and stirring process will vary each time you make the soap. It can take as little as 30 minutes to as long as 3 hours. The soap is ready when it turns golden brown and you can draw a streak through it with a spoon.[16]
- Once the soap turns golden brown, pull the tip of a non-metal spoon across the top. If the streak stays, the soap is ready. If you don't see a streak, the soap's not ready.
-
6Add any desired dried herbs, exfoliants, or essential oils. Refer to a soap recipe for this step or make up your own combination. If you choose the latter, however, refer to a soap-making calculator or an existing recipe with similar ingredients to find out how much of each ingredient you should use.[17]
- Dried lavender is very popular in soap, but you can also experiment with lemon zest, loose-leaf tea, and chamomile.
- Coffee is a great exfoliant, but you can also try coarse sea salt, ground walnut shell, or ground apricot seeds.
- Essential oils are a great way to add fragrance to your soap. You can also use soap-making fragrance oils.


Pouring and Curing the Soap
-
1Line a wooden, soap-making box mold with wax paper. This is not essential, but it will make the demolding process easier. Tear off a strip of wax paper that’s longer than your mold, then tuck it inside, making sure to make the corner creases nice and neat.[18]
- You can use other soap-making molds as well. If you can use the mold for traditional hot- or cold-process soap, then you can use it here.
-
2Pour the soap into the mold like you would batter into a baking pan. Hold the pot over the mold, then gently tip the soap into it. Move the pot back-and-forth from 1 end of the mold to the other. Work quickly but carefully. You don’t want to spill the soap, but you also don’t want it to cool down too fast.[19]
-
3Cover the mold with a towel, then remove it the next day. This is important because it will slow down the cooling process. If you let the soap cool down too fast, it may turn brittle and develop cracks. During this time, keep the soap some place warm and dry where it won't get bumped or moved around.[20]
- Don’t stop at just 1 towel. You can layer several towels or blankets on top of the mold as well!
-
4Wait 1 week for the soap to harden before demolding it. Continue to store the soap some place warm and dry where it won't be disturbed. Once the soap has hardened, take it out of the mold. How you do this will depend on how your mold is constructed.[21]
- Some molds need to be taken apart in order to get to the soap. Other molds simply have to be turned upside-down, like a cake pan.
- You can cut the soap a few days earlier while it is still in the mold. It will be soft and thus easier to cut.
- If you lined the mold with wax paper, it may get stuck to the soap. In this case, just peel it off.
-
5Cut the soap into 1⁄2 to 1 in (1.3 to 2.5 cm) thick slices. You can use a special soap cutting knife for this, or you can use a regular knife instead. If you pour the soap into individual molds, then you don't have to cut them since they are already a convenient size.
-
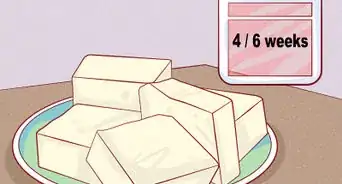
6Let the soap cure on a rack for 2 to 6 weeks in a cool, dry spot. Halfway through the curing process, about 1 to 3 weeks, flip the soap bars over. This will help ensure that they cure evenly on all sides.[22]
-
7Wrap the soap in plastic wrap or store it in an airtight container. Keep the soap in a cool, dry place. Too much warmth or moisture may cause the soap to melt. Homemade soap, including ash soap, can last indefinitely, although it may shrink and harden over time.
- If you used essential oils, you may notice the fragrance fading after about 1 year. This does not affect the soap itself, however.


Community Q&A
-
QuestionHow much fat is used for the 12oz of lye?
 Community AnswerDifferent oils will need differing amounts of lye to saponify. For example, olive oil will need a very different amount than lard or tallow. Use an online saponification calculator to correctly calculate how much of each to use.
 -
QuestionWhat kind of preservatives should I use?
 Community AnswerSoap doesn’t need preservatives; it should be cured for 4 - 6 weeks, which helps the water evaporate and makes the bar harder.
 -
QuestionWhat is responsible for the brown or tan color of the soap?
 Community AnswerThe amount of sugar in the batter causes heat. The more heat, the darker the color can be. The age of the soap is can also change the color.
Warnings
- Do not use tin, aluminum, Teflon, or copper soap molds as they will react with the lye.⧼thumbs_response⧽
- Never handle lye without proper safety gear. It will burn through your skin.⧼thumbs_response⧽
- Do not use candle-making fragrance oils. These are not the same as essential oils or soap-making oils; they are not skin-safe.⧼thumbs_response⧽
Things You’ll Need
- Sieve (for separating the ashes)
- 5 US gal (19 L) wood or plastic bucket
- Stainless steel or enamel pot
- Soap mold(s)
- Glass measuring cup
- Long-handled wooden spoon
- Safety gloves
- Safety goggles
- Old clothes
- Rubber boots
- Dried herbs, exfoliants, and essential oil (optional)


References
- ↑ https://www.primalsurvivor.net/wood-ash-soap/
- ↑ https://www.primalsurvivor.net/wood-ash-soap/
- ↑ https://www.primalsurvivor.net/wood-ash-soap/
- ↑ http://www.soap-made-easy.com/make-lye.html
- ↑ https://www.primalsurvivor.net/wood-ash-soap/
- ↑ https://farmingmybackyard.com/homemade-soap-from-ashes/
- ↑ https://farmingmybackyard.com/homemade-soap-from-ashes/
- ↑ https://farmingmybackyard.com/homemade-soap-from-ashes/
- ↑ https://farmingmybackyard.com/homemade-soap-from-ashes/
- ↑ https://www.primalsurvivor.net/wood-ash-soap/
- ↑ https://farmingmybackyard.com/homemade-soap-from-ashes/
- ↑ https://www.primalsurvivor.net/wood-ash-soap/
- ↑ https://farmingmybackyard.com/homemade-soap-from-ashes/
- ↑ https://www.primalsurvivor.net/wood-ash-soap/
- ↑ https://www.primalsurvivor.net/wood-ash-soap/
- ↑ https://farmingmybackyard.com/homemade-soap-from-ashes/
- ↑ https://www.primalsurvivor.net/wood-ash-soap/
- ↑ https://www.primalsurvivor.net/wood-ash-soap/
- ↑ https://www.primalsurvivor.net/wood-ash-soap/
- ↑ https://www.primalsurvivor.net/wood-ash-soap/
- ↑ https://www.primalsurvivor.net/wood-ash-soap/
- ↑ https://farmingmybackyard.com/homemade-soap-from-ashes/
- ↑ https://www.primalsurvivor.net/wood-ash-soap/
- ↑ https://www.primalsurvivor.net/wood-ash-soap/
- ↑ https://www.primalsurvivor.net/wood-ash-soap/
- ↑ https://www.primalsurvivor.net/wood-ash-soap/
About This Article