wikiHow is a “wiki,” similar to Wikipedia, which means that many of our articles are co-written by multiple authors. To create this article, 12 people, some anonymous, worked to edit and improve it over time.
This article has been viewed 253,052 times.
Learn more...
Mannequins are used to display fashions and dressing a mannequin properly often distinguishes a product, increasing sales. Small shops, accessory stores, and decorators may not want to buy a whole mannequin when they have to only display hats or accessories. In these cases, all that is needed is a mannequin head and these can be created using paper mache and decoupage.
Steps
Papier Mâché Mannequin Head
-
1Blow up a balloon so that it is approximately the size, or a little smaller than you want your mannequin head to be.
-
2Add your base.
- Fill a tin can 1/3 full of sand. Use masking tape to affix your balloon inside the can on all sides. Smooth down the masking tape wherever there are bumps. The can will serve as a neck to your paper mache head.
Advertisement -
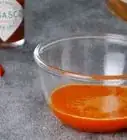
3Make your paper mache paste. Mix 1 part water with 1 part flour.
- Most paper mache recipes suggest 2 parts water to 1 part flour. You want your recipe to be a little bit thicker for your paper mache head, but feel free to dilute it with more water to make it easier to work with.
-
4Tear newspapers into 2 by 6 inch (5 by 15 cm) strips. Tear a few larger squares and set aside.
-
5Work outside or on a drop cloth, and begin making your mannequin head.
-
6Dip a newspaper strip into the thick flour and water mixture. Smooth it onto your balloon. Working with 1 strip at a time, cover the entire head and can.
-
7Allow the can and balloon to dry completely.
-
8Cover with a second layer of newspaper strips dipped in the flour and water mixture.
-
9Allow to dry and repeat 2 more times. You should have done 4 paper mache coats on your mannequin head. Allow them to dry completely.
-
10Wad larger pieces of newspaper to form the nose, ears and any other features you would like. Affix them with masking tape. Continue to pinch the newspapers into the shape you want.
-
11Smooth the masking tape very well. Use a wooden spoon to press down gently and thoroughly on all tape edges.
-
12Dip larger squares of newspaper in the flour and water mixture and smooth 1 layer over the features. Allow to dry.
-
13Cover your mannequin head. There are a few options.
- Spray your mannequin head with a light coat of spray adhesive and cover the head with fabric. Cut off at the bottom edge of the can so that the can will stand.
- Paint the mannequin with colored paint. For light colors, make sure to do more than 1 coat. Use spray paint for a fast application.
- For a detailed painted mannequin head, use different color paints to draw features.
- Take a plain or patterned nylon sock or tights. Stretch it over the head of the mannequin head and the can. Knot it at the back of the can. This is the fastest way to cover your mannequin with a layer of fabric, as it does not require any drying time.
-
14Let dry and use your mannequin head to display accessories.


Styrofoam Mannequin Head
-
1Buy a Styrofoam mannequin head. These heads are white, with features, and they are available at most arts and crafts stores. Many of them are already sized to fit hats or headbands. Miniature versions are also available.
-
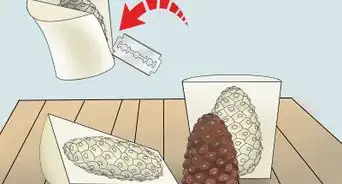
2Choose a paper that you would like to use to decoupage your foam mannequin head. Decoupage is the art of decorating something by gluing small pieces of paper to it. It is commonly used on small objects, boxes and furniture.
-
3Decoupage your mannequin head using strips of paper, such as specialty craft papers, musical scores or magazine pages.
-
4Rip your paper into strips of 1 inch (2.5 cm) or less, until you have a large pile.
-
5Use a foam brush to wet the top of the mannequin head with decoupage glue. Place pieces of paper on to of the wet portions, making sure they overlap and there isn't any white space.
-
6Place another layer of decoupage glue over the top of the paper pieces, flattening all edges with the brush to ensure a smooth coating of paper. Once the glue and paper dry, you will be unable to flatten any edges, so it is important to take time to smooth it with the glue and brush now.
-
7Continue to wet the Styrofoam, attach the paper and glue over the top, using the smaller pieces of paper to fit over the nose, eyes and mouth.
-
8Stop and allow the top of your mannequin head to dry according to the directions on the decoupage glue. When it is dry, balance the top of the mannequin head in a large sturdy cup, so you can glue pieces of paper around the edges, and leave it to dry.
-
9Choose a base. You can use an antique plate, a wooden base from an arts and crafts shop, or any sturdy object that will hold your mannequin head steady when you place hats or accessories on it. Foam mannequin heads are very light and unsteady, so it is important to have a base if you intend to use it in a store.
-
10Connect the base to your newly decorated mannequin head with hot glue. Allow to dry and then use for decoration or accessories.


Community Q&A
-
QuestionIn the first method, does anything happen if the balloon pops?
 Mrs.SpooksCommunity AnswerIf it pops when the outside layer is dry, nothing should happen. If it's wet, it may or may not collapse. If it happens during step 1, just get another balloon and re-inflate it.
 -
QuestionHow much water and flour am I supposed to use?
 Community AnswerYou need to use one part flour and two parts water. The exact amounts are entirely up to you. For example, you could use one cup of flour and two cups of water, or two cups of flour and four cups of water.
 -
QuestionWhat if it's dry and it's starting to sink? I think the balloon deflated during the drying time. Can I fix it?Mrs.SpooksCommunity AnswerIf there is not too much damage, you may just be able to "fill" the hole with tape and mache. If there is a lot, it may be too late, and you will have to restart.
Warnings
- This is a very messy project. Work in clothes that can get dirty.⧼thumbs_response⧽
Things You'll Need
- Tin can
- Balloon
- Newspapers
- Flour
- Water
- Masking tape
- Paints or spray paint (optional)
- Drop cloth (optional)
- Fabric (optional)
- Nylon sock (optional)
- Styrofoam mannequin head
- Decoupage glue
- Pieces of colored or designed paper
- Foam paint brush
- Plate or wooden base
- Hot glue gun


References
About This Article
To make a mannequin head with paper mâché, start by blowing up a balloon to the size you want your head to be. Then, tear newspaper into several 2-inch by 6-inch strips, and dip them in a paste made of 2 parts water to 1 part flour. Smooth the strips over the balloon one at a time until it’s completely covered, and create details like a nose and mouth by wadding up newspaper, taping it to the head, and covering with more wet strips. Once it’s dried, smooth out edges with a light coat of spray adhesive. For more ways to make mannequin heads, like how to use decoupage to create a stylish wig holder, read on!