This article was co-authored by wikiHow Staff. Our trained team of editors and researchers validate articles for accuracy and comprehensiveness. wikiHow's Content Management Team carefully monitors the work from our editorial staff to ensure that each article is backed by trusted research and meets our high quality standards.
There are 11 references cited in this article, which can be found at the bottom of the page.
This article has been viewed 126,140 times.
Learn more...
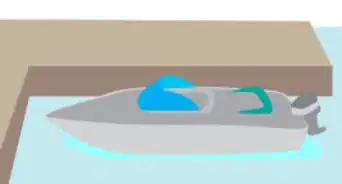
Flushing a boat motor by running it out of water is a routine maintenance task. Running the engine without a water source for any length of time will cause damage, so you’ll need to attach a hose to the motor’s water intakes. Some newer motors have built-in attachments that accept a hose nozzle. If your motor doesn’t, you’ll need a set of motor flusher muffs. Turn on the water before starting the engine, then run it for 5 to 10 minutes or according to the manufacturer’s recommendations.[1]
Steps
Attaching a Hose and Motor Flusher Muffs
-
1Read your manual before starting the motor out of water. Check the manual to find out where your intakes are located and whether they have built-in attachments for a garden hose. If not, you’ll need a set of motor muffs.[2]
- Most manufacturers’ recommendations for flushing or running a motor out of water are similar. However, you should still check the specific procedure for your model.
-
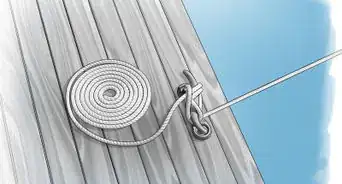
2Screw the hose directly into the motor if it has a built-in attachment. With the engine lowered into the vertical position (not tilted in the tow position), locate the water intakes on the sides of the lower unit. Screw the hose nozzle into one of the intakes. Your manual will most likely recommend covering the other intake with heavy tape.[3]Advertisement
-
3Purchase motor muffs at a boating store or online. If you need motor muffs, you can purchase a set for under $10 (USD) at a marina, sporting goods store, or online. They look like earmuffs connected by a long, V-shaped rod.[4]
-
4Wet the muffs to get a better seal. Many boat owners like to splash the insides of the muffs with water before attaching them to the motor. A better seal can help prevent the muffs from sliding off while the engine’s running.[5]
-
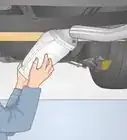
5Clamp the muffs to the motor and stay clear of the propeller. Slide the muffs onto the motor’s lower unit so they’re aligned over the water intakes. Be sure to position the muffs so the connecting rod is located in front of the motor on the opposite side of the propeller.[6]
- While you should keep the engine in neutral while running it out of water, you still need to be careful around the propeller. Injury or damage will result if the engine accidentally slips into gear and the connecting rod is on the propeller side of the motor.
-
6Screw the garden hose onto the muffs. One of the muffs has a nozzle, and the other is solid. Find the one with the nozzle, then screw your garden hose into it. Double check that the connection is tight and that the muffs fit snugly over the motor’s water intakes.[7]


Starting the Engine
-
1Turn on the water. After attaching the garden hose, head to the faucet and turn on the water. Check your manual to see if it specifies a water pressure setting. Many manufacturers recommend setting it to about half pressure.[8]
- Do not start the engine before turning on the water.
-
2Put the engine in neutral. Make sure the gearshift or throttle is in the neutral position. The engine needs to be in neutral to start and should stay in neutral while you run it.[9]
- If you need to put the engine in gear to test the propeller's function, use caution and make sure no people or objects go near the moving propeller.
-
3Start the engine. Depending on your engine type, insert the key or pull the starter to engage the engine. For some electric engines, you’ll also need to push and release a button after turning the key.[10]
-
4Make sure the motor’s water pump is working. You should see a stream of water flowing out of the top of the motor. If there’s no overflow stream, there’s something wrong with your water pump.[11]
- If there’s no stream, turn off the engine immediately. Insert a thin wire into the outflow tube to check for debris. Start the engine again to see if that solved the problem. If there’s still no outflow, you will likely need to have a mechanic replace your water pump.[12]


Flushing the Motor
-
1Run the engine for 10 minutes, or according to the manual’s instructions. If you’re flushing the motor, most manufacturers recommend running it for 5 to 10 minutes. If you’re running the engine for another purpose, such as to test its function, run it for as long as your maintenance task requires.[13]
- Don’t run the engine unattended. Keep an eye on the muffs and make sure they don’t slip off of the water intakes.[14]
- Regardless of your task, it’s unlikely that you’ll need to run it more than 10 to 15 minutes.
-
2Turn off the engine before turning off the water. After about 10 minutes, turn the key or close the throttle to turn off the engine. Turn off the water only after disengaging the engine. Running the engine without a water source for just a moment could cause damage.[15]
-
3Unscrew the hose from the muffs or built-in attachment. After turning off the water, remove the garden hose from the muffs or motor’s water intake, coil it up, and put it away.[16]
-
4Remove the muffs if you’re using them. If necessary, slide the muffs off of the motor’s lower unit. Store them in your boat house, garage, or other handy spot so you can flush your motor after your next outing.[17]
-
5Let water drain before tilting the engine. Keep the engine down for 30 to 60 minutes so water drains from the powerhead. After letting it drain, lift the motor into the tilted position. Cover the boat and tow it into your garage or boat house, or store it as you prefer.[18]


Community Q&A
-
QuestionI have the water on and it does not come out where it is supposed to. Where is the water going?
 Community AnswerYour motor will have to warm up before the thermostat opens up to allow water to cool your engine. After you run it for a while it should begin to come out. Give it some time. If your motor runs for a minute or more, you may need a new impeller.
 -
QuestionIs water supposed to come out the propeller when the muffs are attached, water on, motor running?
 Aloha27Community AnswerYes. As a matter of fact, most of the cooling water exits through the prop. The "pee hole" is just a visual aid for the operator to ensure that cooling water is being circulated.
 -
QuestionIf the motor ran for 5 to 10 minutes without water going through it what kind of damage would it cause?
 NathanCommunity AnswerIt is not certain within that timeframe but running the motor without a garden hose or some type of water source can result in overheating.
Things You’ll Need
- Boat trailer
- Garden hose
- Motor flusher muffs (optional)
- Duct tape (optional)


References
- ↑ https://www.dnr.illinois.gov/cmp/Documents/TipSheets.pdf
- ↑ http://www.boatus.com/magazine/2013/August/outboard-flushing-the-right-way.asp
- ↑ http://www.boatus.com/magazine/2013/August/outboard-flushing-the-right-way.asp
- ↑ http://dnr.wi.gov/topic/invasives/fact/pdfs/ProtectYourBoat.pdf
- ↑ https://www.youtube.com/watch?v=e9fZ5ykTne4&feature=youtu.be&list=UUX5uNpKyy9TU6f1tkCYn0LA&t=100
- ↑ https://www.youtube.com/watch?v=e9fZ5ykTne4&feature=youtu.be&list=UUX5uNpKyy9TU6f1tkCYn0LA&t=82
- ↑ http://dnr.wi.gov/topic/invasives/fact/pdfs/ProtectYourBoat.pdf
- ↑ https://www.youtube.com/watch?v=e9fZ5ykTne4&feature=youtu.be&list=UUX5uNpKyy9TU6f1tkCYn0LA&t=107
- ↑ https://www.youtube.com/watch?v=e9fZ5ykTne4&feature=youtu.be&list=UUX5uNpKyy9TU6f1tkCYn0LA&t=123
- ↑ https://www.youtube.com/watch?v=e9fZ5ykTne4&feature=youtu.be&list=UUX5uNpKyy9TU6f1tkCYn0LA&t=129
- ↑ https://www.youtube.com/watch?v=e9fZ5ykTne4&feature=youtu.be&list=UUX5uNpKyy9TU6f1tkCYn0LA&t=132
- ↑ http://www.boatsafe.com/nauticalknowhow/outboard.htm
- ↑ http://dnr.wi.gov/topic/invasives/fact/pdfs/ProtectYourBoat.pdf
- ↑ http://www.boatus.com/magazine/2013/August/outboard-flushing-the-right-way.asp
- ↑ http://www.boats.com/reviews/outboard-expert-lay-up-goofs/#.WnNYvqinGCg
- ↑ http://www.boatus.com/magazine/2013/August/outboard-flushing-the-right-way.asp
- ↑ https://www.youtube.com/watch?v=e9fZ5ykTne4&feature=youtu.be&list=UUX5uNpKyy9TU6f1tkCYn0LA&t=129
- ↑ http://www.boatus.com/magazine/2013/August/outboard-flushing-the-right-way.asp
About This Article

To run your boat motor out of water, start by attaching a hose to your motor’s water intake so you can flush in water, which will avoid damaging the engine. Once the hose is attached, turn on the water faucet. Then, pull the gear shift to neutral and start the engine. Make sure there’s a stream of water flowing out of the top of the motor, which means the water pump is working correctly. If you don’t see a stream, turn off the engine immediately and fix the water pump before restarting it. Once your engine is on, run the boat for 5-10 minutes to flush it out, then turn off the engine before turning off the water. For more advice on attaching a hose to your motor’s water intake, read on!