This article was co-authored by wikiHow staff writer, Dan Hickey. Dan Hickey is a Writer and Humorist based in Chicago, Illinois. He has published pieces on a variety of online satire sites and has been a member of the wikiHow team since 2022. A former teaching artist at a community music school, Dan enjoys helping people learn new skills they never thought they could master. He graduated with a BM in Clarinet Performance from DePauw University in 2015 and an MM from DePaul University in 2017.
There are 13 references cited in this article, which can be found at the bottom of the page.
This article has been viewed 17,713 times.
Learn more...
Massage guns are an easy solution to muscle pain and stiffness, but how do you use one effectively? Massage guns are generally safe for most people to use every day, and their benefits include relaxation, muscle recovery, and increased mobility.[1] We’ve outlined the best techniques for using a massage gun whether you’re stiff from a long day in the car or sore from an intense workout. If you’re ready to kick back and relax, keep scrolling!
Things You Should Know
- Use a massage gun for 30 seconds before a workout to activate your muscles, or for 2 minutes afterward to prevent or reduce muscle soreness.
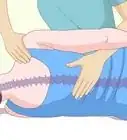
- Target muscle groups and soft tissue with your massage gun while avoiding bony areas and joints like your spine, ankles, or elbows.
- Begin massaging on the lowest setting and work your way up to higher speeds as you get used to the intensity.
Steps


Warnings
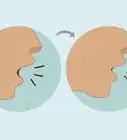
- Do not use a massage gun on the front of your neck, your throat, your face, your head, or the front of your torso.[20]⧼thumbs_response⧽
- Massage guns are designed to work on soft tissue and muscle groups. Avoid bony areas and joints like the shins, spine, head, ankles, or elbows.[21]⧼thumbs_response⧽
- Talk to your doctor before using a massage gun if you’re over 65 years old, have a musculoskeletal condition, or take blood thinners.[22]⧼thumbs_response⧽


References
- ↑ https://www.livescience.com/5-benefits-of-a-massage-gun
- ↑ https://www.houstonmethodist.org/blog/articles/2021/sep/are-massage-guns-worth-it-4-more-questions-about-percussive-therapy-answered/
- ↑ https://www.handheldmassagerguide.com/how-to-use-a-massage-gun/
- ↑ https://www.handheldmassagerguide.com/how-to-use-a-massage-gun/
- ↑ https://cnalifestyle.channelnewsasia.com/wellness/massage-gun-effective-vibration-percussive-therapy-237646
- ↑ https://cnalifestyle.channelnewsasia.com/wellness/massage-gun-effective-vibration-percussive-therapy-237646
- ↑ https://www.livescience.com/5-benefits-of-a-massage-gun
- ↑ https://www.handheldmassagerguide.com/how-to-use-a-massage-gun/
- ↑ https://massagegunfight.com/how-to-use-a-massage-gun-on-your-lower-back/#Selecting_The_Right_Massage_Heads
- ↑ https://youtu.be/WJ_iVydJAcI?t=216
- ↑ https://www.hackensackmeridianhealth.org/en/HealthU/2022/04/01/Are-Massage-Guns-Good-for-You-A-PT-Explains#.YtWH3ezMJJU
- ↑ https://www.hackensackmeridianhealth.org/en/HealthU/2022/04/01/Are-Massage-Guns-Good-for-You-A-PT-Explains#.YtWH3ezMJJU
- ↑ https://www.hackensackmeridianhealth.org/en/HealthU/2022/04/01/Are-Massage-Guns-Good-for-You-A-PT-Explains#.YtWH3ezMJJU
- ↑ https://allthestuff.com/percussion-massage-usage/
- ↑ https://connect.uclahealth.org/2022/02/02/considering-a-massage-gun-heres-what-you-need-to-know-about-percussive-therapy/
- ↑ https://health.clevelandclinic.org/should-you-use-ice-or-heat-for-pain-infographic/
- ↑ https://integrehab.com/blog/athletic-training/hydration-recovery-healing/
- ↑ https://connect.uclahealth.org/2022/02/02/considering-a-massage-gun-heres-what-you-need-to-know-about-percussive-therapy/
- ↑ https://health.clevelandclinic.org/should-you-reach-for-a-handheld-massager/
- ↑ https://massagegunfight.com/how-to-use-a-massage-gun-on-your-lower-back/
- ↑ https://www.livescience.com/5-benefits-of-a-massage-gun
- ↑ https://www.hackensackmeridianhealth.org/en/HealthU/2022/04/01/Are-Massage-Guns-Good-for-You-A-PT-Explains#.YtWH3ezMJJU
About This Article