21

I want to shape my WPF tooltip like the image below:

enter image description here

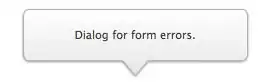
How do I achieve this?

Dave Clemmer
  • 3,741
  • 12
  • 49
  • 72
Mohammad Zare
  • 1,489
  • 7
  • 25
  • 45
  • I came across a similar problem recently and produced two posts that I believe may help: http://pmichaels.net/2016/04/01/tooltip-speech-bubbles/ and http://pmichaels.net/2016/04/08/creating-a-speech-bubble-with-rounded-corners/ – Paul Michaels Apr 19 '16 at 20:02

2 Answers2

46

Use this Code:

<Window x:Class="WpfApplication2.MainWindow"
    xmlns="http://schemas.microsoft.com/winfx/2006/xaml/presentation"
    xmlns:x="http://schemas.microsoft.com/winfx/2006/xaml"
    xmlns:ed="http://schemas.microsoft.com/expression/2010/drawing"
    x:Name="Window"
    Title="MainWindow"
    Width="640"
    Height="480">

<Window.Resources>

    <Style x:Key="{x:Type ToolTip}" TargetType="ToolTip">
        <Setter Property="OverridesDefaultStyle" Value="true" />
        <Setter Property="HasDropShadow" Value="True" />
        <Setter Property="Template">
            <Setter.Value>
                <ControlTemplate TargetType="ToolTip">
                    <ed:Callout Name="Border"
                                Width="{TemplateBinding Width}"
                                Height="{TemplateBinding Height}"
                                MinWidth="100"
                                MinHeight="30"
                                Margin="0,0,0,50"
                                AnchorPoint="0,1.5"
                                Background="{StaticResource LightBrush}"
                                BorderBrush="{StaticResource SolidBorderBrush}"
                                BorderThickness="1"
                                CalloutStyle="RoundedRectangle"
                                Fill="#FFF4F4F5"
                                FontSize="14.667"
                                Stroke="Black">
                        <ContentPresenter Margin="4"
                                          HorizontalAlignment="Left"
                                          VerticalAlignment="Top" />
                    </ed:Callout>

                </ControlTemplate>
            </Setter.Value>
        </Setter>
    </Style>

</Window.Resources>
<Grid>
    <Button ToolTip="Hello" />
</Grid>

this is the begining, now you have to play with it... enjoy!

enter image description here

Harry
  • 1,686
  • 2
  • 15
  • 21
  • thank you harry. i have another question: should i add an assembly for xmlns:ed="http://schemas.microsoft.com/expression/2010/drawing"? – Mohammad Zare Jul 12 '12 at 09:37
  • 8
    Yes, add Microsoft.Expression.Drawing assembly. – Harry Jul 12 '12 at 09:46
  • This tool tip is shown below the control! How to show it above the button? – SepehrM Jun 11 '14 at 07:15
  • 2
    To show it below the control simply add: `` – SepehrM Jun 11 '14 at 10:09
  • I am not sure why it is not working anymore even that the new namespace http://schemas.microsoft.com/expression/blend/2008 don't raise any error. – Cfun May 30 '20 at 08:01
  • With this approach, how do you set the speech bubble point at the correct place pointing to the right target? Is this managed automatically? – Willy Dec 06 '22 at 09:40
0
 <Style x:Key="BalloonTooltipStyle" TargetType="ToolTip">
        <Setter Property="OverridesDefaultStyle" Value="True" />
        <Setter Property="Template">
            <Setter.Value>
                <ControlTemplate TargetType="ToolTip">
                    <Grid>
                        <Grid.ColumnDefinitions>
                            <ColumnDefinition Width="Auto" />
                            <ColumnDefinition Width="*" />
                        </Grid.ColumnDefinitions>
                        <Path x:Name="BalloonPointer" Fill="#6082B6" Stretch="Fill" Data="M0,0 L0,-1 -1,-0.5 Z" Width="15" Height="15" HorizontalAlignment="Left" VerticalAlignment="Top" Margin="5,35,0,0" />
                        <Border Background="#6082B6"   BorderBrush="#6082B6"  Grid.Column="1">
                            <Grid>
                                <ContentPresenter Content="{TemplateBinding Content}"   />
                            </Grid>
                        </Border>
                    </Grid>
                    <ControlTemplate.Triggers>
                        <Trigger Property="Placement" Value="Right">
                            <Setter TargetName="BalloonPointer" Property="Margin" Value="5,0,0,0" />
                        </Trigger>
                        <Trigger Property="Placement" Value="Left">
                            <Setter TargetName="BalloonPointer" Property="Margin" Value="-5,0,0,0" />
                        </Trigger>
                        <Trigger Property="Placement" Value="Top">
                            <Setter TargetName="BalloonPointer" Property="Margin" Value="0,-5,0,0" />
                        </Trigger>
                        <Trigger Property="Placement" Value="Bottom">
                            <Setter TargetName="BalloonPointer" Property="Margin" Value="0,0,0,-5" />
                        </Trigger>
                    </ControlT[1]emplate.Triggers>
                </ControlTemplate>
            </Setter.Value>
        </Setter>
    </Style>
hamza
  • 1
  • 2
  • Your answer could be improved with additional supporting information. Please [edit] to add further details, such as citations or documentation, so that others can confirm that your answer is correct. You can find more information on how to write good answers [in the help center](/help/how-to-answer). – Community Jun 01 '23 at 10:01