16

I try to recreate a script that uses the ImageMagick command "convert" to compose an image. But I want to do the same in PHP using Imagick (version 6.6.2-10).

The command is as follows:

convert A1.mpc A3.mpc A4.mpc -channel rgba -alpha on -virtual-pixel background -background none -define compose:args=312x26.6776 -compose displace -composite out.mpc

I found out that the parameters stand for the following:

convert  {background} {overlay} [{mask}] [-compose {method}] -composite {result}

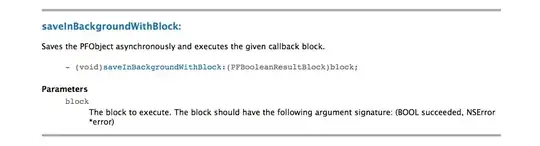
The PHP Imagick gives me a compose method, but without a mask parameter: http://www.php.net/manual/en/imagick.compositeimage.php

I found another question and tries this (but does not result in the same image):

// load images
$a1 = new Imagick('a1.png');
$a3 = new Imagick('a3.png');
$a4 = new Imagick('a4.png');

// mask the overlay
$a1->compositeImage($a4, Imagick::COMPOSITE_DSTIN, 0, 0, Imagick::CHANNEL_ALPHA);

// compose overlay to background
$a1->setImageVirtualPixelMethod(Imagick::VIRTUALPIXELMETHOD_BACKGROUND);
$a1->setImageBackgroundColor(new ImagickPixel('none'));
$a1->setOption('compose:args', '312x26.6776');
$a1->compositeImage($a3, Imagick::COMPOSITE_DISPLACE, 0, 0);

So my question is: is this the right way to compose an image using a mask? Or what's wrong here?

To help visualizing what I want to do, here are some input images:

input image a1 (background):

a1

input image a3 (overlay):

a3

input image a4 (mask):

a4

What I want the result to be:

correct output

What my php code creates:

wrong output

Thanks in advance! Michael

Michael
  • 200
  • 2
  • 10
  • 1
    why don't you use the flag COMPOSITE_OVERLAY – artragis Nov 26 '12 at 13:56
  • I struggled with this exact same problem, and I eventually ended up writing a package dedicated to composing images with filters and layers. The package is called [pslayers](https://github.com/darrynten/pslayers) and we use it in production on a few of our apps. – darryn.ten Mar 28 '18 at 22:22

4 Answers4

3

try using compositeImage method and Imagick::COMPOSITE_COPYOPACITY

Godfre
  • 41
  • 2
1

Try this code:

// x-displacement
$a3->setImageArtifact('compose:args', "312x0");
$a1->compositeImage($a3, Imagick::COMPOSITE_DISPLACE, 0, 0);

// y-displacement
$a4->setImageArtifact('compose:args', "0x26.6776");
$a1->compositeImage($a4, Imagick::COMPOSITE_DISPLACE, 0, 0); 
  • 4
    While this code snippet may be the solution, [including an explanation](//meta.stackexchange.com/questions/114762/explaining-entirely-‌​code-based-answers) really helps to improve the quality of your post. Remember that you are answering the question for readers in the future, and those people might not know the reasons for your code suggestion. – yivi Oct 26 '17 at 10:04
  • After some more tests this turned out not to be the ideal solution, as ImageMagick behaved really strange: sometimes the correct image was generated, sometimes not. I ended up with another solution which I will post as an answer. – Michael Feb 21 '19 at 12:16
1

After struggling with this I finally found a way how to do it properly with PHP-Imagick.

// merge x-displacement and y-displacement into one displacement-map
$displaceMask = new Imagick();
$displaceMask->addImage($a3);
$displaceMask->addImage($a4);
$displaceMask->flattenImages();
$displaceMask = $displaceMask->combineImages(Imagick::CHANNEL_ALL);

$displaceMask->setImageArtifact('compose:args', '312x26.6776');
$a1->compositeImage($displaceMask, Imagick::COMPOSITE_DISPLACE, 0, 0);

Resources that I used:

Michael
  • 200
  • 2
  • 10
  • 1
    Congratulations, this is the correct way to do it in Imagick. See the comment about Unified Displacement Maps at the end of the section at https://imagemagick.org/Usage/mapping/#displace_2d – fmw42 Feb 21 '19 at 17:08
  • @fmw42 It seems that with some ImageMagick/Imagick version something changed on how to apply the displacement maps. I updated ImageMagick now from 6.7.9-Q16 to 6.9.10-Q16 (I know, still not up-to-date) and Imagick from 3.2.0 to 3.4.3 then the resulting image it not a cylinder anymore. Do you have any hint what has changed? – Michael Aug 30 '19 at 04:56
  • Sorry, no. I know of no reason that the upgrade would cause an issue unless the new version of ImageMagick had a bug in that regard. Sorry, I know little about Imagick. You just need to combine the 3 images into one RGB image. X displacement into red channel, Y displacement into green channel and a black (or any) image into blue channel. But then I am not an expert on Imagick – fmw42 Aug 30 '19 at 05:28
  • @fmw42 Alright, nevertheless thanks for having a look! Btw, the "flattenImage" is needed somehow, as described here as well: https://stackoverflow.com/a/10888157/1800172 – Michael Aug 30 '19 at 05:40
  • Have you tried avoiding addImage and flatten image and just combine each of the 3 images with combineImage one channel at a time or with OR's as mentioned in the documentation? Sorry, the docs show no example and I am just guessing based upon how ImageMagick works. In other words, create a new image for each of the X,Y and black images. Then load each one into the red, green and blue channel one combineImage command at a time into the displacement image. – fmw42 Aug 30 '19 at 05:44
  • 1
    Another possible way would be to simply use composite 3 times, once for each of the X,Y,black images using copy_red, copy_green and copy_blue. So that X,Y,black are copied into the displacement image's 3 channels. – fmw42 Aug 30 '19 at 05:49
  • @fmw42 I tried a lof already, and to check where the problem is I also exported the displacement map as a PNG via the old versions, then switched to the new versions and load the displacement directly from that file. Now the displacement result looks different, but still wrong. I also compared the generated displacement maps between the versions, and the one from the new version is heavily brighter. Maybe it's a configuration issue of ImageMagick that changed the default config or something like that. – Michael Aug 30 '19 at 05:56
  • ImageMagick 6.7.9.x was during a time when RGB and SRGB and grayscale were being changed around. So I would have thought that 6.9.10.x would have been better. It could be some error in applying the displacement map. But you seem to say that the displacement image is different between the two. So perhaps there is an issue in Imagick when doing your approach. Have you tried creating the displacement map on a local system with Imagmagick and importing that into Imagick to test whether it is the creation of the displacement map or its application? – fmw42 Aug 30 '19 at 06:07
  • How are you creating the $a3 and $a4 images for the displacement map? Perhaps that is where they now differ? Can you show your full code? – fmw42 Aug 30 '19 at 06:08
  • @fmw42 I finally got the displacement map created exactly the same with this code, as you suggested: `$displaceMask->setImageColorspace(Imagick::COLORSPACE_RGB);` `$displaceMask->compositeImage($a3, imagick::COMPOSITE_COPYRED, 0, 0);` `$displaceMask->compositeImage($a4, imagick::COMPOSITE_COPYGREEN, 0, 0);` `$displaceMask->compositeImage($a4, imagick::COMPOSITE_COPYBLUE, 0, 0);` Afterwards I do the last 2 lines like in my accepted aswer above: `setImageArtifact()` and `compositeImage()` with displace operator. – Michael Aug 30 '19 at 06:29
  • Glad to hear that my copy_red, copy_green, copy_blue approach works. Perhaps you should write that up in a new post showing the full code to help others down the road. – fmw42 Aug 30 '19 at 06:34
  • @fmw42 very good idea, thanks! I created a new question with all details: https://stackoverflow.com/questions/57722353/apply-displacement-map-via-imagick-after-version-update – Michael Aug 30 '19 at 07:26
1

I do not know if this will help, but I processed your images in ImageMagick 6.9.10.62 and 6.9.10.5 Q16 Mac OSX with the same result as shown below.

So if there is an issue, it is likely with Imagick.

What was your exact version of 6.9.10.x?

convert img.png \
\( dx.png dy.png dy.png -combine \) \
-define compose:args=312x26.6776 -compose displace -composite \
result.png


enter image description here

I notice that if the same image dx is combined for dy, then I get a result similar to your bad result. That might mean that either the addImage or the flattenImage or the combineImage is not working correctly in your new Imagick.

convert img.png \
\( dx.png dx.png dy.png -combine \) \
-define compose:args=312x26.6776 -compose displace -composite \
result2.png


enter image description here

Check your code to be sure you do not have a typo using $a3, $a3, and either $a3 or $a4 for your addImage.

For a test, try PHP

exec("convert img.png \( dx.png dy.png dy.png -combine \) -define compose:args=312x26.6776 -compose displace -composite result.png")
fmw42
  • 46,825
  • 10
  • 62
  • 80
  • I tried this, and it seems to work fine via the command line, same result with both versions. I added this as 2nd Edit : https://stackoverflow.com/questions/57722353/apply-displacement-map-via-imagick-after-version-update – Michael Aug 30 '19 at 08:05
  • As an update: it's working like this, but the result is somehow pixelated. So I can't use this as a workaround so far :-( – Michael Aug 30 '19 at 10:14