I'm going to answer this the way I achieved the results you intended, but it may not be the best approach, improvements are more than welcome! I did it on a Cocoa Touch Framework subproject, but it should be easy to adapt to a Cocoa Touch Static Library, if it doesn't work already. This will be more like a tutorial than an answer, to be honest, but anyway...
First things first. Quick overview of my solution: you'll have two projects on the same workspace. One is the framework, the other one is the app itself. You'll create the xib/storyboard on the framework, and use it either on the framework or the app (although the latter doesn't make much sense to me).
The framework project will contain a build run script that will copy all it's resources (images, xibs, storyboards) to a bundle, and that bundle will be part of the app project. Also, the framework project will be a dependency of your app project. This way, whenever you compile your app, the build run script should run automatically and update the resources bundle before packaging your app.
It sure is NOT a quick & easy thing to set up, but that's why I'm answering your question. This way I'll be able to come back here myself and remember how I achieved the same goal. You never know when Alzheimer's gonna hit you :)
Anyway, let's get to work.
Create/open your app's project. I'll be referring to this as AppProject.
Create a framework/library project and add it as subproject to the AppProject, or just drag your current framework project to the AppProject. What matters here is that the framework project is a subproject of AppProject. I'll be referring to the framework project as MyFramework.
Configure whatever you need for your specific projects. I guess it's a standard thing to use linker flags -ObjC and -all_load, at least. This isn't really useful for the purpose of this mini-tutorial, but the project should at least be compiling. Your workspace should be looking something like this:

Open the AppProject folder and create a new directory called MyBundle.bundle.
Drag the MyBundle.bundle to the AppProject (this is important: you are NOT supposed to drag it to the library project!). You probably want to un-check the Copy items if needed and select/check the targets where this bundle will be copied to when compiling your app.
Leave MyBundle.bundle alone for now.
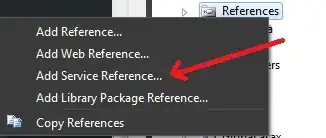
Go to MyFramework's Build Settings and add a new Run script phase.
This step might be optional, but it worked like this for me, so I'm including it. Drag the just-created Run script right above the Compile sources phase.
Edit the Run script phase, changing it's shell to /bin/sh if it's not that already. Set the script to the following (comments should explain the script):
Run script
#!/bin/bash
echo "Building assets bundle."

# Bundle name (without the ".bundle" part). I separated this because I have different app targets, each one with a different bundle.
BUNDLE_NAME='MyBundle'
CURRENT_PATH=`pwd`

# This should generate the full path to your bundle. Might need to be adapted if the bundle
# directory you created was in another directory.
BUNDLE_PATH="$CURRENT_PATH/$BUNDLE_NAME.bundle"

# Check if the bundle exists, and removes it completely if it does.
if [ -d "$BUNDLE_PATH" ]; then
    rm -rf "$BUNDLE_PATH"
fi

# Re-creates the same bundle (I know this is weird. But at least I am SURE the bundle will
# be clean for the next steps)
mkdir "$BUNDLE_PATH"

# Copy all .jpg files to the bundle
find ./ -name *.jpg -type f -print0 | xargs -0 -J% cp % "$BUNDLE_PATH"

# Copy all .png files to the bundle
find ./ -name *.png -type f -print0 | xargs -0 -J% cp % "$BUNDLE_PATH"

# Copy all .xib files to the bundle.
find ./ -name *.xib -type f -print0 | xargs -0 -J% cp % "$BUNDLE_PATH"

# Copy all .storyboard files to the bundle.
find ./ -name *.storyboard -type f -print0 | xargs -0 -J% cp % "$BUNDLE_PATH"

# This is the golden thing. iOS code will not load .xib or storyboard files, you need to compile
# them for that. That's what these loop do: they get each .xib / .storyboard file and compiles them using Xcode's
# ibtool CLI.

for f in "$BUNDLE_PATH/"*.xib ;
do
    # $f now holds the complete path and filename a .xib file
    XIB_NAME="$f";

    # Replace the ".xib" at the end of $f by ".nib"
    NIB_NAME="${f%.xib}.nib";

    # Execute the ibtool to compile the xib file
    ibtool --compile "$NIB_NAME" "$XIB_NAME"

    # Since the xib file is now useless for us, remove it.
    rm -f "$f"
done

for f in "$BUNDLE_PATH/"*.storyboard ;
do
    # $f now holds the complete path and filename a .storyboard file
    STORYBOARD_NAME="$f";

    # Replace the ".storyboard" at the end of $f by ".storyboardc" (could've just added the final "c", but I like
    # to keep both loops equal)
    COMPILED_NAME="${f%.storyboard}.storyboardc";

    # Execute the ibtool to compile the storyboard file
    ibtool --compile "$COMPILED_NAME" "$STORYBOARD_NAME"

    # Since the .storyboard file is now useless for us, remove it.
    rm -f "$f"
done
- Your workspace/settings should be looking something like this now:
- Go to AppProject
Build phases, and add your framework to the Link Binary with Libraries section. Also add the framework as the Target dependencies section.
- Everything seems to be set up. Create a xib or storyboard file on the framework project, and create the view (or view controller) just the way you usually do. Nothing special here. You can even set custom classes for your components and everything (as long as the custom class is inside the framework project, and not in the app project).
Before compiling the app project
After compiling the app project
- On your code, wherever you need to load your NIB/Xib, use one of the following codes. If you managed to follow so far, I don't even need to tell you you'll need to adapt these codes to whatever you wanna do with the xib/Storyboard, so... Enjoy :)
Registering cell xib for a UITableView:
NSString* bundlePath = [[NSBundle mainBundle] pathForResource:@"MyBundle" ofType:@"bundle"];
NSBundle* bundle = [NSBundle bundleWithPath:bundlePath];
UINib* nib = [UINib nibWithNibName:@"TestView" bundle:bundle];
[tableView registerNib:nib forCellReuseIdentifier:@"my_cell"];
Pushing a UIViewController to the navigation controller:
NSString* bundlePath = [[NSBundle mainBundle] pathForResource:@"MyBundle" ofType:@"bundle"];
NSBundle* bundle = [NSBundle bundleWithPath:bundlePath];
UIViewController* vc = [[UIViewController alloc] initWithNibName:@"BundleViewController" bundle:bundle]; // You can use your own classes instead of the default UIViewController
[navigationController pushViewController:vc animated:YES];
Presenting modally a UIStoryboard from it's initial UIViewController:
NSString* bundlePath = [[NSBundle mainBundle] pathForResource:@"MyBundle" ofType:@"bundle"];
NSBundle* bundle = [NSBundle bundleWithPath:bundlePath];
UIStoryboard* storyboard = [UIStoryboard storyboardWithName:@"BundleStoryboard" bundle:bundle];
UIViewController* vc = [storyboard instantiateInitialViewController];
vc.modalPresentationStyle = UIModalPresentationFormSheet;
vc.modalTransitionStyle = UIModalTransitionStyleCrossDissolve;
[self presentViewController:vc animated:YES completion:^{}];
If it doesn't work for you (or whoever is visiting this question/answer), please let me know and I'll try to help.