35

I've managed to add a custom font by:

  • putting *.ttf files in ProjectName/android/app/src/main/assets/fonts/ like this:

    • Open Sans.ttf
    • Open Sans_italic.ttf
    • Open Sans_bold.ttf
    • Open Sans_bold_italic.ttf
  • and setting font family by fontFamily: "Open Sans"

But there are extra font weights I want to use like 'Semi Bold', 'Extra Bold'. I tried adding them as 'Open Sans_900.ttf' and setting fontWeight: 900 but that didn't work, it displayed bold version of the font.

Is there a way to add these additional font weights?

Gokhan Sari
  • 7,185
  • 5
  • 34
  • 32
  • Would you mind mark this answer? https://stackoverflow.com/a/70247374/2779871 AFAIK, it is the only one which properly matches your requirements. – Jules Sam. Randolph Dec 07 '21 at 15:54

6 Answers6

66

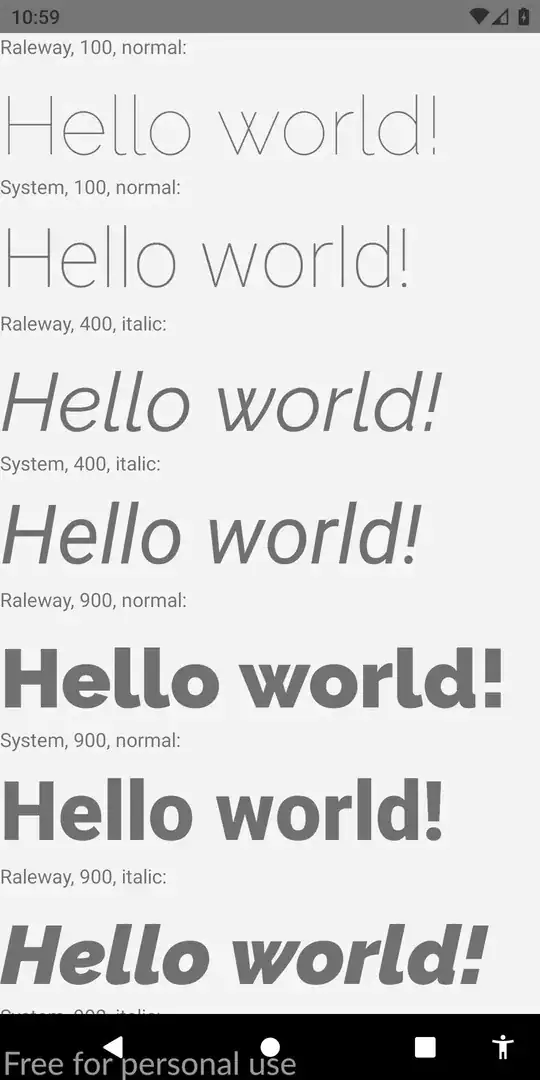
Other answers are outdated. Since React Native 0.66.0 (tested with RN 0.66.3), it is absolutely feasible! The solution is to use XML Fonts feature for Android. I have written a complete guide here for a consistent typeface multi-platform experience. This post focuses on the Android side. Result:

Remark: This procedure is available in React Native since commit fd6386a07eb75a8ec16b1384a3e5827dea520b64 (7 May 2019 ), with the addition of ReactFontManager::addCustomFont method.

I will use Raleway for this example, but this method should work with any font family! I am assuming that you have the whole Raleway font family TTF files, extracted in a temporary folder, /tmp/raleway. That is:

  • Raleway-Thin.ttf (100)
  • Raleway-ThinItalic.ttf
  • Raleway-ExtraLight.ttf (200)
  • Raleway-ExtraLightItalic.ttf
  • Raleway-Light.ttf (300)
  • Raleway-LightItalic.ttf
  • Raleway-Regular.ttf (400)
  • Raleway-Italic.ttf
  • Raleway-Medium.ttf (500)
  • Raleway-MediumItalic.ttf
  • Raleway-SemiBold.ttf (600)
  • Raleway-SemiBoldItalic.ttf
  • Raleway-Bold.ttf (700)
  • Raleway-BoldItalic.ttf
  • Raleway-ExtraBold.ttf (800)
  • Raleway-ExtraBoldItalic.ttf
  • Raleway-Black.ttf (900)
  • Raleway-BlackItalic.ttf

0. Find the exact font family name

You will need otfinfo installed in your system to perform this step. It is shipped with many Linux distributions. On MacOS, install it via lcdf-typetools brew package.

otfinfo --family Raleway-Regular.ttf

Should print "Raleway". This value must be retained for later. This name will be used in React fontFamily style.

1. Copy and rename assets to the resource font folder

mkdir android/app/src/main/res/font
cp /tmp/raleway/*.ttf android/app/src/main/res/font

We must rename the font files following these rules to comply with Android asset names restrictions:

  • Replace - with _;
  • Replace any uppercase letter with its lowercase counterpart.

You can use the below bash script (make sure you give the font folder as first argument):

#!/bin/bash
# fixfonts.sh

typeset folder="$1"
if [[ -d "$folder" && ! -z "$folder" ]]; then
  pushd "$folder";
  for file in *.ttf; do
    typeset normalized="${file//-/_}";
    normalized="${normalized,,}";
    mv "$file" "$normalized"
  done
  popd
fi
./fixfonts.sh /path/to/root/FontDemo/android/app/src/main/res/font

2. Create the definition file

Create the android/app/src/main/res/font/raleway.xml file with the below content. Basically, we must create one entry per fontStyle / fontWeight combination we wish to support, and register the corresponding asset name.

<?xml version="1.0" encoding="utf-8"?>
<font-family xmlns:app="http://schemas.android.com/apk/res-auto">
    <font app:fontStyle="normal" app:fontWeight="100" app:font="@font/raleway_thin" />
    <font app:fontStyle="italic" app:fontWeight="100" app:font="@font/raleway_thinitalic"/>
    <font app:fontStyle="normal" app:fontWeight="200" app:font="@font/raleway_extralight" />
    <font app:fontStyle="italic" app:fontWeight="200" app:font="@font/raleway_extralightitalic"/>
    <font app:fontStyle="normal" app:fontWeight="300" app:font="@font/raleway_light" />
    <font app:fontStyle="italic" app:fontWeight="300" app:font="@font/raleway_lightitalic"/>
    <font app:fontStyle="normal" app:fontWeight="400" app:font="@font/raleway_regular" />
    <font app:fontStyle="italic" app:fontWeight="400" app:font="@font/raleway_italic"/>
    <font app:fontStyle="normal" app:fontWeight="500" app:font="@font/raleway_medium" />
    <font app:fontStyle="italic" app:fontWeight="500" app:font="@font/raleway_mediumitalic"/>
    <font app:fontStyle="normal" app:fontWeight="600" app:font="@font/raleway_semibold" />
    <font app:fontStyle="italic" app:fontWeight="600" app:font="@font/raleway_semibolditalic"/>
    <font app:fontStyle="normal" app:fontWeight="700" app:font="@font/raleway_bold" />
    <font app:fontStyle="italic" app:fontWeight="700" app:font="@font/raleway_bolditalic"/>
    <font app:fontStyle="normal" app:fontWeight="800" app:font="@font/raleway_extrabold" />
    <font app:fontStyle="italic" app:fontWeight="800" app:font="@font/raleway_extrabolditalic"/>
    <font app:fontStyle="normal" app:fontWeight="900" app:font="@font/raleway_black" />
    <font app:fontStyle="italic" app:fontWeight="900" app:font="@font/raleway_blackitalic"/>
</font-family>

3. Register the new font

In android/app/src/main/java/com/fontdemo/MainApplication.java, bind the font family name with the asset we just created inside onCreate method.

⚠️ If you are registering a different font, make sure you replace "Raleway" with the name found in the former step (find font family name).


// Add this!
import com.facebook.react.views.text.ReactFontManager;

public class MainApplication extends Application implements ReactApplication {

  // ...
  @Override
  public void onCreate() {
     super.onCreate();
     // And that line! Note that "raleway" in R.font.raleway must be the name of
     // the XML file.
     ReactFontManager.getInstance().addCustomFont(this, "Raleway", R.font.raleway);
   }
  // ...
}

4. Enjoy!

You can now render

<Text style={{ fontFamily: "Raleway", fontStyle: "italic", fontWeight: "900" }}>
  Hello world!
</Text>

on both Android and iOS (given you link assets with the CLI, see this document for the iOS side).

Community
  • 1
  • 1
Jules Sam. Randolph
  • 3,610
  • 2
  • 31
  • 50
  • I have followed all step but getting error on MainApplication.java ``` error: cannot find symbol ReactFontManager.getInstance().addCustomFont(this, "Raleway", R.font.raleway); ^ symbol: variable font location: class R ``` – Dhiroo Verma Mar 20 '22 at 16:58
  • Did you import `ReactFontManager`? – Jules Sam. Randolph Mar 21 '22 at 09:20
  • Yes I have imported import com.facebook.react.views.text.ReactFontManager; ""it is showing error on R"" – Dhiroo Verma Mar 21 '22 at 09:23
  • You could try a gradlew clean (https://stackoverflow.com/q/17054000/2779871); if that doesn't work, take a look at the referred repository and try to hunt for differences https://github.com/jsamr/react-native-font-demo – Jules Sam. Randolph Mar 21 '22 at 12:51
  • Thanks for your response Jules. Actually We are using RN 0.64.2 version thats why it is not working. If you got any solution for this version please add comment. – Dhiroo Verma Mar 22 '22 at 08:40
  • Thanks for letting me know; I've edited the answer to stress it has been tested with RN 0.66.3. – Jules Sam. Randolph Mar 22 '22 at 13:05
  • Awesome instructions! This worked for me perfectly. – v_nomad Mar 31 '22 at 13:34
  • Hey. Sounds good. But what about variable fonts (provided by Google Fonts, for example)? – Stafox Jul 15 '22 at 10:09
  • "But what about variable fonts (provided by Google Fonts, for example)?" - I've just made this work with WorkSans. @JulesSam.Randolph It took me a bit of tinkering around to figure out that "raleway" in `R.font.raleway` is actually the filename for the xml spec. Would be nice to have that added to the answer. – arinray Feb 27 '23 at 16:38
  • At the time of this comment, this is clearly the way to go. Implemented on RN 0.72 and it works like a charm. – c4k Jul 19 '23 at 13:34
60

The out of the box support for custom fonts on Android is a little limited in React Native. It does not support font weights other than normal and bold (it also supports the italic fontStyle). If you want other custom weights, you must add them as separate fonts with a different name (as David mentioned in his answer).

The only font files that RN will find are of the following format:

  • {fontFamilyName}
  • {fontFamilyName}_bold
  • {fontFamilyName}_italic
  • {fontFamilyName}_bold_italic

Supported extensions: .ttf and .otf

This really isn't documented anywhere (that I know of), but you can read the Font Manager code here: https://github.com/facebook/react-native/blob/master/ReactAndroid/src/main/java/com/facebook/react/views/text/ReactFontManager.java

Dan Horrigan
  • 1,275
  • 7
  • 8
13

Android has limitation for using fontWeight property even if you tried

{ fontFamily: 'fontFamily-bold', fontWeight: 'bold' }

It will not show font correctly, you will need to remove fontWeight to make it work.

My solution for that is to depend on platform.OS property:

import { Platform, ... } from 'react-native';

const styles = StyleSheet.create({
   text: {
     fontFamily: 'fontFamily',
     color: '#336666',
     backgroundColor: 'transparent',
   },
   bold: Platform.OS === 'ios' ? {
     fontFamily: 'fontFamily',
     fontWeight: 'bold'
   } : {
    fontFamily: 'fontFamily-bold'
   },
});

In render section:

<Text style={[styles.text, styles.bold]}>My bold text</Text>

It will works on both iOS and Android

Belal mazlom
  • 1,790
  • 20
  • 25
3

I ran into the same problem and had to make "new fonts" out of the font weight files (as it works by the font name not the file name)

Using something like FontForge - load the font weight file (e.g.Open Sans_bold.ttf) and rename it to "Open Sans Bold" (the actual name not the filename) and then use that as the fontFamily in react-native (obviously attach that font to your project) So you will have 2 font files: "Open Sans" and "Open Sans Bold"

Hope this helps!

David
  • 7,395
  • 5
  • 29
  • 45
1

Here are my recommendation:

In your assets/fonts/, you place the following files:

  • YourFont-Regular.tff
  • YourFont-Bold.tff

react-native link it by

package.json

“rnpm”: {
   “assets”: [“./assets/fonts/”]
}

In your styles, you do:

const styles = StyleSheet.create({
  text: {
    fontFamily: 'YourFont-Regular',
    color: '#336666',
    backgroundColor: 'transparent',
    },
  bold: {
    fontFamily: 'YourFont-Bold',
    },
  })

Then, in your render it like this:

<Text style={[styles.text, bold]}>Hello World</Text>

This approach will work on both Android and iOS.

Norfeldt
  • 8,272
  • 23
  • 96
  • 152
0

I created a custom component to translate the font weights into the font family with an affix. It probably looks a bit dumb to list all the fonts rather than using Object.entries()...map(), but I believe keeping static style entries could allow StyleSheet to properly refer to the styles using an ID, as they are used frequently.

const Typography = {
  primary: 'Inter-Regular',
  thin: 'Inter-Thin',
  extraLight: 'Inter-ExtraLight',
  light: 'Inter-Light',
  medium: 'Inter-Medium',
  semiBold: 'Inter-SemiBold',
  bold: 'Inter-Bold',
  extraBold: 'Inter-ExtraBold',
  black: 'Inter-Black',
};

export default Typography;

export function StyledText(props: TextProps & { children?: ReactNode }) {
  const { style, ...others } = props;
  if (!style) {
    return <Text {...props} />;
  }

  const { fontWeight } = StyleSheet.flatten(style);
  if (!fontWeight) {
    return <Text {...props} />;
  }

  let weightedFontFamily: StyleProp<TextStyle> | undefined;

  switch (fontWeight) {
    case '100':
      weightedFontFamily = styles.thin;
      break;
    case '200':
      weightedFontFamily = styles.extraLight;
      break;
    case '300':
      weightedFontFamily = styles.light;
      break;
    case '500':
      weightedFontFamily = styles.medium;
      break;
    case '600':
      weightedFontFamily = styles.semiBold;
      break;
    case 'bold':
    case '700':
      weightedFontFamily = styles.bold;
      break;
    case '800':
      weightedFontFamily = styles.extraBold;
      break;
    case '900':
      weightedFontFamily = styles.black;
      break;
    default:
      weightedFontFamily = styles.regular;
  }

  return <Text style={[style, weightedFontFamily]} {...others} />;
}

const styles = StyleSheet.create({
  regular: { fontFamily: Typography.primary },
  thin: { fontFamily: Typography.thin },
  extraLight: { fontFamily: Typography.extraLight },
  light: { fontFamily: Typography.light },
  medium: { fontFamily: Typography.medium },
  semiBold: { fontFamily: Typography.semiBold },
  bold: { fontFamily: Typography.bold },
  extraBold: { fontFamily: Typography.extraBold },
  black: { fontFamily: Typography.black },
});

Because I am using only one font family throughour the app, I didn't take the fontFamily into consideration. If you have multiple fonts, you will have to get fontFamily from the style, but also get the fontFamily from the theme, since it may be inherited.

Serena Yu
  • 117
  • 2
  • 3