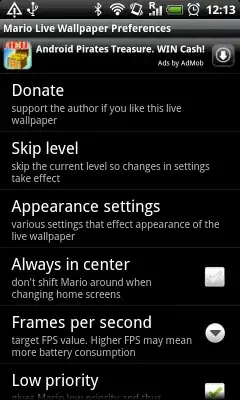
For those wondering how to implement this with a PreferenceFragment, here is a solution, there is no need to create a custom Preference:
First create a new layout (here named settings.xml in the layout resources folder) that will be inflated in the PreferenceFragment:
<?xml version="1.0" encoding="utf-8"?>
<RelativeLayout xmlns:android="http://schemas.android.com/apk/res/android"
                android:layout_height="match_parent"
                android:layout_width="match_parent">

    <com.google.android.gms.ads.AdView
            xmlns:ads="http://schemas.android.com/apk/res-auto"
            android:id="@+id/adview"
            android:layout_width="match_parent"
            android:layout_height="wrap_content"
            ads:adUnitId="XXXXX"
            ads:adSize="SMART_BANNER"
            android:layout_alignParentTop="true" />

    <ListView android:id="@android:id/list"
        android:layout_width="match_parent"
        android:layout_height="wrap_content"
        android:layout_below="@id/adview" />

</RelativeLayout>
Then, use this layout in the PreferenceFragment, load it in the onCreateView method:
private AdView adView;
@Override
    public View onCreateView(LayoutInflater inflater, ViewGroup container, Bundle savedInstanceState) {
        View v = inflater.inflate(R.layout.settings, null);

        adView = (AdView)v.findViewById(R.id.adview);

        //** Adview */
        if(Tools.isNetworkConnected(getActivity())){
            adView.setVisibility(View.VISIBLE);
        }
        else{
            adView.setVisibility(View.GONE);
        }

        //Create ad banner request
        AdRequest adBannerRequest = new AdRequest.Builder()
//      .addTestDevice(AdRequest.DEVICE_ID_EMULATOR)
//      .addTestDevice("XXXXX")
        .build();

        // Begin loading banner
        adView.loadAd(adBannerRequest);

        return v;
    }
Don't forget to add the following code for the new version of Admob using Google Play services:
@Override
    public void onResume() {
        super.onResume();
        if(adView != null){
            adView.resume();
        }
    }

    @Override
    public void onPause() {
        if(adView != null){
            adView.pause();
        }
        super.onPause();
    }

    @Override
    public void onDestroy() {
        if(adView != null){
            adView.destroy();
        }
        super.onDestroy();
    }
