127

We have a project set up with maven for resolving dependancies. It usually works fine, but now I am trying to compile and run it on a new PC and I have problem with missing dependencies in Eclipse.

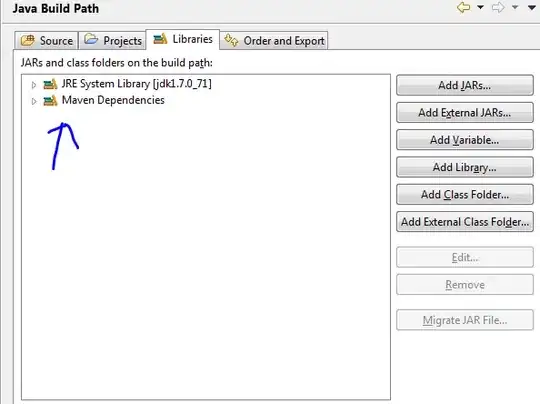
What is funny is that if I run "mvn package" in console or in eclipse, it works fine and even produces war containing all necessary jars. Only Eclipse complains with "The project was not built since its build path is incomplete. Cannot find the class file for org.slf4j.Logger...". If I compare the project with some other computer (where project works fine), I notice that there are quite a few libraries missing under "Maven dependencies" listing in Eclipse. Eventhough they are in the packaged war and they can be found also under repository folder.

So, the jar-s are there just Eclipse won't list them all under "Maven dependencies". What can I do?

Computer is running on Windows 7 with 64bit java & eclipse.

Sean Patrick Floyd
  • 292,901
  • 67
  • 465
  • 588
hostnik
  • 2,583
  • 2
  • 17
  • 15
  • Is it a scope issue like in http://jira.codehaus.org/browse/MNG-2045? – VonC Nov 24 '10 at 05:11
  • 1
    This isn't worth posting an answer, but for anyone reading this in the future, it seems you need to type at least three characters without wildcards. Eg typing "t" or "to" won't show any results, but "tom" will. Believe it or not, I spent about an hour searching for different reasons before realising this. – Chris Neve Sep 18 '15 at 11:43

50 Answers50

141

Well, I tried everything posted here, unfortunately nothings works in my case. So, trying different combinations I came out with this one that solved my problem.

1) Open the .classpath file at the root of your eclipse's project.

2) Insert the following entry to the file:

<classpathentry kind="con" path="org.eclipse.m2e.MAVEN2_CLASSPATH_CONTAINER">
        <attributes>
            <attribute name="maven.pomderived" value="true"/>
            <attribute name="org.eclipse.jst.component.nondependency" value=""/>
        </attributes>
</classpathentry> 

Then, rebuild your project at eclipse (Project->Clean-Build). You now can check at the Java Build Path of you project at the Libraries tab the Maven Dependencies included: enter image description here

Ualter Jr.
  • 2,320
  • 1
  • 25
  • 28
  • 3
    This is the first thing everyone should try. Open the .classpath file that will be in your project directory with notepad and add the lines mentioned and refresh your project. – Amit Kumar Oct 06 '15 at 14:09
  • 12
    This worked where everything else failed. But do i have to do this for every project i create? Why doesnt it work automatically? What is the real problem? – yeaaaahhhh..hamf hamf Dec 11 '15 at 11:27
  • Sigh, this is still broken in m2e 1.6.2.20150902-002. Tested with a fresh vanilla Eclipse install on Mac OS X / JDK 1.8. Eclipse IDE for Java Developers Version: Mars.2 Release (4.5.2) Build id: 20160218-0600 I wonder if this plugin requires Eclipse Java EE to work properly? – Mat Gessel May 05 '16 at 01:32
  • 1
    this answer should be the first one. The only one which worked ;-) thx – Manuel Manhart Jun 16 '16 at 16:37
  • 1
    Magic! still valid for Eclipse 4.4.2 – versvs Oct 04 '17 at 13:49
  • This messes up workspace in newer version of eclipse. Next time when I open eclipse it gives error in '.metadata' dir and eclipse fails to open. – nir Mar 05 '18 at 22:38
  • It works, but, why doesn't eclipse do this by itself any longer? – user3289695 Jan 28 '19 at 09:29
  • It worked for me but still the jars are missing. showing with red color cross – Vanaja Jayaraman Oct 25 '19 at 05:05
  • This works for me. What I have inserted to .classpath file is:
    – chance May 14 '20 at 13:39
  • finally this worked for me.. all the other answers just wasted my time – strash Jan 20 '21 at 08:51
99

Problem solved!

I don't know what exactly solved it, but I did 4 things in Eclipse:

  • Window->Preferences: Maven->Installations: Global settings -> open file and hardcoded localRepository
  • Project->Clean
  • right click on project: Maven->Update dependencies
  • right click on project: Maven->Update project configuration

I guess it was the Update dependencies since right after first two there were no change.

Sean Patrick Floyd
  • 292,901
  • 67
  • 465
  • 588
hostnik
  • 2,583
  • 2
  • 17
  • 15
  • Project -> clean usually does the job in cases like this, but sometimes you also have to do `mvn test-compile` (or something similar) on the shell – Sean Patrick Floyd Nov 24 '10 at 09:08
  • 2
    I know "Project->Clean" and I've tried it, but it didn't help at first. – hostnik Nov 27 '10 at 12:10
  • 8
    It was the last point. Update project configuration will add a "Maven Dependencies" library to your project. – Eduard Wirch Aug 30 '11 at 16:40
  • 2
    FYI, I first had to right click on my project, go to Configure and "Convert to Maven project." – duma Jul 24 '14 at 16:10
  • 2
    Expanding on Eduard Wirch's answer, I also had to check the "Force Update of Snapshots/Releases" box found at Maven->Update Project... window. My missing artifact was a Snapshot and somehow wasn't updating well without forcing it. – evaldeslacasa Jul 10 '15 at 14:44
  • 1
    I had to change the User Settings 'settings.xml' to be the one under my '.m2' directory. It was previously set to one under the Maven install dir. – Jack Straw Feb 23 '18 at 01:57
  • I don't see `Maven -> Update project dependencies` at my end. I tried all steps but the folder `Maven Dependencies` is still hidden. Please help. – tarekahf Nov 29 '22 at 19:52
41

I'm also new to Eclipse, and I've been having a similar problem where Eclipse just won't recognize an import statement, even though all signs point to the dependency having been successfully downloaded.

You should check that your dependency file has actually been downloaded by going to the command line and typing

mvn dependency:tree

If you see your package there, then but Eclipse doesn't acknowledge it, the thing that works for me (sometimes) is to go to the terminal, cd into the project folder, and type

mvn eclipse:clean then mvn eclipse:eclipse

Finally refresh project in eclipse

I don't know why this works, and sometimes it doesn't work once, then doing it again does work... so worth a try!

seoservice.ch
  • 330
  • 2
  • 9
rogueleaderr
  • 4,671
  • 2
  • 33
  • 40
  • This pointed me in the correct direction by showing me that there were issues with my settings.xml file! Thank you, @rogueleaderr! – cjones26 Oct 04 '17 at 15:16
  • yeah, it worked for my friend, solved all her problems and headaches. Unfortunately didn't work for me. – Zack Zilic Feb 21 '18 at 08:09
  • It worked for me too but could someone explain what has happen behind the scene?? – Indrajeet Gour Jul 20 '19 at 12:16
  • Working for me. Perfect fix. – Ramaraj Karuppusamy Aug 18 '20 at 04:33
  • Worked well for me! – Abdollah Sep 14 '21 at 03:38
  • What a pain! Every time I import this project to a new VM I have issues with Eclipse/Maven and I don't think the same solution has worked 3 times. Luckily for me, this one has worked this time. Thanks! I'll add it to my list of possible solutions, which is ever growing :-/ – camria Sep 16 '21 at 16:56
  • Worth noting: this has removed the Maven nature of my project. So, after the above is done, also right-click on the project -> Configure -> Convert to Maven Project; then, right-click again on the project -> Maven -> Update Project... – camria Sep 16 '21 at 17:07
36

I had this issue for dependencies that were created in other projects. Downloaded thirdparty dependencies showed up fine in the build path, but not a library that I had created.

SOLUTION: In the project that is not building correctly,

  • Right-click on the project and choose Properties, and then Maven.

  • Uncheck the box labeled "Resolve dependencies from Workspace projects"

  • Hit Apply, and then OK.

  • Right-click again on your project and do a Maven->Update Snapshots (or Update Dependencies)

And your errors should go away when your project rebuilds (automatically if you have auto-build enabled).

Priyantha
  • 4,839
  • 6
  • 26
  • 46
IceBox13
  • 1,338
  • 1
  • 14
  • 21
  • Thanks, that resolved my issue. Seems to point to it being an Eclipse bug. – Scott McIntyre Apr 01 '15 at 18:37
  • 1
    Hey, there is no such thing as Maven->Update Snapshots (or Update Dependencies). If I go right click, there is no Maven option? Where is located what you described? I'm looking but can't find description after you hit Apply – DarioBB May 27 '16 at 07:35
  • 1
    @DarioBB This answer is nearly 5 years old. I haven't worked in Eclipse for well over a year. I have no idea if this option is still available or not. I may not be in the most recent version. – IceBox13 May 27 '16 at 14:45
  • 2
    This solution worked for me in Eclipse neon. Do Maven > Update Project (not Update Snapshots) afterwards. – Ivana May 04 '18 at 11:48
33

My Project was just screwed up. Here is how I fixed it for Eclipse Indigo x64 (J2EE 3.7.3):

  1. Deleted my POM file (backedup of course).
  2. Project Context Menu > Maven > Disable Maven Nature.
  3. Deleted the project (but not contents on disk).
  4. Re-imported as Import > General > Existing Project.
  5. Project Context Menu > Configure > Convert to Maven Project....
  6. Accept defaults from Maven wizard.
  7. Overwrite POM with your backedup POM. (Now you have Maven Dependencies folder).
  8. Maven Update/Clean for good measure.

Hope that helps someone. :)

Joseph Lust
  • 19,340
  • 7
  • 85
  • 83
  • This helps me! I don't know what's wrong, but I'm using 64-bit Juno / Springsource 3 and it always fails to import my Maven projects correctly. If I check out as a regular project, rename my POM, then follow your directions from step 5 onward, it works. Otherwise, nothing I try will get the Maven dependencies added to my project aside from command-line `mvn eclipse:eclipse` which is just awful. – ngreen Sep 29 '12 at 19:05
  • I did this but I still have not the maven dependencies folder. Here is my pom.xml file and I think it is why I have this problem: ` 4.0.0 antlr.tuto.calco CalculatriceAntlr 0.0.1-SNAPSHOT ` – Anatch Mar 24 '15 at 16:33
  • I really dont know where is the problem but I have follow above steps and its working really fine. It causes error like class not found, xml dtd not found. But now it is resolved. Thanks Buddy. Upvote. – Sagar007 Mar 14 '17 at 06:30
  • This works for me. Thanks a lot, you save me a ton of time – Minh Kha Dec 06 '22 at 08:21
13

Well, I tried everything posted here, unfortunately nothings works in my case. So, trying different combinations I came out with this one that solved my problem.

1) Open the .classpath file at the root of your eclipse's project.

2) Insert the following entry to the file:

<classpathentry kind="con" path="org.eclipse.m2e.MAVEN2_CLASSPATH_CONTAINER">
        <attributes>
            <attribute name="maven.pomderived" value="true"/>
            <attribute name="org.eclipse.jst.component.nondependency" value=""/>
        </attributes>
</classpathentry> 

Then, rebuild your project at eclipse (Project->Clean-Build).

Ualter Jr.
  • 2,320
  • 1
  • 25
  • 28
  • Thanks! this solution worked best for me, just one correction tough, I had to close and reopen the project. – Tarun Gupta Aug 24 '18 at 10:06
  • Wonderful. This worked for me as well. In my project, I couldn't see maven dependencies. Now visible and added to build-path as well. Thanks! – Tahir Mehmood Oct 15 '18 at 07:01
7

For me the problem was maven couldn't find the settings.xml file which is located in myMavenFolder\conf.

What I did to fix the issue was to select the right location of the settings.xml file from eclipse:
Window -> Preferences -> Maven -> User Settings

Finally, hit apply and update your project

I. YOCK
  • 305
  • 1
  • 3
  • 9
7

Just in case anybody has tried all the other options and you are still stuck, try right-clicking on the project folder, head over to Maven option and click the "add dependency" button. For some reason Eclipse isn't updating the dependencies manually from the pom.xml at first try.

screen shot of menu selection

ale
  • 6,369
  • 7
  • 55
  • 65
FrankDupree
  • 209
  • 3
  • 12
6

I had a similar problem. I solved it by running the Maven->Update Project Configuration action

Chris Gerken
  • 16,221
  • 6
  • 44
  • 59
Darryl Sibeon
  • 61
  • 1
  • 1
4

So I'm about 4 or 5 years late to this party, but I had this issue after pulling from our repo, and none of the other solutions from this thread worked out in my case to get rid of these warnings/errors.

This worked for me:

From Eclipse go to to Window -> Preferences -> Maven (expand) -> Errors/Warnings. The last option reads "Plugin execution not covered by lifecycle configuration" - use the drop-down menu for this option and toggle "Ignore", then Apply, then OK. (At "Requires updating Maven Projects" prompt say OK).

Further Info:

This may not necessarily "fix" the underlying issue(s), and may not qualify as "best practice" by some, however it should remove/supress these warnings from appearing in Eclipse and let you move forward at least. Specifically - I was working with Eclipse Luna Service Release 1 (4.4.1) w/ Spring Dashboard & Spring IDE Core (3.6.3), and m2e (1.5) installed, running on Arch Linux and OpenJDK 1.7. I imported my project as an existing maven project and selected OK when warned about existing warnings/errors (to deal with them later).

Suppress/Remove "Plugin Execution not covered..." warnings Eclipse-Maven

(Sorry, I'm not a designer, but added picture for clarity.)

Brandon K
  • 751
  • 1
  • 4
  • 12
4

For the following steps worked in my case:

1 On eclipse, right click on the desired project Maven -> Disable Maven Nature

2 Right click again then go to Properties. Delete every evidence of external Maven dependency leaving only JRE System Library.

3 Right click one more time on the project then go to Configure -> Convert to Maven Project

3

None of the solutions above worked for me, so this answer is for anyone else in my situation. I eventually found the problem myself, and a different solution. The pom.xml file contained a dependencyManagement tag that wrapped the dependencies, and M2Eclipse would not add the Maven Dependencies folder when this was present. So, I removed this tag, then carried out the solution offered by Ualter Jr., and Eclipse immediately added the missing folder!

Paul Crease
  • 150
  • 5
3

Here is the steps which i followed.
1. Deleted maven project from eclipse.
2. Deleted all the file(.setting/.classpath/target) other than src and pom from my source folder.
3. imported again as a maven project
4. build it again, you should be able to see maven dependencies.

karuna nidhan
  • 41
  • 1
  • 4
2

This is how I solved it

  • Window->Preferences: Maven->User Settings (Click on "open file" in resulting window, or just edit settings.xml with an external text editor like Notepad) Make sure localRepository (which is displayed in this window) is correct. I had a typo in my file.
  • Once you have corrected settings.xml, click on Update Settings, which is on this same Preferences->Maven->User Settings screen.

Now rebuild, and it will install the latest JAR's in the correct location.

guyland123
  • 841
  • 9
  • 4
2

My answer is similar to that of @JerylCook: find another .classpath file in a working Maven project, edit your bad ones as that good working ones. The key is to add

<attributes>
    <attribute name="maven.pomderived" value="true"/>
</attributes>

in every <classpathentry> of type con and src. Don't forget to change <classpathentry .... /> to <classpathentry ...>xxx</classpathentry>.

At last, update the maven project and reinstall/rebuild in maven.

WesternGun
  • 11,303
  • 6
  • 88
  • 157
2

I got this error when had an error in Pom.

  1. Run mvn eclipse:eclipse command on console to check that pom is parsable or not.
  2. If not parsable search for the error.
slfan
  • 8,950
  • 115
  • 65
  • 78
Ahmed Bilal
  • 137
  • 2
  • 11
  • I am running under cygwin, I noticed that only this project was not building under eclipse, though I got successful build (with mvn) on the command line. After running `mvn eclipse:eclipse` all the dependencies were added to the classpath in the eclipse project and the project looked fine. ++ – Bill Naylor Nov 05 '19 at 08:45
  • Keep in mind that "Project files created with the maven-eclipse-plugin are not supported in M2Eclipse". – Cromax Dec 20 '20 at 12:58
1

If you have "nested paths" errors after performing Maven -> Update Project Configuration (or in Juno it's "Update Configuration...") then your build path is misconfigured.

Right-click project -> Build Path -> Configure Build Path

Ensure that only '/src' and directories at that level are included. If you have e.g. '/src' and also '/src/main/resources' present, this is incorrect. The second resource ('/src/main/resources') is "nested" under the first ('/src') which is causing your inability to import resources, since it prevents eclipse from seeing maven dependencies.

KomodoDave
  • 7,239
  • 10
  • 60
  • 92
1

My issue sounds similar so I'll add to the discussion. I had cancelled the import of an existing maven project into Eclipse which resulted in it not being allowed to Update and wouldn't properly finish the Work Space building.

What I had to do to resolve it was select Run As... -> Maven build... and under Goals I entered dependency:go-offline and ran that.

Then I right clicked the project and selected Maven -> Update Project... and updated that specific project.

This finally allowed it to create the source folders and finish the import.

Welsh
  • 5,138
  • 3
  • 29
  • 43
1

I could solve the error by 1) Right click (your maven project) -> maven -> maven install

After successful installation

2) Right click (your maven project) -> maven -> update project. And the whole error of maven got solved!

1

For me it was sufficient add a buildCommand (org.eclipse.m2e.core.maven2Builder) and a nature (org.eclipse.m2e.core.maven2Nature) in the .project file, like this:

<?xml version="1.0" encoding="UTF-8"?>
<projectDescription>
    <name>iText</name>
    <comment></comment>
    <projects>
    </projects>
    <buildSpec>
        <buildCommand>
            <name>org.eclipse.jdt.core.javabuilder</name>
            <arguments>
            </arguments>
        </buildCommand>
        <buildCommand>
            <name>org.eclipse.m2e.core.maven2Builder</name>
            <arguments>
            </arguments>
        </buildCommand>
    </buildSpec>
    <natures>
        <nature>org.eclipse.jdt.core.javanature</nature>
        <nature>org.eclipse.m2e.core.maven2Nature</nature>
    </natures>
</projectDescription>

and I had enter image description here

Frizz1977
  • 1,121
  • 13
  • 21
1

I had a similar issue and have tried all the answers in this post. The closest I had come to resolving this issue was by combining the Joseph Lust and Paul Crease solutions. I added the backed up pom.xml file after deleting and reimporting the project, and nothing showed up until I deleted the dependency management tag in the pom.xml and magically the dependencies folder was there.

However, it broke up the child POM's since they need the parent pom.xml dependency management to function, and as a result my MVN was not functioning properly on the project either from Eclipse or the command line, giving a broken pom.xml error.

The last solution if all fails, is to manually import the .jar files needed by your project. Right click the project Properties -> Java Build Path -> Libraries and Add external Jar.

If your MVN is working correctly from the command line and you have done a successful build on the project, you will have all the repos needed in your .m2/repository folder. Add all the external jars mentioned in your dependencies tag of pom.xml and you will see a referenced library section in your Eclipse, with all the pesky red errors gone.

This is not the optimal solution, but it will let you work in Eclipse without any errors of missing dependencies, and also allow you to build the Maven project both from Eclipse and command line.

Mogsdad
  • 44,709
  • 21
  • 151
  • 275
Saad
  • 915
  • 9
  • 19
1

This same problem happened to me, and it was because there an error in downloading a jar due to repo issues, indicated by a red flag in the pom.xml.

I added another repository so the red flag in the pom.xml disappeared and Eclipse then loaded the pom again, resolved its issue and listed the maven dependencies in Project Explorer. it sounds simple and obvious to resolve visible issues, but since Eclipse was quite happy to run maven, and build successfully, it was not obvious that the red flag and repo issue were at the root of its unwillingness to parse the pom and list the maven dependencies

James Monger
  • 10,181
  • 7
  • 62
  • 98
bigbadmouse
  • 216
  • 1
  • 11
1
mvn eclipse:clean

then from eclipse: "Maven Update Project" does the trick!

1

update the .classpath to below will work every time.

<?xml version="1.0" encoding="UTF-8"?>
<classpath>
    <classpathentry kind="src" output="target/classes" path="src/main/java">
        <attributes>
            <attribute name="optional" value="true"/>
            <attribute name="maven.pomderived" value="true"/>
        </attributes>
    </classpathentry>
    <classpathentry kind="src" output="target/test-classes" path="src/test/java">
        <attributes>
            <attribute name="optional" value="true"/>
            <attribute name="maven.pomderived" value="true"/>
        </attributes>
    </classpathentry>
    <classpathentry excluding="**" kind="src" output="target/test-classes" path="src/test/resources">
        <attributes>
            <attribute name="maven.pomderived" value="true"/>
        </attributes>
    </classpathentry>
    <classpathentry excluding="**" kind="src" output="target/classes" path="src/main/resources">
        <attributes>
            <attribute name="maven.pomderived" value="true"/>
        </attributes>
    </classpathentry>
    <classpathentry excluding="WEB-INF/" kind="src" path="src/main/webapp"/>
    <classpathentry kind="con" path="org.eclipse.m2e.MAVEN2_CLASSPATH_CONTAINER">
        <attributes>
            <attribute name="maven.pomderived" value="true"/>
            <attribute name="org.eclipse.jst.component.dependency" value="/WEB-INF/lib"/>
        </attributes>
    </classpathentry>
    <classpathentry kind="con" path="org.eclipse.jdt.launching.JRE_CONTAINER"/>
    <classpathentry kind="output" path="target/classes"/>
</classpath>
Jeryl Cook
  • 989
  • 17
  • 40
1

All of the above did not work for me. To fix just delete the repository folder under .m2 and then do a maven update from eclipse.

D M
  • 300
  • 5
  • 16
Khalid Abdlqader
  • 311
  • 4
  • 11
1

Maven Dependencies: What solved it for me in Eclipse? I added the dependency in the "pom" file. I did a build, but could not see the Maven Dependency in the Eclipse. Next Step: Closed the project. Then Reopened the project. I could see the Maven dependencies.

1

I experienced a similar problem lately after i created a maven project, the maven dependencies folder did not appear in the project structure.To solve this simply add any dependency in the pom file, such as in code below, or right-click on the project and go to maven and select add dependency, search for any dependency such as junit add this, and the maven dependency should appear on your project structure now.

<dependencies>
 <dependency>
 <groupId>org.springframework</groupId>
 <artifactId>spring-context</artifactId>
 <version>4.2.9.RELEASE</version>
 <scope>runtime</scope>
 </dependency>
</dependencies>
Jude Ukana
  • 121
  • 7
1

enter image description hereJust right click over Project folder and under maven > Update project > Select your project > OK. it will automatically download all dependencies under pom.xml to folder named Maven Dependencies.

Denil Nair
  • 86
  • 5
1
  1. Open the .classpath file at the root of your eclipse's project.
  • As it’s currently written, your answer is unclear. Please [edit] to add additional details that will help others understand how this addresses the question asked. You can find more information on how to write good answers [in the help center](/help/how-to-answer). – Community Nov 07 '22 at 05:56
0

It's so amazing that this one problem has so many different causes and possible solutions. I found yet a different solution that worked for me.

Well, it's not so much a solution but a discovery: I can see the Maven Dependencies node in the Package Explorer, which is the default for the Java perspective, but I can not see it in the Java EE perspective, which uses the Project Explorer by default. Both of those explorers look very similar at quick glance, so you may expect to see the Maven Dependencies in both.

As I was trying to figure this out, I hadn't realized that difference, so it wasn't really a problem for me in the end after all.

Danger
  • 2,043
  • 2
  • 21
  • 24
0

the whole project looked weird in eclipse, maven dependencies folder were missing, it showed some types as unknown, but I was able to build it successfully in maven. What fixed my issue was adding gen folder to source path on project build path.

Probably this is similar to this Android /FBReaderJ/gen already exists but is not a source folder. Convert to a source folder or rename it

Community
  • 1
  • 1
mik80
  • 25
  • 2
  • 8
0

In Eclipse STS if "Maven Dependencies" disappears it, you have to check and fix your pom.xml. I did this (twice) and I resolved it. It was not a dependencies issue but a String generated and moved in a position random in my pom.xml.

xlm
  • 6,854
  • 14
  • 53
  • 55
LucianoDemuru
  • 131
  • 1
  • 4
0

So many answers. You see, there could be many reasons, why this is not working, as expected. In my case, I also did not realize the - Tag around my dependencies. facepalm

Example:

...
<dependencyManagement>
    <dependencies>
        <dependency>
            <groupId>org.slf4j</groupId>
            <artifactId>slf4j-log4j12</artifactId>
            <version>${org.slf4j.version}</version>
        </dependency>
    </dependencies>
</dependencyManagement>

this only DEFINES the dependency for this and all subprojects with desired version! This is, what it e.g. should look like in the master-POM. To really use the lib in THIS current project, you have too add the depency as following:

...
<dependencyManagement>
    <dependencies>
        <dependency>
            <groupId>org.slf4j</groupId>
            <artifactId>slf4j-log4j12</artifactId>
            <version>${org.slf4j.version}</version>
        </dependency>
    </dependencies>
</dependencyManagement>

<dependencies>
    <dependency>
        <groupId>org.slf4j</groupId>
        <artifactId>slf4j-log4j12</artifactId>
    </dependency>
</dependencies>

NOW it will provide the lib in THIS current project.

0

I also encountered this problem. It confused me several hours. I tried many of solutions which were suggested in this topic. At last, I found it was due to the Java Element Filters.

Java Element Filters.

Jesse
  • 3,522
  • 6
  • 25
  • 40
Kevin He
  • 1
  • 1
0

Below solution worked for me -
1- Go to project directory
2- run mvn eclipse:eclipse (Hope mvn is added in your path)
3- run mvn clean install

Refresh your project in Eclipse and check.

Basu
  • 73
  • 1
  • 5
0

window -> preferences -> Maven -> Instalations -> Global Settings C:\Program Files (x86)\apache-maven-(version)\conf\settings.xml

mvn dependency:tree mvn dependency:resolve

once it points to the correct settings file, right click on project : update dependencies, update project configuration, once it is not loaded or code still keep'n errors, close / open project

Tiago Medici
  • 1,944
  • 22
  • 22
0

for me issue was due to multi module project .

  1. delete project from disk
  2. checkout project from your repo and import as maven project in eclipse
  3. clean install
Codified
  • 135
  • 9
0

I changed my project facet to java and copy pasted a working maven projects .classpath content to this project. This resolved my issue.

Parthi
  • 123
  • 1
  • 7
0

Th ROOT CAUSE of this issue is that, when you port a project to a new machine, you have to delete the ".project" file in the root of your project, and try to import that. This makes the import smooth and Maven dependencies are properly configured for me

Note: You should exclude .project from Git versioning.

Thanga
  • 7,811
  • 3
  • 19
  • 38
0

From my end, I have tried all these and none of them worked. The most probable problem with this is that you have added more than one dependency, hence it is mandatory to wrap them in a <dependencies> </dependencies> tag. Hope it helps!

MexicoBoy
  • 47
  • 6
0

I have the same issue as you, after trying all the clean, update and install and there was still missing artifacts. Problem for me is that profiles are not being applied. Check in your .m2/settings.xml and look for <activeProfile>. Go back to your project, right click under properties -> maven and enter your Active Maven Profiles. All the missing artifacts were resolved.

Eddie
  • 1
0

I was also facing the same issue, it got resolved by using below : right click on Project-> maven->Update Project->Force update.

0
You need to add the maven-compiler-plugin in your pom.

 1. Add the maven compiler plugin to your pom.

<build>
        <sourceDirectory>src</sourceDirectory>
        <plugins>
            <plugin>
                <artifactId>maven-compiler-plugin</artifactId>
                <version>3.8.0</version>
                <configuration>
                    <release>13</release>
                </configuration>
            </plugin>
        </plugins>
    </build>

2]Right click on the project -> Maven ->Update Project
Karen
  • 11
  • 1
0

I faced similar issues in STS4. Here's how I resolved it.

  • Build(mvn clean install) the project using command line.

  • Right click the project folder -> Maven -> Update Project.

Joohay
  • 51
  • 7
0

You need to change project Facets and project nature in eclipse. Right Click on project go to properties and you can find the above options. Refer below image. Project Natures

Rahul
  • 337
  • 3
  • 10
0

In my case, maven did not have the Global Settings set in eclipse. This meant the internal maven, which eclipse uses to resolve dependencies did not know which repos to talk to.

You can find this in Window > Preferences > Maven > User Settings, and then point Global Settings to your external maven settings.xml.

Then i removed the broken projects and re-added them, and the Maven Dependencies library appeared again.

Adrian C
  • 71
  • 3
0

My problem solved by right click on project -> Maven -> Update project. Then the Maven Dependencies appear on the project explore.

0

I had a silly issue where I had a long comment below the code, blocking compilation. I could only find out about this when I checked the very useful Markers tab and found an explicit "Maven Problem" pointing out the line with the issue.

C G O
  • 41
  • 6
0

My issue was resolved by removing duplicate dependency declarations in pom.xml file. My pom.xml was having 2 entries of httpclient dependency, so after removing one of them and then performing maven build fixed the issue.

<!-- https://mvnrepository.com/artifact/org.apache.httpcomponents/httpclient -->
        <dependency>
            <groupId>org.apache.httpcomponents</groupId>
            <artifactId>httpclient</artifactId>
        </dependency>
        <!-- https://mvnrepository.com/artifact/org.springframework.boot/spring-boot-starter-jersey -->
        <dependency>
            <groupId>org.springframework.boot</groupId>
            <artifactId>spring-boot-starter-jersey</artifactId>
        </dependency>
        <!-- https://mvnrepository.com/artifact/org.apache.httpcomponents/httpclient -->
        <!-- Removed this dependency -->
        <dependency>
            <groupId>org.apache.httpcomponents</groupId>
            <artifactId>httpclient</artifactId>
        </dependency>
-1

For the following steps worked in my case:

1 On eclipse, right click on the desired project Maven -> Disable Maven Nature

2 Right click again then go to Properties. Delete every evidence of external Maven dependency leaving only JRE System Library.

3 Right click one more time on the project then go to Configure -> Convert to Maven Project

it worked for me also

anurag1007
  • 107
  • 1
  • 10