1

I searched for image recognition using python. It seems there is no tutorial about Extracting Numbers from colored background so I followed THIS TUTORIAL

import cv2
import matplotlib.pyplot as plt 

def detect_edge(image):
''' function Detecting Edges '''

    image_with_edges = cv2.Canny(image , 100, 200)

    images = [image , image_with_edges]

    location = [121, 122]

    for loc, img in zip(location, images):
        plt.subplot(loc)
        plt.imshow(img, cmap='gray')

    plt.savefig('edge.png')
    plt.show()

image = cv2.imread('myscreenshot.png', 0)
detect_edge(image)

This is my image:

enter link description here

This is the result:

edge.png

Any solution to print out these numbers?

Ruli
  • 2,592
  • 12
  • 30
  • 40
wert trew
  • 51
  • 2
  • 7
  • probably. try adjusting the parameters of your [Canny edge detector](https://docs.opencv.org/4.5.1/dd/d1a/group__imgproc__feature.html#ga04723e007ed888ddf11d9ba04e2232de). alternatively, you can try normalizing/shifting the colors around – Nullman Feb 03 '21 at 13:03
  • Are you trying to do OCR? – jtlz2 Feb 03 '21 at 14:02
  • Does this answer your question? [Digit recognizing, using opencv](https://stackoverflow.com/questions/52083129/digit-recognizing-using-opencv) – jtlz2 Feb 03 '21 at 14:05
  • https://www.google.com/search?q=opencv+digit+recognition very fruitful... :\ – jtlz2 Feb 03 '21 at 14:07
  • no thats not gonna help. anyway there most be a ready-to-use script for extracting numbers from that image. the last thing I wanna do is to study Machine Learning and all that stuff – wert trew Feb 03 '21 at 17:07
  • are your numbers gonna show up in groups like this, or individually in their own backgrounds? – Ian Chu Feb 03 '21 at 17:16

2 Answers2

2

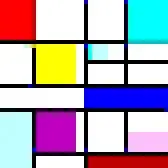
Here is some code for getting clean canny edges for this image.

enter image description here

import cv2
import numpy as np

# load image
img = cv2.imread("numbers.png");

# change to hue colorspace
hsv = cv2.cvtColor(img, cv2.COLOR_BGR2HSV);
h,s,v = cv2.split(hsv);

# use clahe to improve contrast 
# (the contrast is pretty good already, so not much change, but good habit to have here)
clahe = cv2.createCLAHE(clipLimit = 10) 
contrast = clahe.apply(v);

# use canny
canny = cv2.Canny(contrast, 20, 110);

# show
cv2.imshow('i', img);
cv2.imshow('v', v);
cv2.imshow('c', contrast);
cv2.imshow("canny", canny);
cv2.waitKey(0);

# save
cv2.imwrite("edges.png", canny);

Without using any OCR like pytesseract or something, I don't see an obvious way to be able to consistently turn this image into "text" numbers. I'll leave that for someone else who might know how to solve that without any pattern recognition stuff because I don't even know where to begin without that. If you're willing to forgo that restriction then pytessaract should have no problem with this; possibly even without doing processing like this.

Ok, I filled in the numbers for the image. OpenCV's findContours' hierarchy wasn't cooperating for some reason so I had to manually do it which makes this code pretty janky. Honestly, if I were to try this again from scratch, I'd try to find colors that contribute to a small number of total pixels and threshold on each and combine the masks.

enter image description here

import cv2
import numpy as np

# check if small box is in big box
def contained(big, small):
    # big corners
    x,y,w,h = big;
    big_tl = [x, y];
    big_br = [x+w, y+h];

    # small corners
    x,y,w,h = small;
    small_tl = [x, y];
    small_br = [x+w, y+h];

    # check
    if small_tl[0] > big_tl[0] and small_br[0] < big_br[0]:
        if small_tl[1] > big_tl[1] and small_br[1] < big_br[1]:
            return True;
    return False;

# load image
img = cv2.imread("numbers.png");

# change to hue colorspace
hsv = cv2.cvtColor(img, cv2.COLOR_BGR2HSV);
h,s,v = cv2.split(hsv);

# use clahe to improve contrast 
# (the contrast is pretty good already, so not much change, but good habit to have here)
clahe = cv2.createCLAHE(clipLimit = 10) 
contrast = clahe.apply(v);

# rescale
scale = 2.0;
h, w = img.shape[:2];
h = int(h * scale);
w = int(w * scale);
contrast = cv2.resize(contrast, (w,h), cv2.INTER_LINEAR);
img = cv2.resize(img, (w,h), cv2.INTER_LINEAR);

# use canny
canny = cv2.Canny(contrast, 10, 60);

# show
cv2.imshow('i', img);
cv2.imshow('v', v);
cv2.imshow('c', contrast);
cv2.imshow("canny", canny);
cv2.waitKey(0);

# try to fill in contours
# contours
_, contours, hierarchy = cv2.findContours(canny, cv2.RETR_TREE, cv2.CHAIN_APPROX_NONE);

# filter contours by size
# filter out noisy bits and the big grid boxes
filtered = [];
for contour in contours:
    perimeter = cv2.arcLength(contour, True);
    if 50 < perimeter and perimeter < 750:
        filtered.append(contour);

# draw contours again
# create a mask of the contoured image
mask = np.zeros_like(contrast);
mask = cv2.drawContours(mask, filtered, -1, 255, -1);

# close to get rid of annoying little gaps
kernel = np.ones((3,3),np.uint8)
mask = cv2.dilate(mask,kernel,iterations = 1);
mask = cv2.erode(mask,kernel, iterations = 1);

# contours
_, contours, hierarchy = cv2.findContours(mask, cv2.RETR_TREE, cv2.CHAIN_APPROX_NONE);

# alright, hierarchy is being stupid, plan B
# SUUUUUPEEERRR JAAAANK
outer_cntrs = [a for a in range(len(contours))];
children = [];
for a in range(len(contours)):
    if a in outer_cntrs:
        # get current box
        big_box = cv2.boundingRect(contours[a]);
        # check against all other boxes
        for b in range(0, len(contours)):
            if b in outer_cntrs:
                small_box = cv2.boundingRect(contours[b]);
                # remove any children
                if contained(big_box, small_box):
                    outer_cntrs.remove(b);
                    children.append(contours[b]);

# # select by hierarchy
top_cntrs = [];
for a in range(len(contours)):
    if a in outer_cntrs:
        top_cntrs.append(contours[a]);

# create a mask of the contoured image
mask = np.zeros_like(contrast);
mask = cv2.drawContours(mask, top_cntrs, -1, 255, -1);
mask = cv2.drawContours(mask, children, -1, 255, -1);

# close
kernel = np.ones((3,3),np.uint8)
mask = cv2.dilate(mask,kernel,iterations = 1);
mask = cv2.erode(mask,kernel, iterations = 1);

# do contours agains because opencv is being super difficult
# honestly, at this point, a fill method would've been better
# contours
_, contours, hierarchy = cv2.findContours(mask, cv2.RETR_TREE, cv2.CHAIN_APPROX_NONE);

# fill in
for con in contours:
    cv2.fillPoly(mask, pts = [con], color=(255));
for con in children:
    cv2.fillPoly(mask, pts = [con], color=(0));

# resize back down
h, w = mask.shape;
h = int(h / scale);
w = int(w / scale);
mask = cv2.resize(mask, (w,h));

# show
cv2.imshow("mask", mask);
cv2.waitKey(0);

# save
cv2.imwrite("filled.png", mask);
Ian Chu
  • 2,924
  • 9
  • 14
  • it seems that python cant extract them all with **pytessaract**. is there a way for example : to fill the numbers with a color, or to clarify them more to be recognizable. nice job btw – wert trew Feb 03 '21 at 21:54
  • there is. I just got back from work and need to eat so it'll be a while before I'll try to tackle this problem. Short answer: OpenCV contours. You can make a mask out of the contour (make sure to check for the contours nested inside and un-fill those bits). I'd start by trying tessaract on the clahe-enhanced image first though, much simpler if it works. – Ian Chu Feb 03 '21 at 23:08
  • your last code doesnt show number 5 https://images.guru/i/duGGc – wert trew Feb 04 '21 at 22:28
  • These numbers are changing also there colors change and the background color too, must be a simpler way to recognize what numbers appeare on the screen like this tutorial : https://www.youtube.com/watch?v=y1ZrOs9s2QA – wert trew Feb 04 '21 at 22:44
0

You can find the digits in three-steps


  1. Adaptive-threshold result:

    • enter image description here

    • Here we see 9 and 0 is different from rest of the digits. We need to remove the boundaries of the 9.

  2. Erosion result:

    • enter image description here
  3. Pytesseract result:

    • 8 | 1
      
      5 9
      4 @
      3 | 3
      6 | 1
      
    • There are multiple page-segmentation-modes are available for pytesseract

    • If you want to remove | from the output you can use re.sub

    • text = re.sub('[^A-Za-z0-9]+', ',', text)
      
    • Result will be:

      • 8
        1
        5
        9
        4
        3
        3
        6
        1
        

Code:

import cv2
import pytesseract
import re
import numpy as np

image = cv2.imread("7UUGYHw.png")
gray = cv2.cvtColor(image, cv2.COLOR_BGR2GRAY)
thresh = cv2.adaptiveThreshold(gray, 255, cv2.ADAPTIVE_THRESH_MEAN_C, cv2.THRESH_BINARY, 13, 2)
erode = cv2.erode(thresh, np.array((7, 7)), iterations=1)
text = pytesseract.image_to_string(erode, config="--psm 6")
text = re.sub('[^A-Za-z0-9]+', '\n', text)
print(text)
Ahmet
  • 7,527
  • 3
  • 23
  • 47
  • Well done! but still some numbers are not shown, how to fix that? – wert trew Feb 03 '21 at 21:44
  • Some numbers? Only `0` can not be shown. You need to apply test-skew-correction to make it readable for pytesseract. However, other images may not be readable. – Ahmet Feb 03 '21 at 21:47
  • its working fine except for ZERO and ONE, it seems that **pytesseract** dont wanna recognize them – wert trew Feb 04 '21 at 22:24
  • One? Please re-read my answer, all ones are recognized. The only digit can't be recognized is `0`, since `pytesseract` is not rotation-invariant. You need to t[rain](https://tesseract-ocr.github.io/tessdoc/TrainingTesseract-4.00.html) pytesseract with the similar 0 samples to be recognized in the imaeg. – Ahmet Feb 05 '21 at 13:50