There was a similar question posted here (https://stackoverflow.com/questions/16773312/facebook-like-navigationbar), unfortunately it was closed quite quickly. I'm redeeming its intended glory here.
You can achieve a persistent navigation bar with ease, if you think of navigation in terms of a Tab based application (with hidden tabs).
Using Storyboards:
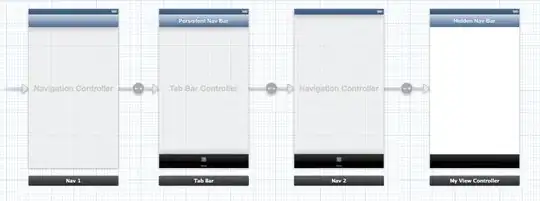
- Create a new UINavigationController (Nav 1).
- Set a UITabController as the root view controller of Nav 1. (Tab Bar) Note that it will have it's own navigation bar (I've labeled it "Persistent Nav Bar").
- Create another UINavigationController (Nav 2).
- Set your view controller of choice (My View Controller) as the root view controller of Nav 2.
Set Nav 2 as the first (tab) view controller of the Tab Bar controller.
For Nav 1: under Attributes Inspector -> Navigation Controller -> Bar visibility, make sure that the box is ticked (so that it Shows Navigation Bar).
- For Nav 2: under Attributes Inspector -> Navigation Controller ->
Bar visibility, make sure that the box is un-ticked (so that it
won't show its Navigation Bar).
If you run the app, you should see the title of the tab bar visible, and the title of your view controller hidden. This gives you the basics of a persistent nav bar. You can keep PUSHing views onto the stack from My View Controller and it will remain persistent. Presenting a MODAL view will bring up a new context, so the persistence is lost. If you repeat these steps, you should be able to create the same effect for modally presented views as well.
The remainder of this answer deals with hiding the tab bar and managing the navigation bar elements.
So that's great, but how do you place your custom view in the nav bar, and how do you hide that tab bar?
Create a subclass of UITabBarController, and assign it to the Tab Bar controller in our storyboard.
Hiding the tab bar
You can hide the tab bar in all sorts of ways. If you're interested, here's more about that (How to hide uitabbarcontroller); this little snippet is adapted from my answer in that thread:
CGRect screenRect = [[UIScreen mainScreen] bounds];
float fHeight = screenRect.size.height;
if(  UIDeviceOrientationIsLandscape([UIApplication sharedApplication].statusBarOrientation) )
{
    fHeight = screenRect.size.width;
}

for(UIView *view in self.view.subviews){
    if([view isKindOfClass:[UITabBar class]]){
        [view setFrame:CGRectMake(view.frame.origin.x, fHeight, view.frame.size.width, view.frame.size.height)];
    }else{
        [view setFrame:CGRectMake(view.frame.origin.x, view.frame.origin.y, view.frame.size.width, fHeight)];
    }
}
This will shift the Tab Bar out of view and resize the view to fill up the space (without animation, as if it was never there). Add this snippet to the beginning of viewDidLoad to get that bar out of the way.
Custom view in nav bar
In the viewDidLoad method of our TB subclass, you can create your custom view with buttons and add it to the navigation bar like so: [self.navigationItem setTitleView:myCustomTitleView]; Easy.
If it doesn't show up properly, make sure you define its frame before you set it as the titleView. Then after adding it, use [myCustomTitleView sizeToFit] to get it sitting snug in the Navigation Bar.
Setting the bar button items
Setting the left and right bar button items requires a small change in notation. Normally, you would set the left bar button by referencing self.navigationItem.leftBarButtonItem. This reference is actually pointing to the left bar button of the HIDDEN navigation bar. To access the VISIBLE navigation bar, use self.tabBarController.navigationItem.leftBarButtonItem. Easy!
Handling the lost bar back button item
One thing that you sacrifice with a persistent nav bar is the management of pushed views. Things like the back arrow won't show (they are appearing on the hidden navigation bar). You can overcome this by setting your TabBarController subclass as a delegate for its view controllers (which should all be UINavigationControllers).
for (UINavigationController *navController in self.viewControllers) {
    navController.delegate = self;
}
Whenever any of these UINavigationControllers push another view, you can intercept this action with this delegate method:
- (void)navigationController:(UINavigationController *)navigationController willShowViewController:(UIViewController *)viewController animated:(BOOL)animated;
In here, you can check how many view controllers are pushed:
if(navigationController.viewControllers.count > 1){
    //create a custom back button here and add it to the nav bar
}else{
    //set the left bar button (where the custom back button would sit) to nil
}
The custom back button can call a method in your tab bar controller subclass, which tells the currently selected view controller to pop its current view.
Is this how Facebook did it?
I can't verify that this is the way Facebook has done it (probably not), but it will achieve a similar effect. I've used it effectively in my latest app (http://www.waterboyapp.com), which was happily accepted by Apple without a hitch. I wish someone had posted this online before, hence my contribution here to save hours/days of searching.
Aside
The added bonus to this implementation (other than it's simplicity and elegance) is that you can link in multiple view controllers to the tab bar. With a for loop and a bit of creativity, you can recreate custom buttons in the navigation bar (based on the tabs) that perform the same function as the tab bar. This saves screen space (because tab bars are pretty big) and still uses the tab bar to perform your view swapping.