X
This article was co-authored by wikiHow staff writer, Jack Lloyd. Jack Lloyd is a Technology Writer and Editor for wikiHow. He has over two years of experience writing and editing technology-related articles. He is technology enthusiast and an English teacher.
The wikiHow Tech Team also followed the article's instructions and verified that they work.
This article has been viewed 47,019 times.
Learn more...
This wikiHow teaches you how to attempt to unbrick an Android phone. Unfortunately, bricked phones will usually require you to wipe and reinstall the operating system in some capacity, meaning that your Android will be erased when you do unbrick it.
Steps
Part 1
Part 1 of 3:
Preparing to Unbrick
-
1Determine the type of brick. There are two types of brick: a soft brick—which usually results in your Android booting directly into the recovery console or restarting endlessly—and a hard brick, which results in your Android being impossible to turn on or interact with.
- As a basic rule of thumb, if you can turn on or off your Android, you're dealing with a soft brick.
- Unfortunately, there is nothing you can do if your Android has been hard-bricked.
-
2Know whether or not your Android was rooted. Rooted Androids allow you to make changes to system files and processes, which increases the likelihood of something going wrong and resulting in a soft brick.
- Rooting an Android voids its warranty.
Advertisement -
3Try to figure out a cause for the brick. If you recently installed an app or downloaded a new version of the Android operating system, your phone might be responding to an incomplete or corrupt installation.
- If you rooted your Android—especially if you also installed a custom firmware ROM—any number of system-level issues may have caused the soft brick.
-
4Consider taking your Android into a tech department. If your Android is soft-bricked, the following two parts should help unbrick the phone; however, taking your Android into a professional tech repair department is more likely to result in success, and the department might even have access to resources you can't find on your own.
- Naturally, most repair services will charge you a fee to unbrick your phone.
- If you didn't root your Android, you can probably take your phone into a manufacturer's or carrier's store, especially if it's still under warranty.


Advertisement
Part 2
Part 2 of 3:
Factory Resetting with the Recovery Console
-
1Understand what a factory reset does. If you installed a faulty app or made a change to your Android's operating system that results in it being soft-bricked, factory resetting the phone will reverse any changes that you made and remove all apps and data from the Android.
- Factory resetting your Android will also erase it, which means that you won't be able to get your data back if you don't have a backup.
-
2Make sure that your Android is off. Your Android must not be on in order for you to access the Recovery Mode menu.
- If your Android boots into the Recovery Mode console when you turn it on, skip this step and the next step.
-
3Open Recovery Mode on your Android. This process will vary depending on your Android's model, but you'll usually press a combination of buttons in order to open the Recovery Mode console.
-
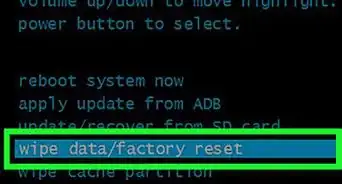
4Select wipe data/factory reset. Use the Volume - button to scroll down to the this option, then press the Power button to open it.
-
5Select Yes -- delete all user data. You'll find this option near the middle of the screen.
- If prompted to confirm, select the affirmative answer and press the Power button again.
-
6Wait for your Android to finish erasing. Once your Android finishes factory resetting, you'll arrive back at the Recovery Mode console.
-
7Select reboot system now. It's at the top of the Recovery Mode menu. This will prompt your Android to restart like usual.
-
8Try using your Android. Now that your Android is back to factory settings, you should be able to use it normally after setting it up.


Advertisement
Part 3
Part 3 of 3:
Downgrading Your Android
-
1Understand what this process entails. "Downgrading" your Android's software refers to installing the factory version of the Android's current operating system (or a lower operating system). While this will fix any problems caused by your Android's operating system, it will also completely wipe your Android.
-
2Install a custom recovery if necessary. If your Android doesn't have a custom Recovery Mode installed, you'll need to install one before you can use ODIN to install a version of your Android's software.
- Popular custom recoveries include TWRP (referenced in the linked article) and ClockworkMod.
-
3Find a factory ROM for your phone. Go to https://forum.xda-developers.com/ in your computer's browser, enter your phone's name and "stock rom" into the search bar in the top-right corner of the page, and then select a search result that matches your Android.
- You'll most likely have to hunt around the XDA forums for a while until you find a suitable stock ROM for your Android, but it's worth the effort since ROMs downloaded from XDA are usually reputable.
-
4Download the ROM. Click the Download button or link to do so. This will prompt the ROM's ZIP folder to download onto your computer.
-
5Connect your Android to your computer. Plug the USB end of the Android's charging cable into your computer, then plug the other end of the cable into your Android's charging port. Your Android's window should open.
-
6Move the ROM onto your Android. In the Android window, double-click the Internal folder, then click and drag the ROM's ZIP folder into the Downloads folder. You can also copy the ZIP folder by clicking it and pressing Ctrl+C (or ⌘ Command+C on a Mac), then paste it into the Downloads folder by opening the folder and pressing Ctrl+V (or ⌘ Command+V on a Mac).
- If your Android's window doesn't open, open This PC and double-click your Android's name first.
- If you're using a Mac, you'll need to install Android File Transfer and open it before you can move files onto your Android.
-
7Eject your Android and remove it from the computer. At this point, you can move on to installing your factory ROM.
-
8Open Recovery Mode on your Android. This process will vary depending on your Android's model, but you'll usually press a combination of buttons in order to open the Recovery Mode console.
-
9Wipe your Android. To do so:
- TWRP - Tap Wipe, tap System, and then swipe right the switch that appears.
- ClockworkMod - Scroll down to wipe data/factory reset by using the volume buttons, press the Power button, and confirm your choice.
-
10Install your downloaded ROM. Once your Android has been wiped, do one of the following depending on your custom recovery:
- TWRP - Tap Install, select the ZIP folder that you put on your Android, and swipe right the bar that appears.
- ClockworkMod - Select install zip, select your ZIP folder, and follow any on-screen instructions until the ROM begins installing.
-
11Wipe the Dalvik cache. Once your Android finishes installing the ROM, you can wipe the cache by doing the following:
- TWRP - Tap Wipe, tap Dalvik, and then swipe right the switch at the bottom of the screen.
- ClockworkMod - Select advanced, select wipe dalvik cache, and confirm your choice.
-
12Reboot your Android. Once your Android finishes wiping its cache, tap the Reboot option near the top of the custom recovery menu. This will prompt your Android to restart itself into its normal operation.
-
13Use your Android like usual. Now that your Android's stock operating system has been restored, you should be able to set it up and use it like you normally do.


Advertisement
Community Q&A
-
QuestionThe device isn't being detected. What should I do?
 Community AnswerMake sure that your USB cable is propery inserted. Also, make sure that the wire is intact and not breaking off at the tips.
Advertisement


About This Article
Jack Lloyd
wikiHow Technology Writer
This article was co-authored by wikiHow staff writer, Jack Lloyd. Jack Lloyd is a Technology Writer and Editor for wikiHow. He has over two years of experience writing and editing technology-related articles. He is technology enthusiast and an English teacher. This article has been viewed 47,019 times.
How helpful is this?
Co-authors: 6
Updated: October 28, 2019
Views: 47,019
Categories: Android
Advertisement