And here we go! A high level overview of this approach can be described as the sequential execution of the following steps:
I don't want to get into too much detail since I'm sharing the source code, so feel free to test and change it in any way you like.
Let's start, Winter Is Coming:
#include <iostream>
#include <vector>
#include <cmath>

#include <opencv2/highgui/highgui.hpp>
#include <opencv2/imgproc/imgproc.hpp>

cv::RNG rng(12345);
float PI = std::atan(1) * 4;

void isolate_object(const cv::Mat& input, cv::Mat& output)
{
    if (input.channels() != 1)
    {
        std::cout << "isolate_object: !!! input must be grayscale" << std::endl;
        return;
    }

    // Store the set of points in the image before assembling the bounding box
    std::vector<cv::Point> points;
    cv::Mat_<uchar>::const_iterator it = input.begin<uchar>();
    cv::Mat_<uchar>::const_iterator end = input.end<uchar>();
    for (; it != end; ++it)
    {
        if (*it) points.push_back(it.pos());
    }

    // Compute minimal bounding box
    cv::RotatedRect box = cv::minAreaRect(cv::Mat(points));

    // Set Region of Interest to the area defined by the box
    cv::Rect roi;
    roi.x = box.center.x - (box.size.width / 2);
    roi.y = box.center.y - (box.size.height / 2);
    roi.width = box.size.width;
    roi.height = box.size.height;

    // Crop the original image to the defined ROI
    output = input(roi);
}
For more details on the implementation of isolate_object() please check this thread. cv::RNG is used later on to fill each contour with a different color, and PI, well... you know PI.
int main(int argc, char* argv[])
{
    // Load input (colored, 3-channel, BGR)
    cv::Mat input = cv::imread("test.jpg");
    if (input.empty())
    {
        std::cout << "!!! Failed imread() #1" << std::endl;
        return -1;
    }

    // Convert colored image to grayscale
    cv::Mat gray;
    cv::cvtColor(input, gray, CV_BGR2GRAY);

    // Execute a threshold operation to get a binary image from the grayscale
    cv::Mat binary;
    cv::threshold(gray, binary, 128, 255, cv::THRESH_BINARY);
The binary image looks exactly like the input because it only had 2 colors (B&W):

    // Find the contours of the C's in the thresholded image
    std::vector<std::vector<cv::Point> > contours;
    cv::findContours(binary, contours, cv::RETR_LIST, cv::CHAIN_APPROX_SIMPLE);

    // Fill the contours found with unique colors to isolate them later
    cv::Mat colored_contours = input.clone();
    std::vector<cv::Scalar> fill_colors;
    for (size_t i = 0; i < contours.size(); i++)
    {
        std::vector<cv::Point> cnt = contours[i];
        double area = cv::contourArea(cv::Mat(cnt));
        //std::cout << "* Area: " << area << std::endl;

        // Fill each C found with a different color.
        // If the area is larger than 100k it's probably the white background, so we ignore it.
        if (area > 10000 && area < 100000)
        {
            cv::Scalar color = cv::Scalar(rng.uniform(0, 255), rng.uniform(0,255), rng.uniform(0,255));
            cv::drawContours(colored_contours, contours, i, color,
                             CV_FILLED, 8, std::vector<cv::Vec4i>(), 0, cv::Point());
            fill_colors.push_back(color);
            //cv::imwrite("test_contours.jpg", colored_contours);
        }
    }
What colored_contours looks like:

    // Create a mask for each C found to isolate them from each other
    for (int i = 0; i < fill_colors.size(); i++)
    {
        // After inRange() single_color_mask stores a single C letter
        cv::Mat single_color_mask = cv::Mat::zeros(input.size(), CV_8UC1);
        cv::inRange(colored_contours, fill_colors[i], fill_colors[i], single_color_mask);
        //cv::imwrite("test_mask.jpg", single_color_mask);
Since this for loop is executed twice, one for each color that was used to fill the contours, I want you to see all images that were generated by this stage. So the following images are the ones that were stored by single_color_mask (one for each iteration of the loop):


        // Crop image to the area of the object
        cv::Mat cropped;
        isolate_object(single_color_mask, cropped);
        //cv::imwrite("test_cropped.jpg", cropped);
        cv::Mat orig_cropped = cropped.clone();
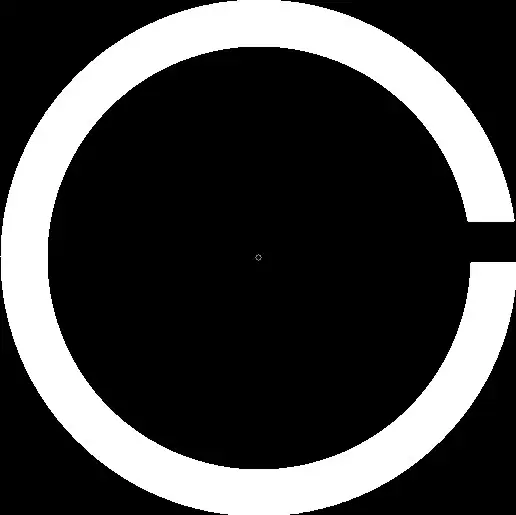
These are the ones that were stored by cropped (by the way, the smaller C looks fat because the image is rescaled by this page to have the same size of the larger C, don't worry):


        // Figure out the center of the image
        cv::Point obj_center(cropped.cols/2, cropped.rows/2);
        //cv::circle(cropped, obj_center, 3, cv::Scalar(128, 128, 128));
        //cv::imwrite("test_cropped_center.jpg", cropped);
To make it clearer to understand for what obj_center is for, I painted a little gray circle for educational purposes on that location:

        // Figure out the exact center location of the border
        std::vector<cv::Point> border_points;
        for (int y = 0; y < cropped.cols; y++)
        {
            if (cropped.at<uchar>(obj_center.x, y) != 0)
                border_points.push_back(cv::Point(obj_center.x, y));

            if (border_points.size() > 0 && cropped.at<uchar>(obj_center.x, y) == 0)
                break;
        }

        if (border_points.size() == 0)
        {
            std::cout << "!!! Oops! No border detected." << std::endl;
            return 0;
        }

        // Figure out the exact center location of the border
        cv::Point border_center = border_points[border_points.size() / 2];
        //cv::circle(cropped, border_center, 3, cv::Scalar(128, 128, 128));
        //cv::imwrite("test_border_center.jpg", cropped);
The procedure above scans a single vertical line from top/middle of the image to find the borders of the circle to be able to calculate it's width. Again, for education purposes I painted a small gray circle in the middle of the border. This is what cropped looks like:

        // Scan the border of the circle for discontinuities
        int radius = obj_center.y - border_center.y;
        if (radius < 0)
            radius *= -1;
        std::vector<cv::Point> discontinuity_points;
        std::vector<int> discontinuity_angles;
        for (int angle = 0; angle <= 360; angle++)
        {
            int x = obj_center.x + (radius * cos((angle+90) * (PI / 180.f)));
            int y = obj_center.y + (radius * sin((angle+90) * (PI / 180.f)));

            if (cropped.at<uchar>(x, y) < 128)
            {
                discontinuity_points.push_back(cv::Point(y, x));
                discontinuity_angles.push_back(angle);
                //cv::circle(cropped, cv::Point(y, x), 1, cv::Scalar(128, 128, 128));
            }
        }

        //std::cout << "Discontinuity size: " << discontinuity_points.size() << std::endl;
        if (discontinuity_points.size() == 0 && discontinuity_angles.size() == 0)
        {
            std::cout << "!!! Oops! No discontinuity detected. It's a perfect circle, dang!" << std::endl;
            return 0;
        }
Great, so the piece of code above scans along the middle of the circle's border looking for discontinuity. I'm sharing a sample image to illustrate what I mean. Every gray dot on the image represents a pixel that is tested. When the pixel is black it means we found a discontinuity:
        // Figure out the approximate angle of the discontinuity:
        // the first angle found will suffice for this demo.
        int approx_angle = discontinuity_angles[0];
        std::cout << "#" << i << " letter C is rotated approximately at: " << approx_angle << " degrees" << std::endl;

        // Figure out the central point of the discontinuity
        cv::Point discontinuity_center;
        for (int a = 0; a < discontinuity_points.size(); a++)
            discontinuity_center += discontinuity_points[a];
        discontinuity_center.x /= discontinuity_points.size();
        discontinuity_center.y /= discontinuity_points.size();
        cv::circle(orig_cropped, discontinuity_center, 2, cv::Scalar(128, 128, 128));

        cv::imshow("Original crop", orig_cropped);
        cv::waitKey(0);
    }

    return 0;
}
Very well... This last piece of code is responsible for figuring out the approximate angle of the discontinuity as well as indicate the central point of discontinuity. The following images are stored by orig_cropped. Once again I added a gray dot to show the exact positions detected as the center of the gaps:

When executed, this application prints the following information to the screen:
#0 letter C is rotated approximately at: 49 degrees
#1 letter C is rotated approximately at: 0 degrees
I hope it helps.
