Ok. here's a new try which might only work for your specific task to blend exactly 3 images of those faces, front, left, right.
I use these inputs:
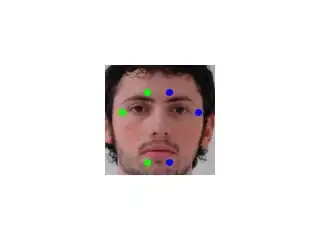
front (i1):
left (i2):

right (i3):

front mask (m1): (optional):

the problem with these images is, that the front image only covers a small part, while left and right overlap the whole front image, which leads to poor blending in my other solution. In addition, the alignment of the images isn't so great (mostly due to perspective effects), so that blending artifacts can occur.
Now the idea of this new method is, that you definitely want to keep the parts of the front image, which lie inside the area spanned by your colored "marker points", these should not be blended. The further you go away from that marker area, the more information from the left and right images should be used, so we create a mask with alpha values, which linearly lowers from 1 (inside the marker area) to 0 (at some defined distance from the marker region).
So the region spanned by the markers is this one:
since we know that the left image is basically used in the region left from the left marker triangle, we can create masks for left and right image, which are used to find the region which should in addition be covered by the front image:
left:

right:

front marker region and everything that is not in left and not in right mask:

this can be masked with the optional front mask input, this is better because this front image example doesnt cover the whole image, but sadly only a part of the image.
now this is the blending mask, with linear decreasing alpha value until the distance to the mask is 10 or more pixel:

now we first create the image covering only left and right image, copying most parts unblended, but blend the parts uncovered by left/right masks with 0.5*left + 0.5*right
blendLR:
finally we blend the front image in that blendLR by compution:
blended = alpha*front + (1-alpha)*blendLR

some improvements might include to caluculate the maxDist value from some higher information (like the size of the overlap or the size from the marker triangles to the border of the face).
another improvement would be to not compute 0.5*left + 0.5*right but to do some alpha blending here too, taking more information from the left image the further left we are in the gap. This would reduce the seams in the middle of the image (on top and bottom of the front image part).
// idea: keep all the pixels from front image that are inside your 6 points area always unblended:
cv::Mat blendFrontAlpha(cv::Mat front, cv::Mat left, cv::Mat right, std::vector<cv::Point> sixPoints, cv::Mat frontForeground = cv::Mat())
{
// define some maximum distance. No information of the front image is used if it's further away than that maxDist.
// if you have some real masks, you can easily set the maxDist according to the dimension of that mask - dimension of the 6-point-mask
float maxDist = 10;

// to use the cv function to draw contours we must order it like this:
std::vector<std::vector<cv::Point> > contours;
contours.push_back(sixPoints);

// create the mask
cv::Mat frontMask = cv::Mat::zeros(front.rows, front.cols, CV_8UC1);

// draw those 6 points connected as a filled contour
cv::drawContours(frontMask,contours,0,cv::Scalar(255),-1);

// add "lines": everything left from the points 3-4-5 might be used from left image, everything from the points 0-1-2 might be used from the right image:
cv::Mat leftMask = cv::Mat::zeros(front.rows, front.cols, CV_8UC1);
{
    cv::Point2f center = cv::Point2f(sixPoints[3].x, sixPoints[3].y);

    float steigung = ((float)sixPoints[5].y - (float)sixPoints[3].y)/((float)sixPoints[5].x - (float)sixPoints[3].x);
    if(sixPoints[5].x - sixPoints[3].x == 0) steigung = 2*front.rows;

    float n = center.y - steigung*center.x;

    cv::Point2f top = cv::Point2f( (0-n)/steigung , 0);
    cv::Point2f bottom = cv::Point2f( (front.rows-1-n)/steigung , front.rows-1);

    // now create the contour of the left image:
    std::vector<cv::Point> leftMaskContour;
    leftMaskContour.push_back(top);
    leftMaskContour.push_back(bottom);
    leftMaskContour.push_back(cv::Point(0,front.rows-1));
    leftMaskContour.push_back(cv::Point(0,0));

    std::vector<std::vector<cv::Point> > leftMaskContours;
    leftMaskContours.push_back(leftMaskContour);
    cv::drawContours(leftMask,leftMaskContours,0,cv::Scalar(255),-1);

    cv::imshow("leftMask", leftMask);

    cv::imwrite("x_leftMask.png", leftMask);
}

// add "lines": everything left from the points 3-4-5 might be used from left image, everything from the points 0-1-2 might be used from the right image:
cv::Mat rightMask = cv::Mat::zeros(front.rows, front.cols, CV_8UC1);
{
    // add "lines": everything left from the points 3-4-5 might be used from left image, everything from the points 0-1-2 might be used from the right image:
    cv::Point2f center = cv::Point2f(sixPoints[2].x, sixPoints[2].y);

    float steigung = ((float)sixPoints[0].y - (float)sixPoints[2].y)/((float)sixPoints[0].x - (float)sixPoints[2].x);
    if(sixPoints[0].x - sixPoints[2].x == 0) steigung = 2*front.rows;

    float n = center.y - steigung*center.x;

    cv::Point2f top = cv::Point2f( (0-n)/steigung , 0);
    cv::Point2f bottom = cv::Point2f( (front.rows-1-n)/steigung , front.rows-1);

    std::cout << top << " - " << bottom << std::endl;

    // now create the contour of the left image:
    std::vector<cv::Point> rightMaskContour;
    rightMaskContour.push_back(cv::Point(front.cols-1,0));
    rightMaskContour.push_back(cv::Point(front.cols-1,front.rows-1));
    rightMaskContour.push_back(bottom);
    rightMaskContour.push_back(top);

    std::vector<std::vector<cv::Point> > rightMaskContours;
    rightMaskContours.push_back(rightMaskContour);
    cv::drawContours(rightMask,rightMaskContours,0,cv::Scalar(255),-1);

    cv::imshow("rightMask", rightMask);
    cv::imwrite("x_rightMask.png", rightMask);
}

// add everything that's not in the side masks to the front mask:
cv::Mat additionalFrontMask = (255-leftMask) & (255-rightMask);
// if we know more about the front face, use that information:
cv::imwrite("x_frontMaskIncreased1.png", frontMask + additionalFrontMask);
if(frontForeground.cols)
{
    // since the blending mask is blended for maxDist distance, we have to erode this mask here.
    cv::Mat tmp;
    cv::erode(frontForeground,tmp,cv::Mat(),cv::Point(),maxDist);
    // idea is to only use the additional front mask in those areas where the front image contains of face and not those background parts.
    additionalFrontMask = additionalFrontMask & tmp;
}
frontMask = frontMask + additionalFrontMask;
cv::imwrite("x_frontMaskIncreased2.png", frontMask);

//todo: add lines
cv::imshow("frontMask", frontMask);

// for visualization only:
cv::Mat frontMasked;
front.copyTo(frontMasked, frontMask);
cv::imshow("frontMasked", frontMasked);

cv::imwrite("x_frontMasked.png", frontMasked);

// compute inverse of mask to take it as input for distance transform:
cv::Mat inverseFrontMask = 255-frontMask;

// compute the distance to the mask, the further away from the mask, the less information from the front image should be used:
cv::Mat dist;
cv::distanceTransform(inverseFrontMask,dist,CV_DIST_L2, 3);

// scale wanted values between 0 and 1:
dist /= maxDist;
// remove all values > 1; those values are further away than maxDist pixel from the 6-point-mask
dist.setTo(cv::Scalar(1.0f), dist>1.0f);
// now invert the values so that they are == 1 inside the 6-point-area and go to 0 outside:
dist = 1.0f-dist;


cv::Mat alphaValues = dist;
//cv::Mat alphaNonZero = alphaValues > 0;
// now alphaValues contains your general blendingMask.
// but to use it on colored images, we need to duplicate the channels:
std::vector<cv::Mat> singleChannels;
singleChannels.push_back(alphaValues);
singleChannels.push_back(alphaValues);
singleChannels.push_back(alphaValues);
// merge all the channels:
cv::merge(singleChannels, alphaValues);

cv::imshow("alpha mask",alphaValues);
cv::imwrite("x_alpha_mask.png", alphaValues*255);

// convert all input mats to floating point mats:
front.convertTo(front,CV_32FC3);
left.convertTo(left,CV_32FC3);
right.convertTo(right,CV_32FC3);


cv::Mat result;
// first: blend left and right both with 0.5 to the result, this gives the correct results for the intersection of left and right equally weighted.
// TODO: these values could be blended from left to right, giving some finer results
cv::addWeighted(left,0.5,right,0.5,0, result);

// now copy all the elements that are included in only one of the masks (not blended, just 100% information)
left.copyTo(result,leftMask & (255-rightMask));
right.copyTo(result,rightMask & (255-leftMask));

cv::imshow("left+right", result/255.0f);
cv::imwrite("x_left_right.png", result);

// now blend the front image with it's alpha blending mask:
cv::Mat result2 = front.mul(alphaValues) + result.mul(cv::Scalar(1.0f,1.0f,1.0f)-alphaValues);

cv::imwrite("x_front_blend.png", front.mul(alphaValues));

cv::imshow("inv", cv::Scalar(1.0f,1.0f,1.0f)-alphaValues);
cv::imshow("f a", front.mul(alphaValues)/255.0f);
cv::imshow("f r", (result.mul(cv::Scalar(1.0f,1.0f,1.0f)-alphaValues))/255.0f);


result2.convertTo(result2, CV_8UC3);
return result2;


}

int main()
{
// front image
cv::Mat i1 = cv::imread("blending/new/front.jpg");
// left image
cv::Mat i2 = cv::imread("blending/new/left.jpg");
// right image
cv::Mat i3 = cv::imread("blending/new/right.jpg");

// optional: mask of front image
cv::Mat m1 = cv::imread("blending/new/mask_front.png",CV_LOAD_IMAGE_GRAYSCALE);

cv::imwrite("x_M1.png", m1);

// these are the marker points you detect in the front image.
// the order is important. the first three pushed points are the right points (left part of the face) in order from top to bottom
// the second three points are the ones from the left image half, in order from bottom to top
// check coordinates for those input images to understand the ordering!
std::vector<cv::Point> frontArea;
frontArea.push_back(cv::Point(169,92));
frontArea.push_back(cv::Point(198,112));
frontArea.push_back(cv::Point(169,162));
frontArea.push_back(cv::Point(147,162));
frontArea.push_back(cv::Point(122,112));
frontArea.push_back(cv::Point(147,91));

// first parameter is the front image, then left (right face half), then right (left half of face), then the image polygon and optional the front image mask (which contains all facial parts of the front image)
cv::Mat result = blendFrontAlpha(i1,i2,i3, frontArea, m1);


cv::imshow("RESULT", result);
cv::imwrite("x_Result.png", result);

cv::waitKey(-1);

return 0;

}