6

Update 02 has a working solution...

I am trying to use the stroke of a UIBezierPath as a mask on another UIView. There are many examples, but they all use the fill to clip views.

I'm trying to use only the stroke of the path, but it's not displaying correctly.

Below is what I currently have in Swift 3.x:

let bezierPath = UIBezierPath()
bezierPath.move(to: CGPoint(x: 0, y: 0))
bezierPath.addLine(to: CGPoint(x: 100, y: 100))
bezierPath.addLine(to: CGPoint(x: 200, y: 50))
bezierPath.addLine(to: CGPoint(x: 300, y: 100))
bezierPath.lineWidth = 5.0
bezierPath.stroke()

let gradient = Gradient(frame: self.bounds)
let mask = CAShapeLayer()

mask.path = bezierPath.cgPath
gradient.layer.mask = mask

self.addSubview(gradient)

But, the above code does this. I'm looking for only to use the stroke for the mask... This is what the code is currently doing

Currently doing..

This is the desired outcome.. Desired outcome

(has more points in this comp snapshot)

I realize that there might be a better way, open to any ideas or alternatives!


--Update 01--

My latest, but masks out everything:

let bezierPath = UIBezierPath()
bezierPath.move(to: CGPoint(x: 0, y: 0))
bezierPath.addLine(to: CGPoint(x: 100, y: 100))
bezierPath.addLine(to: CGPoint(x: 200, y: 50))
bezierPath.addLine(to: CGPoint(x: 300, y: 100))
bezierPath.lineWidth = 5.0
bezierPath.stroke()

let gradient = Gradient(frame: self.bounds)

UIGraphicsBeginImageContext(CGSize(width: gradient.bounds.width, height: gradient.bounds.height))
let context : CGContext = UIGraphicsGetCurrentContext()!
context.addPath(bezierPath.cgPath)

let image = UIGraphicsGetImageFromCurrentImageContext()
gradient.layer.mask?.contents = image?.cgImage

And.. got nowhere after trying to figure it out with CAShapeLayer:

let mask = CAShapeLayer()
mask.fillColor = UIColor.black.cgColor
mask.strokeColor = UIColor.black.cgColor
mask.fillRule = kCAFillModeBoth
mask.path = bezierPath.cgPath
gradient.layer.mask = mask
self.addSubview(gradient)

--Update 02 - Working Solution --

Thanks for everybody's help!

let bezierPath = UIBezierPath()
bezierPath.move(to: CGPoint(x: 0, y: 0))
bezierPath.addLine(to: CGPoint(x: 100, y: 300))
bezierPath.addLine(to: CGPoint(x: 200, y: 50))
bezierPath.addLine(to: CGPoint(x: 300, y: 200))
bezierPath.addLine(to: CGPoint(x: 400, y: 100))
bezierPath.addLine(to: CGPoint(x: 500, y: 200))

let gradient = Gradient(frame: self.bounds) // subclass of UIView

let mask = CAShapeLayer()
mask.fillColor = nil
mask.strokeColor = UIColor.black.cgColor
mask.path = bezierPath.cgPath
mask.lineWidth = 5.0
gradient.layer.mask = mask

self.addSubview(gradient)

And, the results are what I was wanting:
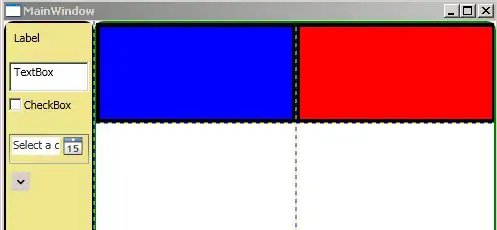
Expected Result

August
  • 698
  • 4
  • 12
  • 21
  • You are not telling where you are using your code. – El Tomato Oct 13 '17 at 02:26
  • Encapsulated in a subclass of UIView – August Oct 13 '17 at 02:28
  • 2
    You might have to render the stroked path into an UIImage then use the UIImage as the mask. – ekscrypto Oct 13 '17 at 02:28
  • That's a good idea @ekscrypto – August Oct 13 '17 at 02:30
  • 2
    1. You say you only want the stroke of the path. But you are not setting the stroke color. 2. Do you need the following line? gradient.layer.mask = mask – El Tomato Oct 13 '17 at 03:45
  • @ElTomato 1. UIBezierPath does not have a stroke color property, only a CGBlendMode and Alpha. So, I cannot color the path.. 2. Yes, I'm trying to "reveal" the gradient view of the area the UIBezier path – good questions too – August Oct 13 '17 at 03:55
  • 2
    No, UIBezierPath doesn't. But CAShapeLayer does. – El Tomato Oct 13 '17 at 04:33
  • @ElTomato I tried setting the .fillColor, .strokeColor, and .fillRule of the CAShapeLayer and it rendered the same as before.. Excellent feedback! – August Oct 13 '17 at 04:52
  • 1
    Any progress with your issue? – ekscrypto Oct 13 '17 at 19:49
  • @ekscrypto, thanks for checking up. But, not really.. I've been trying wrap my head around rendering the stroke only into a UIImage --- I'll update my question with my latest – August Oct 13 '17 at 19:55
  • 2
    I don't understand the question. What can it mean to use a stroke as a mask? Can you explain/draw the effect you're trying to produce? – matt Oct 13 '17 at 20:05
  • @matt, okay added a snapshot of what I am looking to achieve.. – August Oct 13 '17 at 20:13
  • @August , i tried to completely explain this confusing issue in an answer below. Hope it helps you or someone! – Fattie Aug 16 '19 at 14:00

4 Answers4

9

A UIBezierPath has several properties that only matter when stroking the path, including lineWidth, lineCapStyle, lineJoinStyle, and miterLimit.

A CGPath has none of these properties.

Thus when you set mask.path = bezierPath.cgPath, none of the stroke properties you set on bezierPath carries over. You've extracted just the CGPath from the UIBezierPath and none of those other properties.

You need to set the stroking properties on the CAShapeLayer rather than on any path object. Thus:

mask.path = bezierPath.cgPath
mask.lineWidth = 5

You also need to set a stroke color, because the default stroke color is nil, which means don't stroke at all:

mask.strokeColor = UIColor.white.cgColor

And, because you don't want the shape layer to fill the path, you need to set the fill color to nil:

mask.fillColor = nil
rob mayoff
  • 375,296
  • 67
  • 796
  • 848
  • Thank you for your help! This did the trick... I'll update my question with the working solution. – August Oct 13 '17 at 20:47
2

Exactly how to do it

with detailed discussion and explanation:

override func layoutSubviews() {
    setup()
    super.layoutSubviews()
}

private lazy var layerToUseAsAMask: CAShapeLayer = {
    let l = CAShapeLayer()

    // Recall that often you'd just draw the path here, but, somewhat confusingly
    // we will draw the path in layout, since, we do need to know the sizes to
    // draw the path

    l.fillColor = UIColor.clear.cgColor
    l.strokeColor = UIColor.white.cgColor
    l.lineWidth = thick
    l.lineCap = .round

    // So, the bezier path is going to be on this layer. recall that (confusingly)
    // it's the >layer<, not the path, which has the line qualities. The bezier
    // path is a 100% platonic path!

    // Recall too that overall, >all< of this is merely the CAShapeLayer, which
    // will be >used as a mask< on our actual layer of interest ("ourLayer")

    return l
}()

private lazy var ourLayer: CAGradientLayer = {
    let l = CAGradientLayer()
    layer.addSublayer(l)
    l.frame = self.bounds
    l.startPoint = CGPoint(x: 0.5, y: 0)
    l.endPoint = CGPoint(x: 0.5, y: 1)
    l.colors = [topColor.cgColor, bottomColor.cgColor]

    // Recall that to round an image layer (or gradient later) you use the .mask
    // facility (>not< a path)

    l.mask = layerToUseAsAMask

    // Recall too that, somewhat bizarrely really, changes at layout to a path
    // push up to a layer (in our case our maskToUseAsMask); and indeed changes
    // to a .mask facility (in our case, the one on our main layer) push up
    // to a layer (ie, in our case to our main layer).

    return l
}()

override func layoutSubviews() {
    common()
    super.layoutSubviews()
}

func common() {

    ourLayer.frame = bounds

    layerToUseAsAMask.frame = bounds

    // Recall as explained above, every single time we layout, you have to
    // actually draw the path again.  It is "pushed up" to maskToUseAsMask
    // and ultimately to the .mask on our ourLayer.

    let pBar = UIBezierPath()
    pBar.move(to: ...)
    pBar.addLine(to: ...)
    maskToUseAsMask.path = pBar.cgPath

    layer.shadowOffset = CGSize(width: 5, height: 5)
    layer.shadowColor = UIColor.green.cgColor
    layer.shadowOpacity = 0.20
    layer.shadowRadius = 2
}

In iOS a mask has been named by Apple .. a layer! Hence a "CAShapeLayer" can be a layer (a layer of an image), or in a totally different usage it can be ... a mask.

let someMaskIAmAMaking = CAMask() ... no! 

let someMaskIAmAMaking = CAShapeLayer() ... strange but true. Bad Apple.

Always bear in mind that in iOS, "CAMask" does not exist - you use "CALayer" for both "CAMask" and "CALayer".

To shape a custom layer you have added (whether a gradient, photo of a cat, or anything else) you need to use a mask. That's a mask .. not a path.

We're going to be shaping a layer, so we'll use a mask. (And that means - WTF - a CAShapeLayer.)

let ourMask = CAShapeLayer( ...

Hence.

1. Make a layer, the only purpose of which is to use as a mask

Recall that often you'd just draw the path here, but, somewhat confusingly we will draw the path in layout, since, we do need to know the sizes to draw the path.

So, the bezier path is going to be on this layer. recall that (confusingly) it's the >layer<, not the path, which has the line qualities. the bezier path is a 100% platonic path!

Recall too that overall, >all< of this is merely the CAShapeLayer, which will be >used as a mask< on our actual layer of interest ("ourLayer")

2. Make your actual new special layer (here, a gradient)

Recall that to round an image layer (or gradient later) you use the .mask facility (>not< a path)

Recall too that, somewhat bizarrely really, changes at layout to a path push up to a layer (in our case our maskToUseAsMask); and indeed changes to a .mask facility (in our case, the one on our ourLayer) push up to a layer (ie, in our case to our ourLayer).

3. At layout times, actually draw the path

Recall as explained above, every single time we layout, you have to actually draw the path again. It is "pushed up" to maskToUseAsMask and ultimately to the .mask on our ourLayer.

4. Finally set an ordinary shadow "on the view"

So,

    layer.shadowOpacity = 0.20 etc ...

Recall that the shadow "on the view" is the one built-in to ".layer", the "main and basic layer" of the view. You simply turn that on by setting the .shadowOpacity of .layer to a value.

That is quite different from adding a shadow on some other layer you have added. To add a shadow on some other layer you have added, such as catLayer, you use catLayer.path. (That procedure, which is totally different, is explained here for example: https://stackoverflow.com/a/57465440/294884 )

Fattie
  • 27,874
  • 70
  • 431
  • 719
1

The solution is to draw a bezierPath into an image, then use the resulting image as a mask. The issue with your code is that while you add the bezier path to the context, you never stroke() it. I would like to refer you to this swift function which can draw an array of paths into an image: Create an UIImage from Uibezierpath Array in Swift

You can confirm the image renders properly by displaying it into a UIImageView. Once you have confirmed that, should be rather easy to use as mask: iOS layer mask from UIImage/CGImage?

Cheers!

ekscrypto
  • 3,718
  • 1
  • 24
  • 38
  • Thanks for your help, man.. I was able to render the path in the image, but couldn't wrap my head around the masking.. Great ideas and links! – August Oct 13 '17 at 20:45
1

You can do this directly in Core Graphics without using CALayer classes, which is useful if you're drawing into an image.

You need to first convert the bezier path into a "stroked" version of itself, then clip and fill the resulting path with your gradient.

I use these wrapper functions:

extension UIBezierPath {
    
    // Return a path that represents the outline of the receiver when stroked
    public func strokedPath() -> UIBezierPath?
    {
        guard let ctx = UIGraphicsGetCurrentContext() else { return nil }
        
        ctx.addPath(self.cgPath)
        ctx.setLineWidth(self.lineWidth)
        ctx.replacePathWithStrokedPath()
        
        guard let path = ctx.path  else { return nil }
        return UIBezierPath(cgPath: path)
    }
    
    /// Fills the receiving bezier path with a gradient
    public func fillWithLinearGradient(start:CGPoint, end:CGPoint, colors:[UIColor], fractions:[CGFloat]? = nil)
    {
        guard let ctx = UIGraphicsGetCurrentContext() else { return }
        
        ctx.saveGState()
        defer { ctx.restoreGState() } // clean up graphics state changes when the method returns
        
        self.addClip() // use the path as the clipping region
        
        let cgColors = colors.map({ $0.cgColor })
        let locations = (fractions?.count == colors.count) ? fractions : nil
        guard let gradient = CGGradient(colorsSpace: nil, colors: cgColors as CFArray, locations: locations) else { return }
        
        ctx.drawLinearGradient(gradient, start: start, end: end, options: [])
    }

}

Usage:

myBezierPath.strokedPath()?.fillWithLinearGradient(start: /* ... */)
Robin Stewart
  • 3,147
  • 20
  • 29