109

I am trying to mask an image with something like this:

image to be masked

Would you please help me?

I am using this code:

- (void) viewDidLoad {
    UIImage *OrigImage = [UIImage imageNamed:@"dogs.png"];
    UIImage *mask = [UIImage imageNamed:@"mask.png"];
    UIImage *maskedImage = [self maskImage:OrigImage withMask:mask];
    myUIIMage.image = maskedImage;
}
Tamás Sengel
  • 55,884
  • 29
  • 169
  • 223
iOS.Lover
  • 5,923
  • 21
  • 90
  • 162
  • 28
    I am the person that wrote the original tutorial. The mask image is just a simple greyscale image I created in photoshop. Nothing special about it. The black area become the "transparent" part of the mask. Keep in mind that any shade of gray is interpreted as a degree of opacity. In this manner, masks can be gradients as well which is useful for creating softer borders around a mask. – ra9r May 10 '11 at 19:21
  • This have to be same sized, right? – KarenAnne Nov 06 '13 at 02:28
  • hyper-elegant code, thanks. just a useful link if anyone needs to crop an image before masking...http://stackoverflow.com/questions/17712797/ios-custom-uiimagepickercontroller-camera-crop-to-square – Fattie Dec 04 '13 at 22:39
  • Any idea about this..http://stackoverflow.com/questions/28122370/masking-and-reverse-masking-in-imageview-ios – Milan patel Jan 24 '15 at 05:01
  • 1
    I urge you to please change the selected answer to the one with almost 3 times as many upvotes. In my opinion it is better in near every way. – Albert Renshaw Feb 20 '17 at 04:17

8 Answers8

174

There's an easier way.

#import <QuartzCore/QuartzCore.h>
// remember to include Framework as well

CALayer *mask = [CALayer layer];
mask.contents = (id)[[UIImage imageNamed:@"mask.png"] CGImage];
mask.frame = CGRectMake(0, 0, yourImageView.frame.size.width, yourImageView.frame.size.height);
yourImageView.layer.mask = mask;
yourImageView.layer.masksToBounds = YES;

For Swift 4 and plus follow code below

let mask = CALayer()
mask.contents =  UIImage(named: "right_challenge_bg")?.cgImage as Any
mask.frame = CGRect(x: 0, y: 0, width: leftBGImage.frame.size.width, height: leftBGImage.frame.size.height)
leftBGImage.layer.mask = mask
leftBGImage.layer.masksToBounds = true
William Denniss
  • 16,089
  • 7
  • 81
  • 124
Bartosz Ciechanowski
  • 10,293
  • 5
  • 45
  • 60
  • 1
    thank you but i put this code on `viewDidLoad` but nothing happened ! – iOS.Lover Apr 23 '11 at 08:15
  • 6
    You should set the layer property to use the mask, i.e. **[yourImageView.layer setMasksToBounds:YES];** – Wolfgang Schreurs Apr 23 '11 at 09:47
  • 3
    Notice that this is necessary to be a UIImageView for this solution. The other solution works with a UIImage only. – adriendenat Oct 05 '12 at 10:29
  • Awesome. Works like a charm. I am combining this with `UIImage`'s `- (UIImage *)resizableImageWithCapInsets:(UIEdgeInsets)capInsets resizingMode:(UIImageResizingMode)resizingMode` to add some gradient masking to the borders of a view. – Timo Dec 11 '12 at 10:40
  • Note that to properly mask a `UIScrollView`, you may have to attach the scroll view to a container `UIView` and apply the mask to said container instead. – Timo Dec 11 '12 at 10:42
  • 1
    I tried this approach but this seems not to be working in iOS 8 – bdv Dec 12 '14 at 06:12
  • 1
    This is not only the easier way, it's the right way to do it! This should be the accepted answer. – sabalaba Dec 07 '15 at 00:45
  • Anyone know if there is a way to animate the mask? Using the normal animate methods? – Unome Dec 28 '16 at 16:13
  • 1
    What are and ? The mask image, or the imageView image being cropped? – Erika Electra Aug 20 '18 at 01:27
  • 6
    For Swift code, when put in the mask.contents, should CGImage. Not [CGImage]. If use bracket [ ], it means Array. – strawnut Oct 25 '19 at 02:44
  • Remove CGImage brackets [ ] Or it WILL NOT work. (Jan '21) – The Way Jan 22 '21 at 04:57
  • Author, plz, remove those braces. I've spent 2 hours before realized myself that braces are not needed. And only after that red comments highlighting this. Plz, do it! – iago849 Oct 29 '21 at 17:29
  • I needed to use a 24-bit PNG with transparency for this to work. – William Denniss Jul 13 '23 at 01:43
61

The tutorial uses this method with two parameters: image and maskImage, these you have to set when you call the method. An example call could look like this, assuming the method is in the same class and the pictures are in your bundle:

Note - amazingly the images do not even have to be the same size.

...
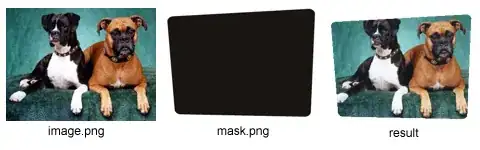
UIImage *image = [UIImage imageNamed:@"dogs.png"];
UIImage *mask = [UIImage imageNamed:@"mask.png"];

// result of the masking method
UIImage *maskedImage = [self maskImage:image withMask:mask];

...

- (UIImage*) maskImage:(UIImage *)image withMask:(UIImage *)maskImage {

    CGImageRef maskRef = maskImage.CGImage; 

    CGImageRef mask = CGImageMaskCreate(CGImageGetWidth(maskRef),
        CGImageGetHeight(maskRef),
        CGImageGetBitsPerComponent(maskRef),
        CGImageGetBitsPerPixel(maskRef),
        CGImageGetBytesPerRow(maskRef),
        CGImageGetDataProvider(maskRef), NULL, false);

    CGImageRef maskedImageRef = CGImageCreateWithMask([image CGImage], mask);
    UIImage *maskedImage = [UIImage imageWithCGImage:maskedImageRef];

    CGImageRelease(mask);
    CGImageRelease(maskedImageRef);

    // returns new image with mask applied
    return maskedImage;
}

After you provided your code I have added some numbers as comments to it for reference. You still have two options. This whole thing is a method, which you are calling somewhere. You don't need to create the images inside it: this reduces the reusability of the method to zero.

To get your code working. Change the methods head (1.) to

- (UIImage *)maskImageMyImages {

Then change the name of the variable in 2. to

UIImage *maskImage = [UIImage imageNamed:@"mask.png"];

The method will return your masked images so you'll have to call this method in some place. Can you show us the code where you are calling your method?

Fattie
  • 27,874
  • 70
  • 431
  • 719
Nick Weaver
  • 47,228
  • 12
  • 98
  • 108
  • sorry ! where should write `UIImage *image` code ? !!! because on `-(UIimage *) maskeImage` compiler gives redefinition error ! – iOS.Lover Apr 22 '11 at 16:25
  • sorry would you please upload a sample code for me ? Iam confused :-s – iOS.Lover Apr 23 '11 at 09:04
  • 1
    Not possible, everything is there. You'll have to show us how you are calling this method, or at least the part in which you'd like to mask your images and show the result. – Nick Weaver Apr 23 '11 at 09:08
  • my problem is to call it , is it should be something like this ?? (viewDidLoad): see my edited code – iOS.Lover Apr 23 '11 at 09:23
  • Any idea about the Reverse masking.(Reverse of above process).Means I want to remove the fill area(make it transparent) and Transparent area with fill. – Milan patel Jan 23 '15 at 11:56
  • @NickWeaver is it possible to get a result image like a border of dog. Means set mask to white part of mask image not clear part of mask image. – Pramod Tapaniya Nov 23 '16 at 08:35
19

Swift 3 - Simplest Solution I Found

I created an @IBDesignable for this so you could see the effect right away on your storyboard.

import UIKit

@IBDesignable
class UIImageViewWithMask: UIImageView {
    var maskImageView = UIImageView()

    @IBInspectable
    var maskImage: UIImage? {
        didSet {
            maskImageView.image = maskImage
            updateView()
        }
    }

    // This updates mask size when changing device orientation (portrait/landscape)
    override func layoutSubviews() {
        super.layoutSubviews()
        updateView()
    }

    func updateView() {
        if maskImageView.image != nil {
            maskImageView.frame = bounds
            mask = maskImageView
        }
    }
} 

How to use

  1. Create a new file and paste in that code above.
  2. Add UIImageView to your storyboard (assign an image if you want).
  3. On Identity Inspector: Change the custom class to "UIImageViewWithMask" (custom class name above).
  4. On Attributes Inspector: Select mask image you want to use.

Example

Masking on Storyboard

Notes

  • Your mask image should have a transparent background (PNG) for the non-black part.
Mark Moeykens
  • 15,915
  • 6
  • 63
  • 62
12

I tried both code using either CALayer or CGImageCreateWithMask but none of them didn't work for me

But i found out that the problem is with png file format, NOT the code!!
so just to share my finding!

If you want to use

- (UIImage*) maskImage:(UIImage *)image withMask:(UIImage *)maskImage

you must use 24bit png without alpha channel

If you want to use CALayer mask, you must use (24bit or 8bit) png with alpha channel where transparent part of your png will mask the image (for smooth gradient alpha mask.. use 24bit png with alpha channel)

Ninji
  • 121
  • 1
  • 3
10
- (UIImage*) maskImage:(UIImage *)image withMask:(UIImage *)maskImage {
        CGColorSpaceRef colorSpace = CGColorSpaceCreateDeviceRGB();

        CGImageRef maskImageRef = [maskImage CGImage];

        // create a bitmap graphics context the size of the image
        CGContextRef mainViewContentContext = CGBitmapContextCreate (NULL, maskImage.size.width, maskImage.size.height, 8, 0, colorSpace, kCGImageAlphaPremultipliedLast);
        CGColorSpaceRelease(colorSpace);

        if (mainViewContentContext==NULL)
            return NULL;

        CGFloat ratio = 0;

        ratio = maskImage.size.width/ image.size.width;

        if(ratio * image.size.height < maskImage.size.height) {
            ratio = maskImage.size.height/ image.size.height;
        }

        CGRect rect1  = {{0, 0}, {maskImage.size.width, maskImage.size.height}};
        CGRect rect2  = {{-((image.size.width*ratio)-maskImage.size.width)/2 , -((image.size.height*ratio)-maskImage.size.height)/2}, {image.size.width*ratio, image.size.height*ratio}};


        CGContextClipToMask(mainViewContentContext, rect1, maskImageRef);
        CGContextDrawImage(mainViewContentContext, rect2, image.CGImage);


        // Create CGImageRef of the main view bitmap content, and then
        // release that bitmap context
        CGImageRef newImage = CGBitmapContextCreateImage(mainViewContentContext);
        CGContextRelease(mainViewContentContext);

        UIImage *theImage = [UIImage imageWithCGImage:newImage];

        CGImageRelease(newImage);

        // return the image
        return theImage;
}

This works for me.

ZYiOS
  • 5,204
  • 3
  • 39
  • 45
  • thank you, this answer is better then other's speaking about performance with more and bigger images. – Radu Ursache Nov 22 '14 at 14:00
  • 1
    Any idea about the reverse masking.(Reverse of above process).Means I want to remove the fill area(make it transparent) and Transparent area with fill. – Milan patel Jan 23 '15 at 11:58
  • Thanks, this code work better than first !! But i have two troubles : Warning on "kCGImageAlphaPremultipliedLast" (i cast to "CGBitmapInfo" for fix it) AND does not work for retina images !! can you help me ??... – fingerup Apr 21 '15 at 09:14
  • @Milanpatel The easy solution is to simply invert your colors in the mask image. :) – Dids Aug 04 '15 at 17:14
  • @ZyiOS how can I customize the frame of masked Image. i.e user can increase or decrease the size of masked image. – Rahul Sep 17 '17 at 13:39
9

SWIFT 3 XCODE 8.1

func maskImage(image: UIImage, withMask maskImage: UIImage) -> UIImage {

    let maskRef = maskImage.cgImage

    let mask = CGImage(
        maskWidth: maskRef!.width,
        height: maskRef!.height,
        bitsPerComponent: maskRef!.bitsPerComponent,
        bitsPerPixel: maskRef!.bitsPerPixel,
        bytesPerRow: maskRef!.bytesPerRow,
        provider: maskRef!.dataProvider!,
        decode: nil,
        shouldInterpolate: false)

    let masked = image.cgImage!.masking(mask!)
    let maskedImage = UIImage(cgImage: masked!)

    // No need to release. Core Foundation objects are automatically memory managed.

    return maskedImage

}

// for use

testImage.image = maskImage(image: UIImage(named: "OriginalImage")!, withMask: UIImage(named: "maskImage")!)
Ahmed Safadi
  • 4,402
  • 37
  • 33
3

Swift version of the accepted solution:

func maskImage(image: UIImage, withMask maskImage: UIImage) -> UIImage {

    let maskRef = maskImage.CGImage

    let mask = CGImageMaskCreate(
        CGImageGetWidth(maskRef),
        CGImageGetHeight(maskRef),
        CGImageGetBitsPerComponent(maskRef),
        CGImageGetBitsPerPixel(maskRef),
        CGImageGetBytesPerRow(maskRef),
        CGImageGetDataProvider(maskRef),
        nil,
        false)

    let masked = CGImageCreateWithMask(image.CGImage, mask)
    let maskedImage = UIImage(CGImage: masked)!

    // No need to release. Core Foundation objects are automatically memory managed.

    return maskedImage

}

Just in case someone need it.

It`s working for me flawlessly.

Juan Valera
  • 139
  • 5
2

we found, that correct answer is not working now and implemented little drop-in class, which helps to mask any image in UIImageView.

It's available here: https://github.com/Werbary/WBMaskedImageView

Example:

WBMaskedImageView *imgView = [[WBMaskedImageView alloc] initWithFrame:frame];
imgView.originalImage = [UIImage imageNamed:@"original_image.png"];
imgView.maskImage = [UIImage imageNamed:@"mask_image.png"];
werbary
  • 1,105
  • 2
  • 14
  • 43