312

My code works fine for normal devices but creates blurry images on retina devices.

Does anybody know a solution for my issue?

+ (UIImage *) imageWithView:(UIView *)view
{
    UIGraphicsBeginImageContext(view.bounds.size);
    [view.layer renderInContext:UIGraphicsGetCurrentContext()];

    UIImage * img = UIGraphicsGetImageFromCurrentImageContext();

    UIGraphicsEndImageContext();

    return img;
}
Ricardo Sanchez-Saez
  • 9,466
  • 8
  • 53
  • 92
Daniel
  • 3,331
  • 4
  • 19
  • 17
  • blurry. It seems to me the right scale got lost... – Daniel Dec 02 '10 at 12:12
  • me too. met the same issue. – RainCast Jul 20 '16 at 23:45
  • Where are you displaying the result image? As others have explained, I believe you are rendering the view onto an image with scale 1, while your device has scale 2 or 3. So you are downscaling to a lower resolution. This is a loss of quality but should not blur. But when you are looking at this image again (on the same screen?) on a device with scale 2 it will convert from the low resolution to higher, using 2 pixels per pixel in the screenshot. This upscaling uses interpolation most likely (default on iOS), averaging color values for the extra pixels. – Hans Terje Bakke Jan 09 '19 at 15:24

18 Answers18

679

Switch from use of UIGraphicsBeginImageContext to UIGraphicsBeginImageContextWithOptions (as documented on this page). Pass 0.0 for scale (the third argument) and you'll get a context with a scale factor equal to that of the screen.

UIGraphicsBeginImageContext uses a fixed scale factor of 1.0, so you're actually getting exactly the same image on an iPhone 4 as on the other iPhones. I'll bet either the iPhone 4 is applying a filter when you implicitly scale it up or just your brain is picking up on it being less sharp than everything around it.

So, I guess:

#import <QuartzCore/QuartzCore.h>

+ (UIImage *)imageWithView:(UIView *)view
{
    UIGraphicsBeginImageContextWithOptions(view.bounds.size, view.opaque, 0.0);
    [view.layer renderInContext:UIGraphicsGetCurrentContext()];

    UIImage * img = UIGraphicsGetImageFromCurrentImageContext();

    UIGraphicsEndImageContext();

    return img;
}

And in Swift 4:

func image(with view: UIView) -> UIImage? {
    UIGraphicsBeginImageContextWithOptions(view.bounds.size, view.isOpaque, 0.0)
    defer { UIGraphicsEndImageContext() }
    if let context = UIGraphicsGetCurrentContext() {
        view.layer.render(in: context)
        let image = UIGraphicsGetImageFromCurrentImageContext()
        return image
    }
    return nil
}
Cœur
  • 37,241
  • 25
  • 195
  • 267
Tommy
  • 99,986
  • 12
  • 185
  • 204
  • Worked for me as well (sort of), I had to flip the image about the X axis to get it to come out right on a PDF context. – BP. Nov 11 '11 at 20:32
  • Thanks for the solution. For 320*480 iDevice, is it possible to implement some codes so that we can get the same good-quality images as if we were capturing it from iPhone 4? – Wayne Liu Feb 27 '12 at 08:17
  • 2
    @WayneLiu you could specify a scale factor of 2.0 explicitly but you probably wouldn't get exactly an iPhone 4 quality image because any bitmaps that had been loaded would be the standard versions rather than the @2x versions. I don't think there's a solution to that as there's no way to instruct everyone that is currently holding on to a `UIImage` to reload but force the high resolution version (and you'd likely run up against problems due to the lesser RAM available in pre-retina devices anyway). – Tommy Feb 27 '12 at 19:13
  • 1
    this still result in a scaled down image, i.e 320*480 instead of a 640*960 image. – Yogev Shelly Aug 06 '12 at 06:45
  • 6
    Instead of using the `0.0f` for the scale parameter, is it more acceptable to use `[[UIScreen mainScreen] scale]`, it works too. – Adam Carter Aug 14 '12 at 17:06
  • I was having trouble when doing this with blurry UIImages being returned on iPhone 3GS. I managed to solve it by forcing the scale to 2.0, it keeps the images nice and crisp. In case that helps anyone. – Dom Chapman Feb 16 '13 at 22:49
  • 7
    Tommy answer is fine , but you still need to import `#import ` to remove `renderInContext:` warning . – gwdp May 10 '11 at 03:29
  • 21
    @Adam Carter `scale: The scale factor to apply to the bitmap. If you specify a value of 0.0, the scale factor is set to the scale factor of the device’s main screen.` It's explicitly documented, so 0.0f is simpler and better in my opinion. – cprcrack Oct 24 '13 at 11:36
  • I have a large white frame around my resulting UIImage. Any idea? – Stéphane de Luca Feb 13 '14 at 22:03
  • 5
    This answer is out of date for iOS 7. See my answer for the new "best" method to do this. – Dima Mar 19 '14 at 02:18
  • This works great for exporting images from a UIViewController. Is there an adaptation that would capture within the image all the rows of a table that has some rows offscreen? – jbbenni Apr 14 '14 at 21:13
  • @jbbenni You wouldn't be able to do that as a closed box easily because one of the main functions of a tableview is to ensure that most of the information that is off screen doesn't currently have any footprint within the `UIView` hierarchy. If you were to attempt just to set `contentOffset` and repeatedly grab a table view you also might not get exactly what you expect as `setNeedsLayout` queue the layout to occur before the next view composition rather than immediately. You'd need to call `layoutIfNeeded` on each cell manually (probably just run through subviews) before grabbing a shot. – Tommy Apr 14 '14 at 21:49
  • @Tommy - Thanks! I took a shortcut, scrolling each successive table row into view (using scrollToRowAtIndexPath). This lets the OS handle all the layout housekeeping. I also scroll the destination UIImage (using CGContextTranslateCTM). The approach appears to handle everything including multi-section tables with headers/footers and such. It might become slow if tables became huge, but it works fine for my moderately sized tables. Thanks for the encouragement and advice! (I could post the method, but it won't fit in a comment, and it's a not an answer to this question.) – jbbenni Apr 18 '14 at 02:01
  • What's the equivalent of this solution when using `CGBitmapContextCreate()`? – Ricardo Sanchez-Saez Jan 31 '15 at 14:26
  • @Tommy After implement above code in my application, but i face memory issues. so it's not perfect. – Chandresh Kachariya May 11 '17 at 13:19
  • @LucaTorella you edited the code in this answer to not compile. Please don't do that. – Nate Mar 10 '18 at 06:23
239

The currently accepted answer is now out of date, at least if you are supporting iOS 7.

Here is what you should be using if you are only supporting iOS7+:

+ (UIImage *) imageWithView:(UIView *)view
{
    UIGraphicsBeginImageContextWithOptions(view.bounds.size, view.opaque, 0.0f);
    [view drawViewHierarchyInRect:view.bounds afterScreenUpdates:NO];
    UIImage * snapshotImage = UIGraphicsGetImageFromCurrentImageContext();
    UIGraphicsEndImageContext();
    return snapshotImage;
}

Swift 4:

func imageWithView(view: UIView) -> UIImage? {
    UIGraphicsBeginImageContextWithOptions(view.bounds.size, view.isOpaque, 0.0)
    defer { UIGraphicsEndImageContext() }
    view.drawHierarchy(in: view.bounds, afterScreenUpdates: true)
    return UIGraphicsGetImageFromCurrentImageContext()
}

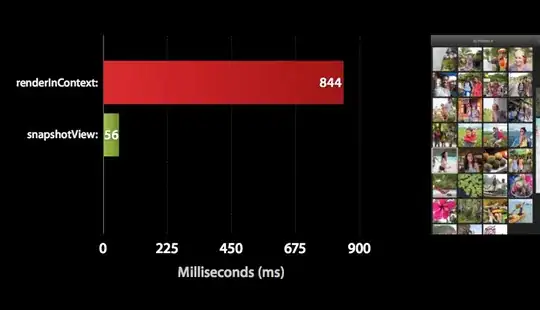
As per this article, you can see that the new iOS7 method drawViewHierarchyInRect:afterScreenUpdates: is many times faster than renderInContext:. benchmark

Linus Unnebäck
  • 23,234
  • 15
  • 74
  • 89
Dima
  • 23,484
  • 6
  • 56
  • 83
  • 5
    There is no doubt, that `drawViewHierarchyInRect:afterScreenUpdates:` is a lot faster. I just ran a Time profiler in Instruments. My image generation went from 138ms to 27ms. – ThomasCle Jul 21 '14 at 07:09
  • yup, quicker than before. – Johnny Rockex Jul 24 '14 at 13:56
  • 9
    For some reason this didn't work for me when I was trying to create custom icons for Google Maps markers; all I got was black rectangles :( – JakeP Sep 10 '14 at 08:44
  • 1
    I'm also just getting a black rectangle –  Nov 27 '14 at 01:17
  • 1
    Same here re black rectangles; I'm attempting to use this for Google Maps markers too. – Carlos P Dec 10 '14 at 23:21
  • 6
    @CarlosP have you tried setting `afterScreenUpdates:` to `YES`? – Dima Dec 11 '14 at 20:31
  • I reverted to `renderInContext` in the end and it solved the issue. – Carlos P Dec 11 '14 at 20:37
  • 7
    set afterScreenUpdates to YES fixed the black rectangle issue for me – hyouuu Jan 06 '15 at 10:40
  • Documentation states: Use this method when you want to apply a graphical effect, such as a blur, to a view snapshot. This method is not as fast as the `snapshotViewAfterScreenUpdates:` method. – Ricardo Pedroni May 19 '15 at 23:02
  • 4
    I was also receiving black images. It turned out that if I call the code in `viewDidLoad` or `viewWillAppear:` the images are black; I had to do it in `viewDidAppear:`. So I also finally reverted to `renderInContext:`. – manicaesar Nov 16 '15 at 10:22
  • maybe this solution is faster but it flickers when i make a snapShot and not always make a good image in my case i used @Tommy answer – Constantin Saulenco Dec 17 '15 at 16:49
  • What if I need to use `drawViewHierarchyInRect:afterScreenUpdates:` with a larger scale? For example: a 300x300 view, with an 3000x3000 imageView inside. If I render this view in a CGContext with scale 10, my final image will be just a 300x300 upscaled. How can I solve this? – Gui Del Frate Aug 24 '18 at 08:31
  • 2
    I was also getting 'black square'. I set the 'isOpaque' property to false in my code, then it worked for me. – ViruMax Sep 04 '18 at 10:48
32

I have created a Swift extension based on @Dima solution:

extension UIImage {
    class func imageWithView(view: UIView) -> UIImage {
        UIGraphicsBeginImageContextWithOptions(view.bounds.size, view.opaque, 0.0)
        view.drawViewHierarchyInRect(view.bounds, afterScreenUpdates: true)
        let img = UIGraphicsGetImageFromCurrentImageContext()
        UIGraphicsEndImageContext()
        return img
    }
}

EDIT: Swift 4 improved version

extension UIImage {
    class func imageWithView(_ view: UIView) -> UIImage {
        UIGraphicsBeginImageContextWithOptions(view.bounds.size, view.isOpaque, 0)
        defer { UIGraphicsEndImageContext() }
        view.drawHierarchy(in: view.bounds, afterScreenUpdates: true)
        return UIGraphicsGetImageFromCurrentImageContext() ?? UIImage()
    }
}

Usage:

let view = UIView(frame: CGRect(x: 0, y: 0, width: 100, height: 100))  
let image = UIImage.imageWithView(view)
Heberti Almeida
  • 1,440
  • 18
  • 27
31

iOS Swift

Using modern UIGraphicsImageRenderer

public extension UIView {
    @available(iOS 10.0, *)
    public func renderToImage(afterScreenUpdates: Bool = false) -> UIImage {
        let rendererFormat = UIGraphicsImageRendererFormat.default()
        rendererFormat.opaque = isOpaque
        let renderer = UIGraphicsImageRenderer(size: bounds.size, format: rendererFormat)

        let snapshotImage = renderer.image { _ in
            drawHierarchy(in: bounds, afterScreenUpdates: afterScreenUpdates)
        }
        return snapshotImage
    }
}
Community
  • 1
  • 1
Aliaksandr Bialiauski
  • 1,541
  • 20
  • 25
  • @masaldana2 maybe not yet, but as soon as they start deprecating stuff or adding hardware accelerated rendering or improvements you better be on giants shoulders (AKA using last Apple APIs) – Juan Boero Apr 09 '19 at 20:45
  • Is anyone aware of what is the performance comparing this `renderer` to the old `drawHierarchy`..? – Nat Sep 19 '19 at 15:01
24

To improve answers by @Tommy and @Dima, use the following category to render UIView into UIImage with transparent background and without loss of quality. Working on iOS7. (Or just reuse that method in implementation, replacing self reference with your image)

UIView+RenderViewToImage.h

#import <UIKit/UIKit.h>

@interface UIView (RenderToImage)

- (UIImage *)imageByRenderingView;

@end

UIView+RenderViewToImage.m

#import "UIView+RenderViewToImage.h"

@implementation UIView (RenderViewToImage)

- (UIImage *)imageByRenderingView
{
    UIGraphicsBeginImageContextWithOptions(self.bounds.size, NO, 0.0);
    [self drawViewHierarchyInRect:self.bounds afterScreenUpdates:YES];
    UIImage * snapshotImage = UIGraphicsGetImageFromCurrentImageContext();
    UIGraphicsEndImageContext();
    return snapshotImage;
}

@end
phatmann
  • 18,161
  • 7
  • 61
  • 51
Glogo
  • 2,694
  • 2
  • 23
  • 23
  • 1
    If I use drawViewHierarchyInRect with afterScreenUpdates:YES my image aspect ratio has changed and the image get distorted. – Michael Apr 21 '15 at 09:54
  • Does this happen when your uiview content is changed? If yes then try to re-generate this UIImage again. Sorry can't test this myself because I'm on phone – Glogo Apr 21 '15 at 12:15
  • I have the same problem and seems like no one has noticed this, did you find any solution to this problem? @confile ? – Reza.Ab Jun 05 '17 at 15:38
  • This is just what I need but it didn't work. I tried making `@interface` and `@implementation` both `(RenderViewToImage)` and adding `#import "UIView+RenderViewToImage.h"` to the header in `ViewController.h` so is this the correct usage ? e.g. `UIImageView *test = [[UIImageView alloc] initWithImage:[self imageByRenderingView]]; [self addSubview:test];` ? – Greg Feb 24 '18 at 05:05
  • and this method in `ViewController.m` was the view I tried to render `- (UIView *)testView { UIView *v1 = [[UIView alloc] initWithFrame:CGRectMake(50, 50, 50, 50)]; v1.backgroundColor = [UIColor redColor]; UIView *v2 = [[UIView alloc] initWithFrame:CGRectMake(50, 50, 150, 150)]; v2.backgroundColor = [UIColor blueColor]; [v2 addSubview:v1]; return v2; }` – Greg Feb 24 '18 at 05:13
15

Swift 3

The Swift 3 solution (based on Dima's answer) with UIView extension should be like this:

extension UIView {
    public func getSnapshotImage() -> UIImage {
        UIGraphicsBeginImageContextWithOptions(self.bounds.size, self.isOpaque, 0)
        self.drawHierarchy(in: self.bounds, afterScreenUpdates: false)
        let snapshotImage: UIImage = UIGraphicsGetImageFromCurrentImageContext()!
        UIGraphicsEndImageContext()
        return snapshotImage
    }
}
Community
  • 1
  • 1
Mehdi Hosseinzadeh
  • 1,160
  • 11
  • 25
9

For Swift 5.1 you can use this extension:

extension UIView {

    func asImage() -> UIImage {
        let renderer = UIGraphicsImageRenderer(bounds: bounds)

        return renderer.image { layer.render(in: $0.cgContext) }
    }
}
Andrey M.
  • 3,021
  • 29
  • 42
6

Drop-in Swift 3.0 extension that supports the new iOS 10.0 API & the previous method.

Note:

  • iOS version check
  • Note the use of defer to simplify the context cleanup.
  • Will also apply the opacity & current scale of the view.
  • Nothing is just unwrapped using ! which could cause a crash.

extension UIView
{
    public func renderToImage(afterScreenUpdates: Bool = false) -> UIImage?
    {
        if #available(iOS 10.0, *)
        {
            let rendererFormat = UIGraphicsImageRendererFormat.default()
            rendererFormat.scale = self.layer.contentsScale
            rendererFormat.opaque = self.isOpaque
            let renderer = UIGraphicsImageRenderer(size: self.bounds.size, format: rendererFormat)

            return
                renderer.image
                {
                    _ in

                    self.drawHierarchy(in: self.bounds, afterScreenUpdates: afterScreenUpdates)
                }
        }
        else
        {
            UIGraphicsBeginImageContextWithOptions(self.bounds.size, self.isOpaque, self.layer.contentsScale)
            defer
            {
                UIGraphicsEndImageContext()
            }

            self.drawHierarchy(in: self.bounds, afterScreenUpdates: afterScreenUpdates)

            return UIGraphicsGetImageFromCurrentImageContext()
        }
    }
}
Leslie Godwin
  • 2,601
  • 26
  • 18
5

Swift 2.0:

Using extension method:

extension UIImage{

   class func renderUIViewToImage(viewToBeRendered:UIView?) -> UIImage
   {
       UIGraphicsBeginImageContextWithOptions((viewToBeRendered?.bounds.size)!, false, 0.0)
       viewToBeRendered!.drawViewHierarchyInRect(viewToBeRendered!.bounds, afterScreenUpdates: true)
       viewToBeRendered!.layer.renderInContext(UIGraphicsGetCurrentContext()!)

       let finalImage = UIGraphicsGetImageFromCurrentImageContext()
       UIGraphicsEndImageContext()

       return finalImage
   }

}

Usage:

override func viewDidLoad() {
    super.viewDidLoad()

    //Sample View To Self.view
    let sampleView = UIView(frame: CGRectMake(100,100,200,200))
    sampleView.backgroundColor =  UIColor(patternImage: UIImage(named: "ic_120x120")!)
    self.view.addSubview(sampleView)    

    //ImageView With Image
    let sampleImageView = UIImageView(frame: CGRectMake(100,400,200,200))

    //sampleView is rendered to sampleImage
    var sampleImage = UIImage.renderUIViewToImage(sampleView)

    sampleImageView.image = sampleImage
    self.view.addSubview(sampleImageView)

 }
rsc
  • 10,348
  • 5
  • 39
  • 36
Alvin George
  • 14,148
  • 92
  • 64
3

Swift 3.0 implementation

extension UIView {
    func getSnapshotImage() -> UIImage {
        UIGraphicsBeginImageContextWithOptions(bounds.size, isOpaque, 0)
        drawHierarchy(in: bounds, afterScreenUpdates: false)
        let snapshotImage = UIGraphicsGetImageFromCurrentImageContext()!
        UIGraphicsEndImageContext()
        return snapshotImage
    }
}
imike
  • 5,515
  • 2
  • 37
  • 44
3

All Swift 3 answers did not worked for me so I have translated the most accepted answer:

extension UIImage {
    class func imageWithView(view: UIView) -> UIImage {
        UIGraphicsBeginImageContextWithOptions(view.bounds.size, view.isOpaque, 0.0)
        view.layer.render(in: UIGraphicsGetCurrentContext()!)
        let img: UIImage? = UIGraphicsGetImageFromCurrentImageContext()
        UIGraphicsEndImageContext()
        return img!
    }
}
Stornu2
  • 2,284
  • 3
  • 27
  • 47
3

Here's a Swift 4 UIView extension based on the answer from @Dima.

extension UIView {
   func snapshotImage() -> UIImage? {
       UIGraphicsBeginImageContextWithOptions(bounds.size, isOpaque, 0)
       drawHierarchy(in: bounds, afterScreenUpdates: false)
       let image = UIGraphicsGetImageFromCurrentImageContext()
       UIGraphicsEndImageContext()
       return image
   }
}
Rudolf Adamkovič
  • 31,030
  • 13
  • 103
  • 118
danfordham
  • 980
  • 9
  • 15
1

UIGraphicsImageRenderer is a relatively new API, introduced in iOS 10. You construct a UIGraphicsImageRenderer by specifying a point size. The image method takes a closure argument and returns a bitmap that results from executing the passed closure. In this case, the result is the original image scaled down to draw within the specified bounds.

https://nshipster.com/image-resizing/

So be sure the size you are passing into UIGraphicsImageRenderer is points, not pixels.

If your images are larger than you are expecting, you need to divide your size by the scale factor.

pkamb
  • 33,281
  • 23
  • 160
  • 191
  • I'm curious, could you help me with this please? https://stackoverflow.com/questions/61247577/how-to-create-an-image-of-specific-size-from-uiview I'm using UIGraphicsImageRenderer, problem is that I want the exported image to be bigger size than the actual view on device. But with desired size subviews (labels) aren't sharp enough – so there is loss of quality. – Ondřej Korol Apr 19 '20 at 13:01
0

Some times drawRect Method makes problem so I got these answers more appropriate. You too may have a look on it Capture UIImage of UIView stuck in DrawRect method

Community
  • 1
  • 1
Mashhadi
  • 3,004
  • 3
  • 46
  • 80
0
- (UIImage*)screenshotForView:(UIView *)view
{
    UIGraphicsBeginImageContext(view.bounds.size);
    [view.layer renderInContext:UIGraphicsGetCurrentContext()];
    UIImage *image = UIGraphicsGetImageFromCurrentImageContext();
    UIGraphicsEndImageContext();

    // hack, helps w/ our colors when blurring
    NSData *imageData = UIImageJPEGRepresentation(image, 1); // convert to jpeg
    image = [UIImage imageWithData:imageData];

    return image;
}
P.J.Radadiya
  • 1,493
  • 1
  • 12
  • 21
0

Something must have changed recently as I was not able to get a retina display image following all the above answers.

What I ended up doing:

    static func takeScreenshot(of viewController: UIViewController) -> UIImage? {
        guard let view = viewController.view else {
            return nil
        }

        let scale = UIScreen.main.scale
        let size = CGSize(width: view.bounds.size.width * scale, height: view.bounds.size.height * scale)

        UIGraphicsBeginImageContextWithOptions(size, view.isOpaque, scale)

        defer { UIGraphicsEndImageContext() }

        if let context = UIGraphicsGetCurrentContext() {
            context.scaleBy(x: scale, y: scale) // Set the scale of the graphics context
            
            view.layer.render(in: context)
            
            let screenshot = UIGraphicsGetImageFromCurrentImageContext()
            
            return screenshot
        }

        return nil

    }
Alex
  • 7,432
  • 20
  • 75
  • 118
-2

In this method just pass a view object and it will returns a UIImage object.

-(UIImage*)getUIImageFromView:(UIView*)yourView
{
 UIGraphicsBeginImageContext(yourView.bounds.size);
 [yourView.layer renderInContext:UIGraphicsGetCurrentContext()];
 UIImage *image = UIGraphicsGetImageFromCurrentImageContext();
 UIGraphicsEndImageContext();
 return image;
}
Atanu Mondal
  • 1,714
  • 1
  • 24
  • 30
-6

Add this to method to UIView Category

- (UIImage*) capture {
    UIGraphicsBeginImageContext(self.bounds.size);
    CGContextRef context = UIGraphicsGetCurrentContext();
    [self.layer renderInContext:context];
    UIImage *img = UIGraphicsGetImageFromCurrentImageContext();
    UIGraphicsEndImageContext();
    return img;
}
Shafraz Buhary
  • 643
  • 6
  • 14
  • 2
    Hiya there, while this may well answer the question, please be aware that other users might not be as knowledgeable as you. Why don't you add a little explanation as to why this code works? Thanks! – Vogel612 Apr 21 '15 at 10:54